Quantcast
Channel: Benchcrafted
Viewing all 305 articles
Browse latest View live

French Oak Bench - Flattening Session 3

$
0
0

Yesterday was shop cleaning day. I had just finished a week long project building two English-style field gates (more on that down the road) and the shop was trashed. Cedar shavings and dust were everywhere. The shop smelled incredible, but I couldn't walk in it. I also found a dead mouse in the shavings. Actually, it wasn't dead, just stuck in the trap and flopping around. I chucked the whole works into the woods behind the shop, then walked back with my head hung low. I asked God to forgive me for killing one of his precious creatures. Then I ate some fried chicken, thanking God for that precious creature.

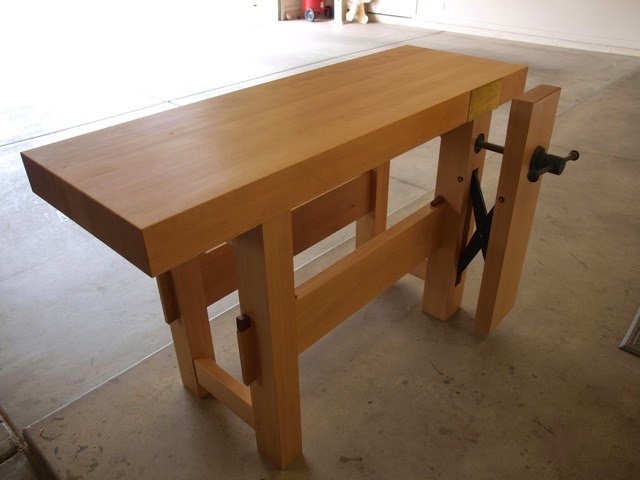
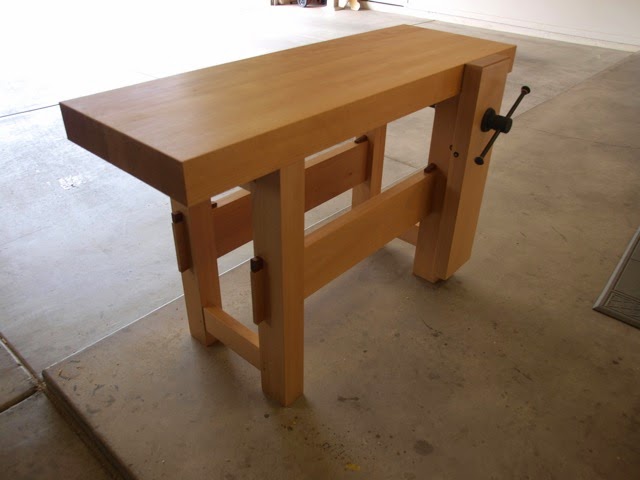
So with all the shavings around, and on the hottest, stickiest day of the year, I thought it was time to flatten the Plate 11-style, French Oak bench again.

Last February I flattened it for the first time after the initial flattening (so technically the second time), removing about 1/8" from the dead center of the top (across the width). It's heart side up, so it crowns. This time, about 7 months later, the crown was about the same.


The odd thing is, the underside of the top wasn't cupped all that much. Technically speaking, you'd think there'd be about 1/4" gap in the middle (1/8" in February plus 1/8" couple days ago) but it was more like 1/16". I think what's happening is that the concave side is doing more of a linear shrink than a curvy one, so, not a parallel curve as with the heart side. I need to look back and see what Hoadley says about this.


The problem with flattening a crowned top is trying to keep the jointer plane from following the crown. I concentrate my effort just in the middle, and literally scrub the top with the plane, pressing down hard and making choppy strokes directly across the grain (90 degrees to the long edges). I don't tilt my plane to empty shavings or prevent them from getting drawn back into the mouth. The latter is really not an issue when traversing since the shavings are not long and durable. I use my breath to blow shavings from the path if they get in the way, again, without lifting the plane. I eat lamb shawarma for lunch, and that makes the breath more powerful for blowing the chunkier shavings I get from traversing. I want to maintain the feel of the sole staying engaged with an imagined flat plane as I traverse along the bench. As long as I concentrate on the middle, I'm usually fine.


Once I've made a couple passes, I check for twist. The red arrow points to the high side of the distant winding stick. My top is out by about 3/16" over the length of the bench (a little over 9'). Normally that wouldn't bother me, but today I was feeling particularly manly. I now take diagonal passes on the high corners to even them out, then make another traversing pass all along the top.


Then I check the length of the bench for flat, since traversing strokes only make it flat front to back. I had two humps directly over these two holdfast holes. I concentrated some more traversing passes in these areas until they were flat with the rest of the top. Then to even it all out I made two diagonal passes along the top. Then, just to make sure I kept the top as stable as possible, I took one pass on the underside of the bench with the plane held upside down. Lamb shawarma can do this.


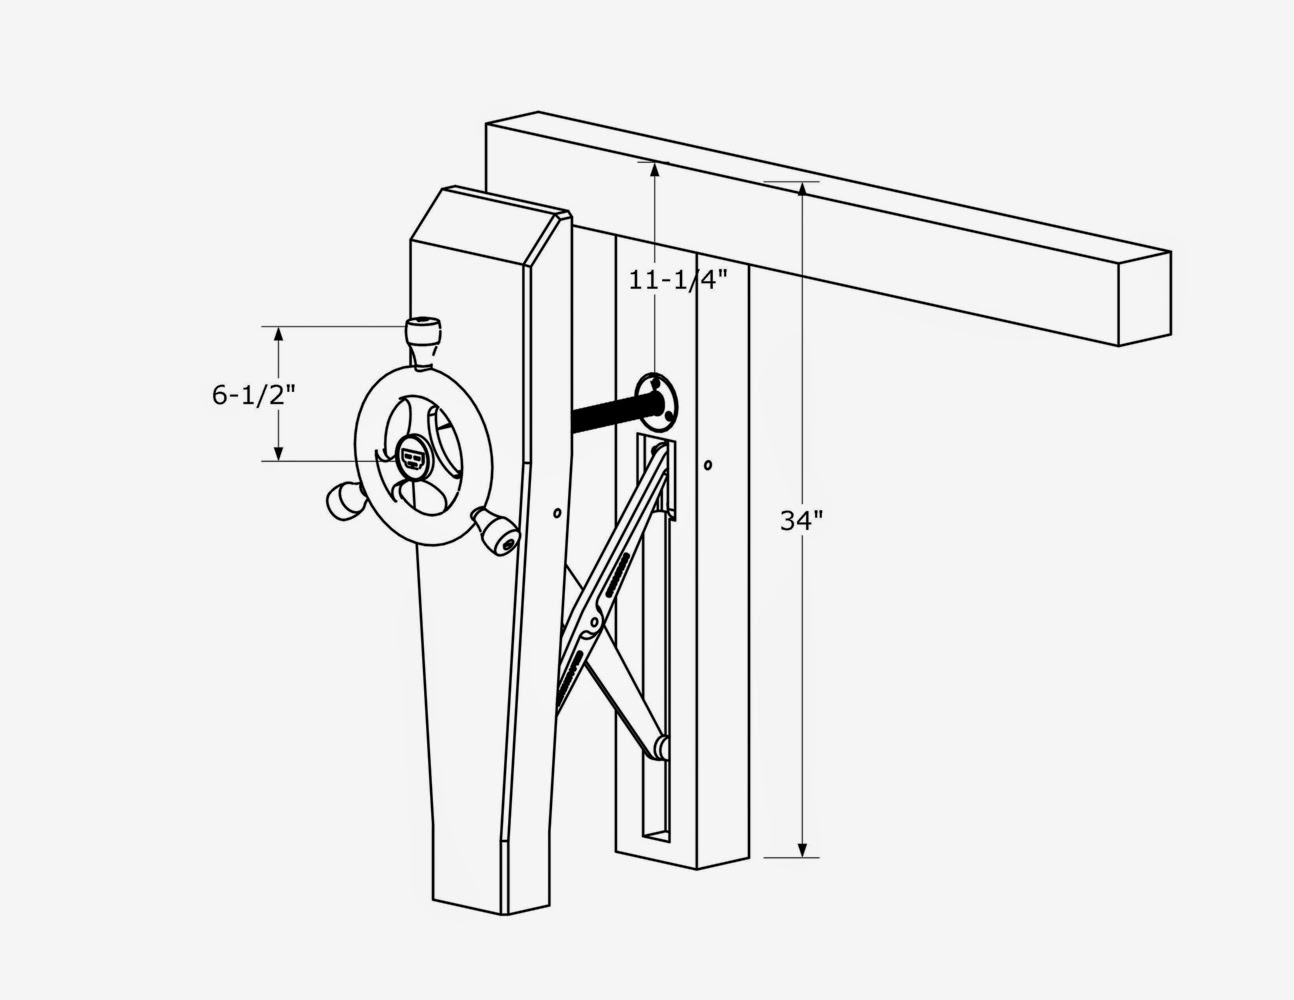
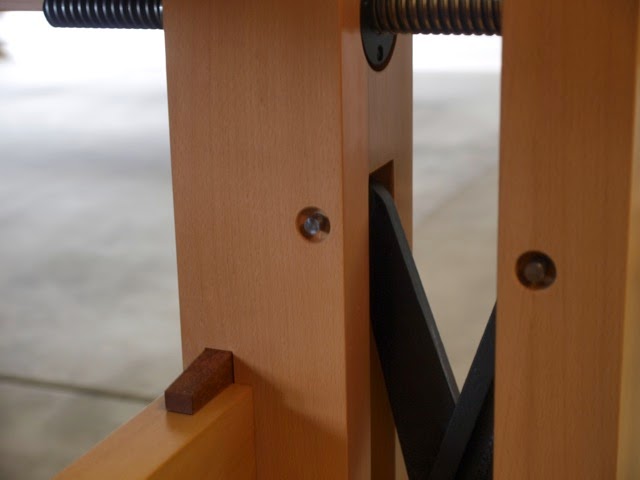
For the last pass I sharpen the jointer plane with a camber and take two lighter traversing passes across the top to give it a toothy texture. Done. I did take the leg vise off the bench for the flattening operation because I needed to trim the length of the chop by just a bit. That's my St. Peter's Cross (okay, Crisscross) in the bench leg, and without which I would not want to work. Roubo says to place a piece of wood on the floor between the chop and the leg, equal to the thickness of the work, but if Roubo were alive today, he'd be a Benchcrafted customer (ahem).


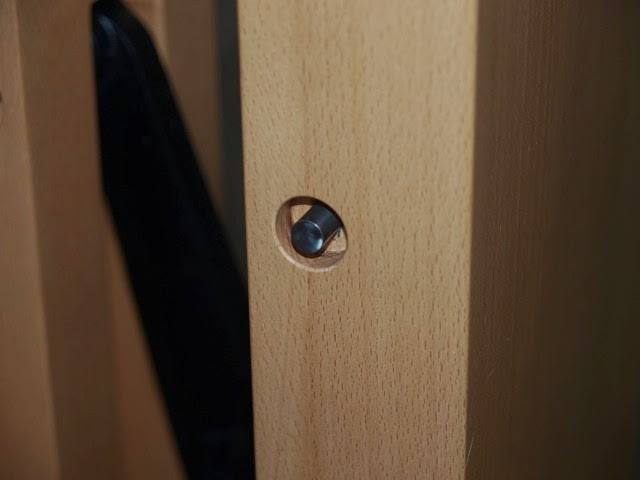
The theory behind using a top slab with the heart up is partly that when the top moves it becomes concave on the underside and wedges itself onto the legs. This is partly true if my bench is any gauge. The top on my bench has arched up in the middle (as expected) so it's actually risen off the legs more at the rear of each leg than the front. Not by much, but its still visible. These joints were tight when we drove the top on last year, as below. Ignore the space between the tenons. That's end grain that got mashed down when I let Jeff Miller do some work on my bench. Never. Again.


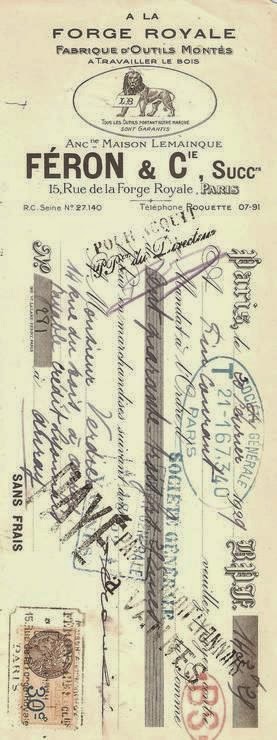
My label also shows evidence of the movement. Next year at the FORP II, we'll figure out a better place to attach our labels. And this time we won't glue them to our cracks.


The New Glide - Top Clearance

$
0
0

We've received a few emails over the weekend about the new dimensions of the Glide M and C. Here are some clarifications.

The Glide M handwheel is identical to the previous model, save for the locations of the knob mounting holes. The wheel itself has not changed. It's the same diameter, weight, and depth. Again, no changes other than the knob locations.

The Glide C also has the exact same specs as the Glide M (diameter, etc.), except it has a sand-cast surface, not machined.

The overall radius of the Glide M and Glide C handwheels is 6-1/2". That's the distance from the center of the acme screw to the tip of any of the knobs.

Here's where you might run into trouble. If you position the Glide less that 6-1/2" from the top of the bench to the center of the screw, the knobs will be above the top surface of the bench when in the 12 o'clock position.

But here's also why no one should ever run into this situation. In the vast majority of benches there will be oodles of room between the benchtop surface and the top of the Crisscross hardware. In an average bench (height 34") you can start the Crisscross mortise 1" above the floor, mount the Glide 1-3/4" above the Crisscross, and still have over 11" above the screw. That's huge. See below.


And if you're bench is really, really short, like 29", you can still mount the Glide and Crisscross without the knobs breaking the top plane of the benchtop. See below.


So, to sum up, mount your Glide and Crisscross as low as you can (we repeat this numerous times throughout the installation instructions). There is no reason to mount it higher, and thus sacrifice capacity above the screw.


DymondWood is No More

$
0
0

In March we announced that we'd be replacing our Cocobolo knobs with DymondWood, an acrylic-infused and pressure-laminated plywood product that looks very much like Cocobolo, but has none of the drawbacks of rare rosewoods.

But it turns out that DymondWood is now rarer than Cocobolo. Sadly, the company that manufactured DymondWood completely burned to the ground a couple weeks ago. Rutland Plywood of Rutland Town, VT, was totally lost in a 5-alarm fire on August 21.

Right now we're not sure what we'll be replacing the DymondWood knobs with. With cocobolo now on the CITES list, we're not keen on replacing the knobs with anything in the Dalbergia family. And plain acrylics or plastics just don't cut the mustard for us. After true rosewood, and the excellent DymondWood, everything else seems like a downgrade. And to our knowledge, no one is making a DymondWood-like product.

Next week we'll be turning some samples in various woods (likely acrylic infused) to see what might fit. We'll be shipping Glide M leg vises and Tail Vises with what remaining DymondWood stock we have. We estimate we'll be out in about two months at best.

Hand Candy

$
0
0

Customer David Keeling sent us a nice email and some photos of his Classic Leg Vise-equipped bench this morning. Gorgeous. We love crisp, clean work like this. Below is David's email:
________________

Subject: Thank you for the super hardware!

Thank you for the criss-cross and classic vise. Below is my European beech bench, shelf and dog hole yet to do, but the vise runs sweet and true.

The Crisscross mounting pin holes that you see are on one side only.  The chop is 8 and 1/2 inches wide which exceeded the length of the mounting pin so I made a choice of treating one side as a "show side" with no holes at all.  I made the leg 5 and 1/2 inches wide giving me 1 and 7/8 inches of wood on either side of the mortise for the Crisscross.  I drilled 1/4 inch shy of all the way through the leg then on the "working side" of the vise drilled a 3/4 inch hole centered on the pin hole 1/4 inch deep to allow me space to grab the pin for removal.  That left 1 and 5/8 inch of beech on each side to support the pin which I hope you concur will be enough.  I did mean to say holes for holdfast but I did make bench dogs out of 3/4 inch hickory dowels that I plan to use in concert with the holdfast and battens for work holding.

I think there will be more orders coming your way.  Three cabinet makers kindly let me use their air conditioned shop to build my bench.  They renamed your vise "hand candy" as everyone who came through their shop and tried it was amazed at how effortless the operation was.

Again in appreciation,

David Keeling


English Field Gate

English Field Gate—Part II

Spagnuolo's Glide M

$
0
0

Video link

Late last night we received the following email from Marc Spagnuolo:

Finished up the final part of the retrofit today, including both the new Glide and the Crisscross. All I can say is wow!! I am able to close the vise from a full open position with a quick flick of the wrist. And the hold is strong enough for me to lift the bench with the workpiece. That's without the suede on the chop! Incredible. 

Just wanted to let you guys know you once again impress the heck out of me with the quality of the hardware! 

marc

In case you've been sleeping under a rock for the past few years (and we feel ridiculous even saying this) Marc owns and operates the online woodworking community/school The Wood Whisperer. Marc built our Split Top Roubo as one of the Guild builds a few years ago. Until we get time (and develop a personal relationship with Francis Ford Coppola) Marc's video series is still the best option for building our bench if you need visual step by step instructions. Marc covers all the bases in minute detail, and gives you more info than you need (the good kind of more.) We imagine Marc will be covering his retrofit on the Wood Whisperer website in the future.


English Field Gates—Finished

$
0
0


Here's the story behind the two English field gates we built over the last couple weeks.

Traditionally these gates were used to contain livestock, but they are also quite popular nowadays for containing human livestock and livestock of the horseless (carriage) variety. We're using them to hopefully prevent deer from wandering into a garden.

I first took a serious interest in these types of gates when I stumbled on an article by Paul Sellers in an issue of Woodwork magazine (#116.) The aesthetically pleasing form of the gate, which stems from its engineering caught my eye immediately. I quickly started looking for an opportunity the build one.

I did a fair amount of research while designing the two gates, here's some of the more interesting aspects of what I discovered.

- The gates are traditionally made from air dried oak.
- The harr stile (hinge stile) was usually made from a piece with a natural bend (crook) for the most strength.
- Only the harr stile and the top rail are made from massive timbers. The rest of the gate is made of lighter, thinner stock.
- The top rail tapers in both in width and thickness to reduce weight at the latch stile.
- The joinery is robust: through wedged tenons and drawbored mortise and tenon.
- The hardware is blacksmith made

The gate is superbly engineered to prevent sag. The harr stile, top rail, and angled brace form the rigid structure, and the rest "hangs" from this structure. The top rail diminishes is both thickness and width from hinge to latch to reduce the weight at the area it can do the most damage. The drawbored joints keep everything immobile. I'm a big believer in super rigid construction. Once a joint starts to get even a little loose, there's little keeping it from getting worse.

In addition to the article in Woodwork, we also referred extensively to Alan and Gill Bridgewaters's Building Doors and Gates (Stackpole Books) This book provides loads of design and engineering advice, as well as construction techniques for building these traditional gates (plus many more styles). It even provides info for setting the posts the traditional English way so they will last longer than you and likely your children. It's a fantastic book with solid info on classic techniques. Not your typical weekend warrior "Time-Life" stuff. You can preview the book via Google Books, but if you plan to build a door or gate sometime, buy the book.

So with all that tradition in mind, here's what we did differently.

We used western red cedar instead of oak. We have a small sawmill that will cut oak to order, but we couldn't wait for the wood to get even partially dry. We needed the gates before winter. So we spent a morning at (get ready) Menards and picked through their entire stock of 6x6 western red cedar. We were able to get all the thick stock for the gates (and then some) out of the 6x6 material. All but one stick was dry. I'm guessing they don't move a lot of this stuff, I bet its been sitting there for some time. We resawed the 6x6s to get the final 3"x5" pieces for the hinge stiles and top rail. The 1"x3" rails and angled braces came out of 2x6 material that we ripped and planed down. These came from 16' boards that were 90% clear and straight. When selecting dimensional lumber I always buy the longest, widest boards I can, they are in every instance better quality than the shorter stuff. The grain on some of the stock was so excellent I was tempted to resaw it into soundboards. The dark color is supposedly more rot resistant. All but one board was deeply red. And yes, we did save big money at Menards, paying just over $2 a board foot for the cedar.

We only tapered the top rail in its height. We wanted to keep the latch stile full thickness to speed and simplify construction. I wasn't too worried about the loss in weight savings with the lightweight cedar.

We cut the top of our harr stile off and glued it to the side of the stile to get the crook. We made sure to position the lag screws in the main part of the stile and the not the added portion.

We did through wedged tenons to join the top rail and latch stile. Everywhere else we cut blind drawbored mortise and tenons with straight-grain white oak pegs.

Both gates were assembled with West System epoxy, and we also sealed the end grain at the bottoms of the stiles with the same so they didn't wick up moisture from the snow or rain. West System is the only epoxy we use around here. We like to buy the quart can of resin, pair that with a pint of hardener (we use fast most the time) and finally the pump set, which meters out exactly the correct amount of resin and hardener everytime. It seems expensive, and you do loose some epoxy if all you do are small jobs, but we've found that the added cost usually evens out if you consider the higher cost of buying syringes, which eventually go bad anyway. The West System last for years, and its top quality. It's the stuff boat builders use after all.

We tried to find the best hardware we could find without going broke. We sourced this from Snug Cottage Hardware. They have a great selection specifically designed for heavy gates like this, as well as free plans to build a number of different gate styles. And almost everything is available hot dipped galvanized and black powder coated (that's what we bought.) We've bought the black painted garbage from the big box stores before. It rusts. That's not a problem if you like that look, but we wanted these to stay black and hold up. The carriage bolts that tie all the 1x3's are stainless. We spray painted them black to match the stuff from Snug Cottage. It would have been ideal to connect the hinges via through bolts, but it was impossible with the attachment at the corner of the buildings. We opted for exterior Spax lags, also spray painted black to match. We oriented the hinges so the gates hang on the lags in a shear arrangement, there is only weight on the threads when the gate is open. Overall span of both gates is 122".

The gates are finished with one coat of Sikkens Cetol SRD in natural color. We did a fair amount of research on this. The #1 choice for exterior finish is Epiphanes varnish. We have a friend who did his deck chairs with it several years ago and they still look great. The product is $45 a quart, and requires seven (!) coats. We ruled that out straightway. The Sikkens Cetol 1 and 23 is a two-step finish that is supposed to be extremely UV resistant. It's $85 a gallon, and you must buy a gallon of each. That was also out of our price range. The Cetol SRD gets great reviews, and is $45 a gallon. We were tempted to simply leave the gates unfinished, and they may eventually end up that way, but for $45 we figured we'd give the SRD a shot. It only requires one coat. Needless to say, we were pretty thrilled with how the gates turned out with the finish applied.

Next on the docket, Tony Konovaloff's trestle table from FWW #106. I've wanted to build this piece since the first time I laid eyes on it when I was 20 years old. We may have enough cedar left over to make it.


We shot some video during part of the build. No music, and little editing in this one. We wanted to show the natural pace of work more than anything, and also how sweet the new Glide is for holding big stuff. It's so great to be able to hold massive timbers with only a little flick of the wrist.


How To Shorten The Split Top Roubo

$
0
0

We get this question frequently:

"I only have room for a 6' bench, how do I alter your Split Top Roubo plans to accomplish this?"

Until we have a chance to draft some plans, here's some info that will help you alter the plans.

Option 1: Angled rails

If you want to get full capacity from your Benchcrafted Tail Vise on really short benches (less than 72") you can make the base longer at the rear of the bench. Angled rails at the top and bottom make this happen. The bench pictured above isn't a split top, but you get the idea. The tenons on the rails are also angled, so they fit into the perpendicular mortises in the legs. This is easier to cut, but it makes for a weaker tenon due to the short grain. A better way would be to chop angled mortises and keep the tenons inline with the rail. If you do the angled tenons, keep them beefy for strength, and drawbore them as well. We did this on the bench above, which is only 60" long.

Option 2: Bury the Tail Vise


Jeff Miller built this short Roubo bench above and reduced the overhang on the Tail Vise end by burying part of the mechanism in the legs and upper rail. This reduces the overall capacity of the vise, but still allows plenty of travel (I've never used the full capacity of our Tail Vise.)


Camil Milincu did a similar thing with his 53" Split Top Roubo. For more details on Camil's bench, see this post.

Option 3: No left hand overhang

This is the best option for a 6' bench without hardly any changes to the plans. Push the top overhang at the leg vise end back so its flush with the left edge of the chop. This will buy you about a foot of length so you don't have to remove it from between the legs. The plans call for a 14-3/4" overhang here, and if you make your chop the width of the leg (5-3/8") instead of the 9" in the plans (the narrower chop will hold just fine) the rest of the bench you can leave unaltered and you'll end up with a bench that's just 72-1/4" long. It will be very stable, even without angled rails.


Glide C Leg VIse - Now Available

$
0
0


Late last week we finished packing up the first of the Glide C leg vises.They are now available to purchase.

The Glide C is different from the Glide M in two ways. First, the C handwheel is sand cast in gray iron, and then only machined to accept the acme screw and infused beech knobs (the Glide M surfaces are entirely machined after casting.) Secondly, the C uses Beech knobs instead of the deep red Dymondwood of the Glide M.

Each vise performs identically.

Why would you choose a Glide C? Two reasons. First, cost. The C is $70 less than the M. Second, looks. The C has much more of a vintage, traditional look if that's your style. It looks perfect on a Roubo bench, especially when made from ring porous hardwoods like ash or oak. It would look outstanding on a beech bench. My personal vises at home usually change pretty frequently during testing, but I currently have a C on my ash bench. I love the look.

Glide C's are available for order now on our Store Page. They ship 1-2 weeks after placing your order, but usually much faster (that lead time gives us a little wiggle room in case the fish are biting.)

Later this fall we hope to release the new Tail Vise C, so we can offer a matched set of vises in the C style.


Cut The Dovetails In The Deutschland

$
0
0
For a double dose of dovetailing delight, we highly recommend the following video. We never tire of seeing our products in use in our homeland. Ironically, we don't speak German, but this video has subtitles.

We would also subtitle our videos in German, but the only phrase that our grandmother taught us growing up was "ist das nicht ein fine malt brew?"


The video features David Barron's dovetail guides (we like them) and our Moxon vise, although the latter is not talked about specifically (we like this too.)

David will be at Handworks next May.

For Sale - Benchmaker's Package With Wood

$
0
0

We have available a Benchmaker's Package with wood. We milled this with the intention of making a demo bench for an upcoming woodworking event, but our plans have changed. Oftentimes we make a bench to display our vises at a show, then sell the demo bench. Since we now have three different leg vises (and soon to be two wagon vises) we're rethinking our display options.

Here's the nitty gritty.

The package includes everything (really, shelf boards, deadman, dogs, everything!) you need to build our Split Top Roubo. All components are precisely milled to final size, but left overlong to cut to final length. The tops are glued up from jointed and planed boards, then finish planed to 4". I lopped off the ends of the tops to a consistent length after glue up (a few inches past 84"), but the cut isn't a finished cut. They will need to be cleaned up to look and feel smooth (of course you'll need to join the end cap.) With careful construction, you'll be able to flatten the tops with a couple passes of a jointer plane. Once you cut the parts to length, all you'll need to do is cut joinery and install the vises. There is no milling to do. For a person with a hand tool-only shop, this would be a great way to build our bench with a minimum of heavy work.

The package includes our Glide M Solo Benchmaker's package, which includes all the hardware (barrel nuts, Spax lags) and vises (our new Glide M with Crisscross Solo, Tail Vise) plus the printed plans. The only material you'll need to finish your bench is a little glue.

Species is hard rock maple.

Price is $3349, plus freight. Due to the great differences in freight by location, please contact us for a quote.

If you'd like to purchase, send an email to info@benchcrafted.com.


For Sale: L'ART DU MENUISIER

$
0
0

I'm selling my set of L'art Du Menuisier. I bought this set three years ago directly from Jacques Laget, the son of Leonce Laget who published this version in 1976 in Paris. Jacques was kind enough to sign the inside cover of Vol. 1-2. There have been other versions of Roubo's original work published over the years, but they are mostly excerpts. This is the only version that's arranged like the first edition. If you want to read Roubo as it was originally published without spending $10k on a first edition, this is the only way to do it. This edition contains the extremely fascinating fold out plates, which no other version contains, again, other than the first edition.

The books are in excellent condition. There is some musty smell to some of the pages. The binding are all intact and strong. The slipcovers have a bit of creasing on the corners, and just a couple very small tears. I've stored the books flat.

If you're interested in the set, drop me an email at jameel at benchcrafted dot com.


The New Bench Plans Are Here

$
0
0

After a long slog we've finally updated our Split Top Roubo Plans to include our Benchcrafted Crisscross.

Couple reasons this has taken so long. First, we made some other changes along the way that we thought would justify a delay on doing a major update. Second, while we were making the updates we lost all our files that make easy updates possible. Several hard drives, and even backup drives were corrupted. This happened right on the cusp of being finished with the big update. So we had to rebuild the plans from the ground up. And of course this meant going through all the dimension yet again to make sure we hadn't made any errors (there are a LOT of numbers to consider.)

But that is all water under the bridge. The good news is the updated plans are at the printer and should be available to ship by the end of the week. The new plans show the Crisscross, the new Glide M/C as well as all the drawings for Crisscross-related joinery that we've been supplying at the end of the Crisscross and Glide installation instructions for the past couple years. Here's another nice bit. If you're installing a Classic Leg Vise instead of a Glide, you can build the bench exactly from the plans. Both vises fit the bench the same way. The only difference is that the Classic mounts to the chop with wood screws instead of machine screws. That's it.

We'll also be updating the Crisscross and Glide installation instructions so the additional templates aren't included any longer. That would just be confusing if you're building the Split Top Roubo. The plans show everything you need to know.

Special thanks to our tireless draftsman Louis Bois.


Another STR Update

$
0
0

Late last week the printers delivered the updated Split Top Roubo plans (they are beautiful) and we uploaded several updates to our downloads page. Here are the details.

Glide M/C Instructions and Crisscross instructions (click any of these for direct download)
As before, the installation instructions for the Glide M/C is the same document as the Crisscross instructions. We've updated the instructions and made clarifications to the templates (really just measured drawings) so those building a Split Top Roubo according the plans aren't confused by additional measured drawings at the end of the instructions.

Split Top Roubo Construction Notes
We've rewritten portions of the notes to further clarify the installation of the Crisscross. We've also added pictures of the new Glide M in a bench. Previous pictures showing the bench with a single-knob Glide are still there since we know some folks with those vises may have not started their builds.

Split Top Roubo eDrawing
The new eDrawing has also been uploaded for free download at any time. Yes, we get many requests for a Sketchup drawing of our bench. Sketchup is great, and we use it frequently, but the eDrawing serves its purpose allowing one to view the bench in 3d at your computer (the printed plans are what you want in the shop) And one huge feature that the eDrawing has over Sketchup is the ability easily view components as transparent without having to actually assign a transparent material to the component. Simply use the pointer tool, right click on a component and select "make transparent". Very useful to see exactly how everything fits together.

If you're building a Shaker bench, you can use the eDrawing to see how the Crisscross would fit in the "leg" of the Shaker bench. The dimensions will be a little different, but the configuration will be the same.


La Forge Royale Price List

$
0
0


Ever on the hunt for vintage French woodworking stuff, we recently scored a 1949 price list for Pierre Feron's A la Forge Royale woodworking tools catalog.

I haven't had much chance to translate any of this (I need to learn more French. Louis, are you there?) but I did try to translate some of the prices from 1949 francs to 2014 dollars. I found this chart which lists several currency conversions since 1948. Then I went to this site to see what it would cost in 2014.

So let's try to price a toothing plane, a "rabots a dents" from the second page of tools in the La Forge Royale catalog reprint from MWTCA. The price is 525 francs for the shorter toothing plane in beech (the least expensive wood). IN 1949 one U.S. dollar was worth 3.3196 francs. Divide 525 by that and you get $158.15, in 1949 dollars. In today's dollar thats $1581.71. Unless "Hètre" is French for "Stanley #1", something is definitely wrong here. (Hètre means beech, Charme is hornbeam, Fruitier is obvious)

So let's assume the prices are in cents, or "centimes". So 525 centimes would be 5.25 francs. That translates into $17.42 in 1949 dollars, or $174.22 in 2014 dollars. That seems more realistic.

Here are a couple links to download the price list and catalog. The catalog document has been around for some time (Schwarz posted it years ago) but this is the first time the price list has been online to my knowledge.

La Forge Royale (Feron era) Price List 1949

La Forge Royale Catalog (Feron era)


In Stock: Hand-Forged Holdfasts

$
0
0


We have another small run of hand-forged holdfasts available. If you missed out on the first run, now's your chance to pick one of these up. These are completely made by hand, no trip hammer, no power hammer, just a forge, anvil, hammer and human. And they are beautiful. Made in rural Georgia exclusively for Benchcrafted.

$189 plus actual shipping.  To order, send an email with your shipping address to info@benchcrafted.com

For more info, click.

Tail Vise C Now Available

$
0
0

We're very pleased to announce that the new Benchcrafted Tail Vise C is available.

Here's a little background about the vise. A few months ago we released the Glide M leg vise, and with improvements came a price increase due to the added components. We immediately decided we needed to offer a lower cost alternative with the same performance as the Glide M. The Glide C was born. Naturally we realized folks would want a Benchmaker's Package with all C series vises, thus the Tail Vise C.

In case you're wondering, "M" denotes machined and "C" cast. These terms don't refer to the way the handwheels are manufactured (since both are cast and machined), but rather describes the final surface finish. The Tail Vise with machined handwheel will now be called the Tail Vise M. Below you can see the difference between the Tail Vise M (left) and Tail Vise C (right.) Both are made of cast gray iron, poured locally.


Aside from the obvious cost savings (our original motivation for producing the vises) the C series vises with their sand cast finish have a distinct vintage and traditional look. As a hat tip to the old toolmakers, we outfitted the C series vises use beech (acrylic infused) knobs. If you're into the vintage aesthetic, the C series nails it. I have a C series Tail Vise and Glide on my Ash bench at home at the moment. I love the understated look. The texture of the cast wheel on the Tail Vise also makes for great ergonomics, since I like to grasp the wheel itself for small adjustments.

Aside from the handwheel and knob, all other components of the Tail Vise C are identical to the Tail Vise M. It also installs and performs exactly like the M.


The Tail Vise C will be shipping shortly, and you can order now through our store page. You may need to refresh your browser.

Price for the Tail Vise C is $295 plus actual shipping.

Price for a Benchmaker's package with C series vises (with Crisscross Solo) is $699.

For those using a Classic Leg Vise in their Benchmaker's Package, the default Tail Vise choice will be the C. We will gladly sell you an M with your Classic, but you must request it via email.


Holdfast after Camion Freres

$
0
0

While developing our hand forged holdfast we toyed with making one based on a holdfast by the Camion Freres company (see the CF holdfast, which we sourced in France, pictured below.)


However, the CF holdfast was just too huge to produce for a fair price, so we quickly ruled out using it as our model.

We did make one however, and we're offering it for sale. We usually don't sell prototypes of anything we make, but this is different, since our vise prototypes usually look like something out of Mad Max. This hand forged holdfast is a thing of beauty.


The CF holdfast reproduction (right) pictured with our Benchcrafted Holdfast prototype.


The CF reproduction works in 1-1/4" or 1-1/8" diameter holes. It takes a couple whacks to release in the smaller hole. The larger hole gives up its grip with usually one whack.

Price is $250 plus shipping. If you'd like to purchase, send an email to info@benchcrafted.com and include your shipping address.

In the video the stock is 5" thick ash.

Cleaned Off Some Shelves

$
0
0

This time of year we're preparing for Black Friday. In other words, we're pondering spending that time in the shop making things other than money. We hope you do too.

Doing a little warehouse cleaning this morning we found a few vises we set aside for a moment like this. And the when the moment is right...

1. Glide Leg Vises.
This is the previous version of the Glide, with the single Dymondwood knob, and fully machine handwheel. These are vises that may have some porosity to the cast iron hanwheel (very minor) or were used on demo benches. They are 100% functional and are just slightly cosmetically deficient on the handwheel. That's it. All other parts are brand new. We usually melt these down, but these are so close to being 100%, we're offering them for your benefit. Price is $300 with Crisscross Solo (add $40 if you want a Retro.) We only have two of these.

2. Classic Leg Vise Hardware Only SOLD
The hardware we used to take the glamour shots earlier this year. If anything, this is likely nicer than what you receive when buying new, since we already buffed out the parkerizing and oiled it up. It's a beaut. Price is $130. We only have one of these. If you'd like to pair it with a Crisscross, request that when you order.

And here's how to do that. Send an email to info@benchcrafted.com stating what you'd like, including your shipping address, and we'll email you an invoice to pay. Simple as that.


Viewing all 305 articles
Browse latest View live