Quantcast
Channel: Benchcrafted
Viewing all 305 articles
Browse latest View live

Hunting Massive French Oak

$
0
0

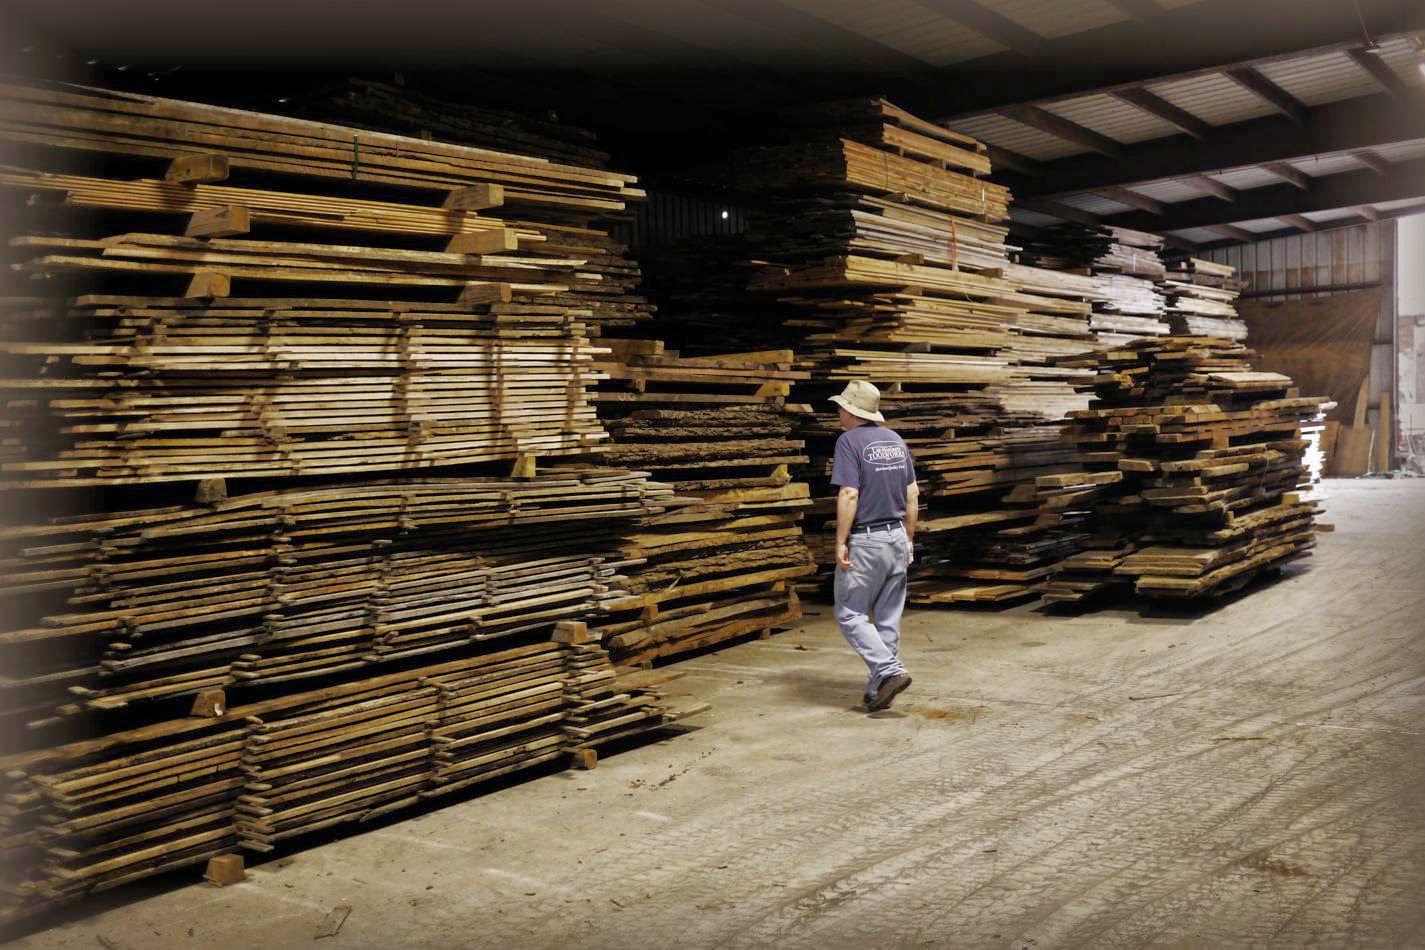
Last week I traveled to the deep south in search of more massive boules of French Oak for Roubo-style workbenches.

What I found was a jaw-dropping.

When we did the groundwork for the French Oak Roubo Project over three years ago, the likelihood of finding more massive slabs was pretty slim. Finding slabs of this size is extremely rare nowadays, let alone finding sawyers in continental Europe who saw the logs into such economically risky dimensions. You have to find the right buyer for 35" wide, 6" thick, 20' long slabs of any wood.That person is Wyatt Childs.


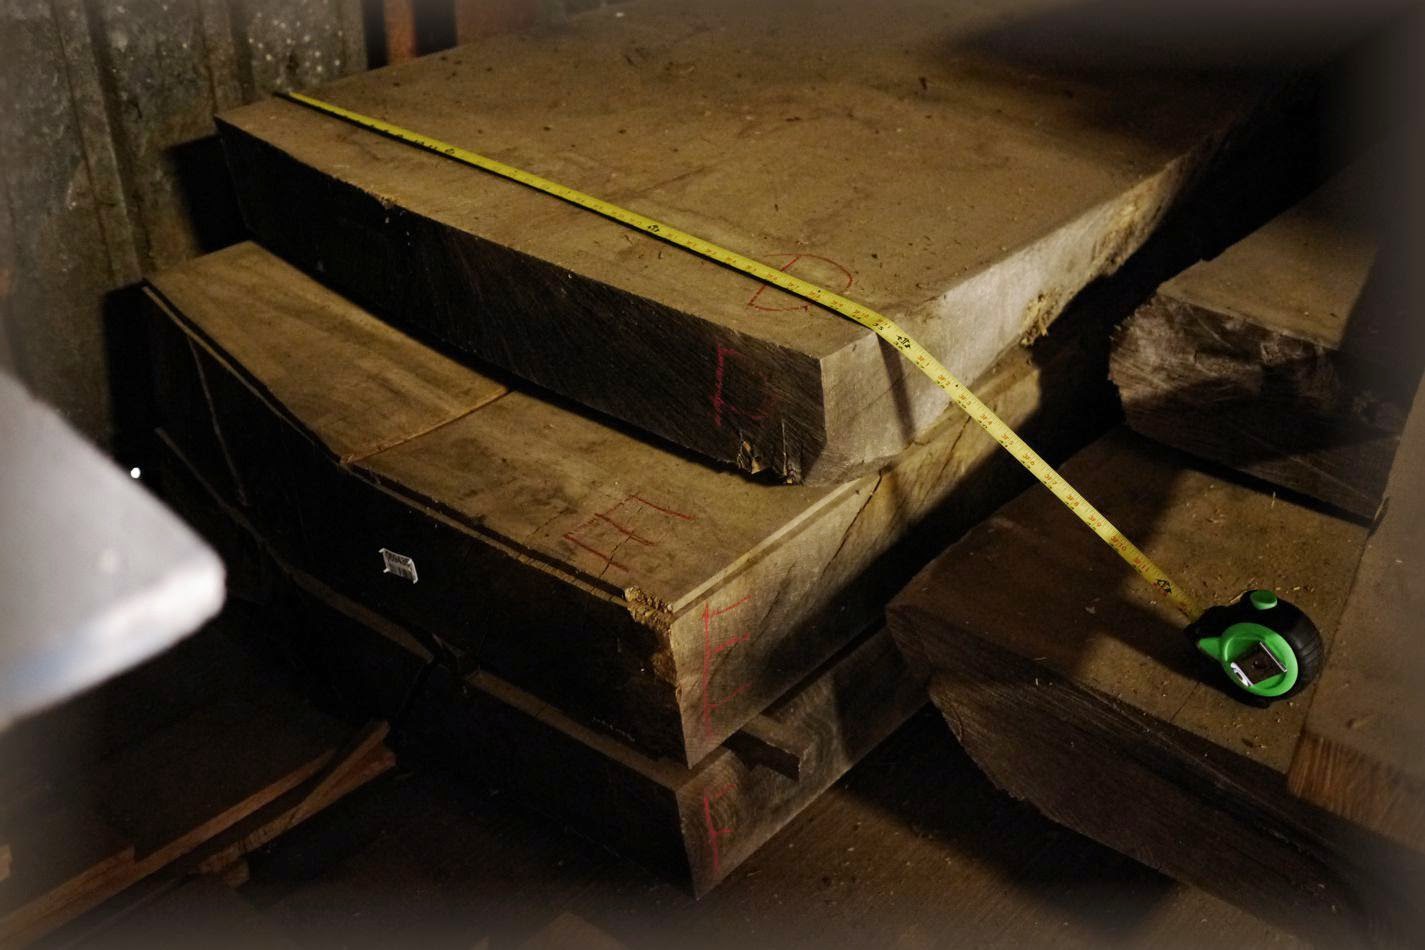
In the past three years, since we discovered the slabs that became the FORP benches of 2013, Childs has made numerous trips to France to hunt down more of this elusive material. And late last year he stumbled(!) on some, loaded them into a shipping container, and sent them west to rural Georgia.

Right now we're crunching numbers on just how much of this stuff we have at our disposal. Is there enough for another FORP? We're not sure at this point, but it's looking good. We still need to make a trip or two back to France. We're still at the preliminary stages of this, so that's all we know for now. More when it develops.


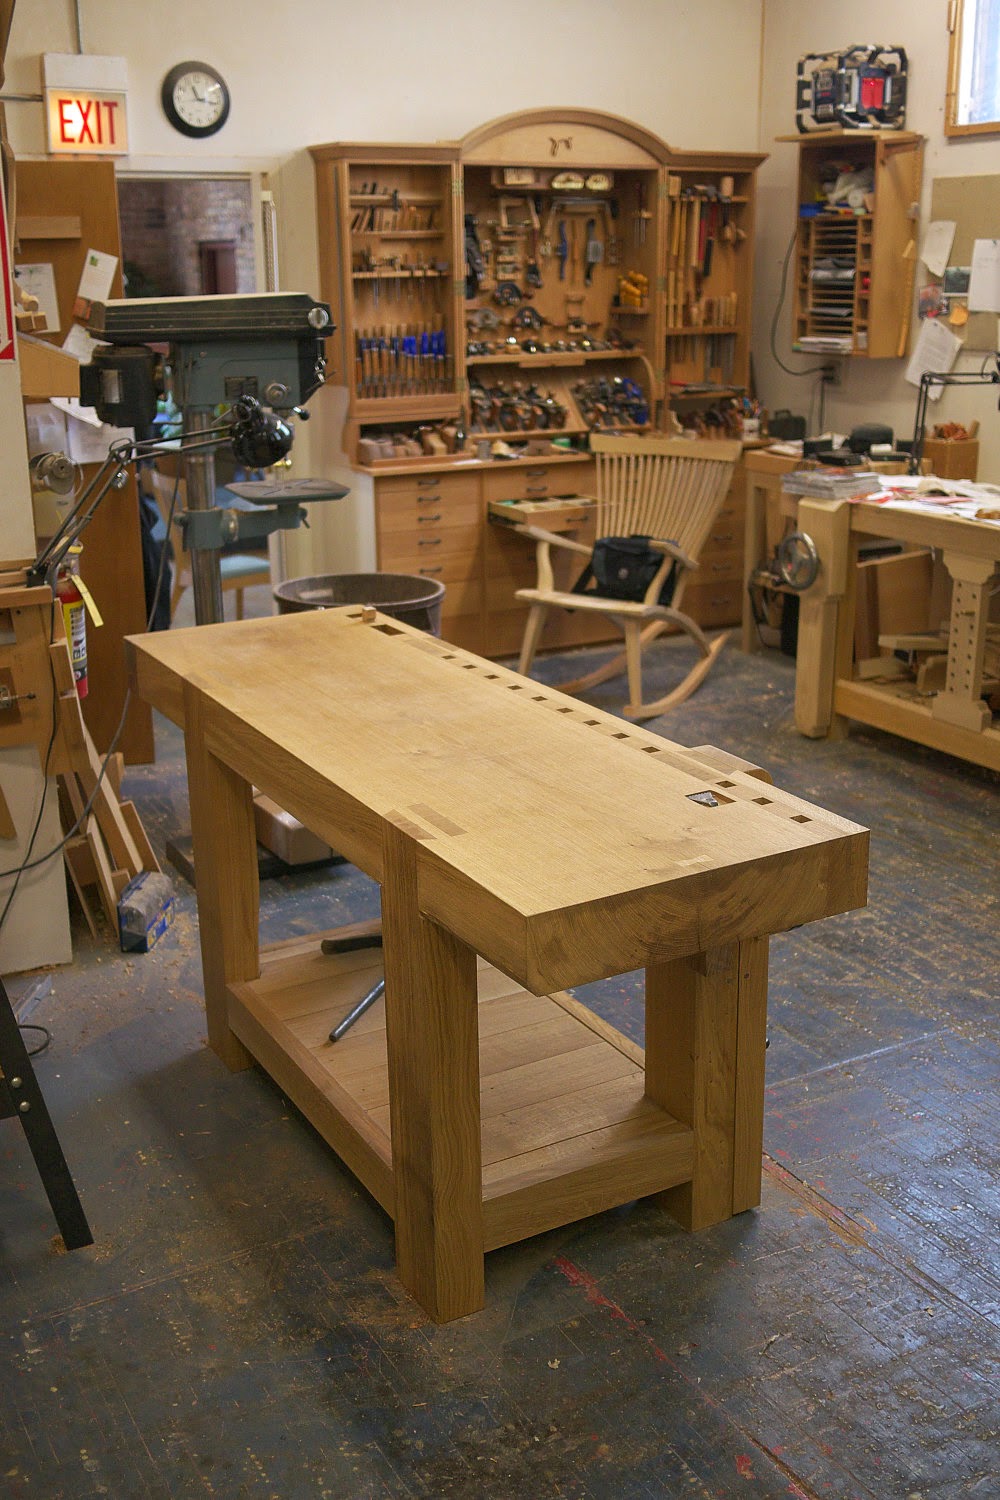
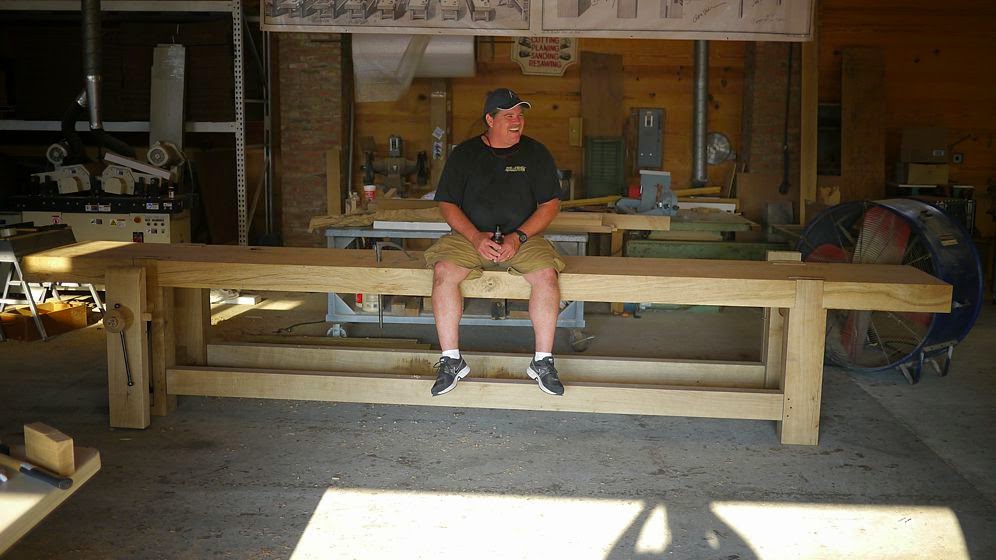
While visiting Childs' millwork and furniture shop, I got a chance to catch up with his team of joiners, who've been using his 16' long Plate 11-style bench for the past 10 months. Has it been simply shop jewelry or a catch-all? Nope. Traci, Chris, and Adam use the heck out of it. Every day.


Traci reports that the 1200 pound partner's bench is usually out in the middle of the shop so the workers can get to both sides easily. But this week it was pushed to the side to make room for a large dining table they are finishing up.


Childs specializes in box beams of oak, and being long things, the joiners use the Plate 11 bench to work these parts. Using axe, scrapers and angle grinder with a wire brush, the oak is transformed into parts that look rough-hewn and aged. It's a look that Childs has perfected. And one that can only be accomplished with hand work. The Roubo bench has become a favorite at Child's.

Has Childs' bench moved in the past 10 months? Of course. The top has been flattened once, and it needs it again. But its settling down. The leg joints have opened up, and at least one has been filled with oak wedges. I cut most of the joints in this bench, the wood was wet. That's impossible to avoid in wood of this dimension (see here for more.) But the reality is, the bench is still in one piece and completely functional. Have the leg vises seized up or become loose? Nope. The leg vises are awesome, actually a bit sweeter than when we had them installed last year. In the next year or so this bench is going to settle in nicely and then move very little in its climate-controlled environment.


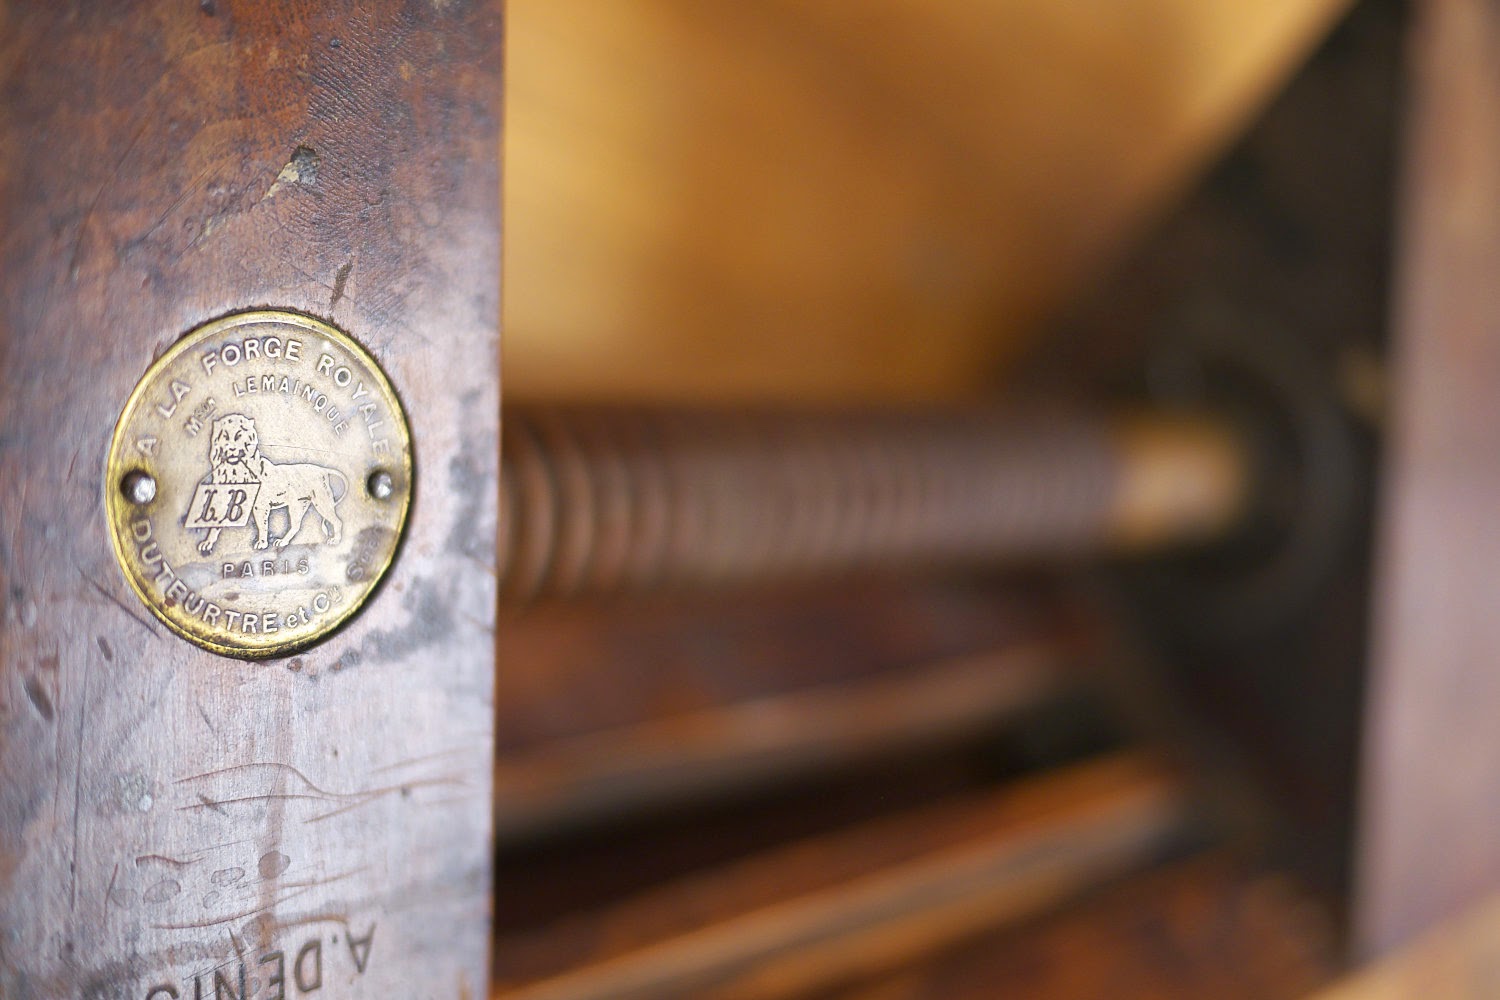
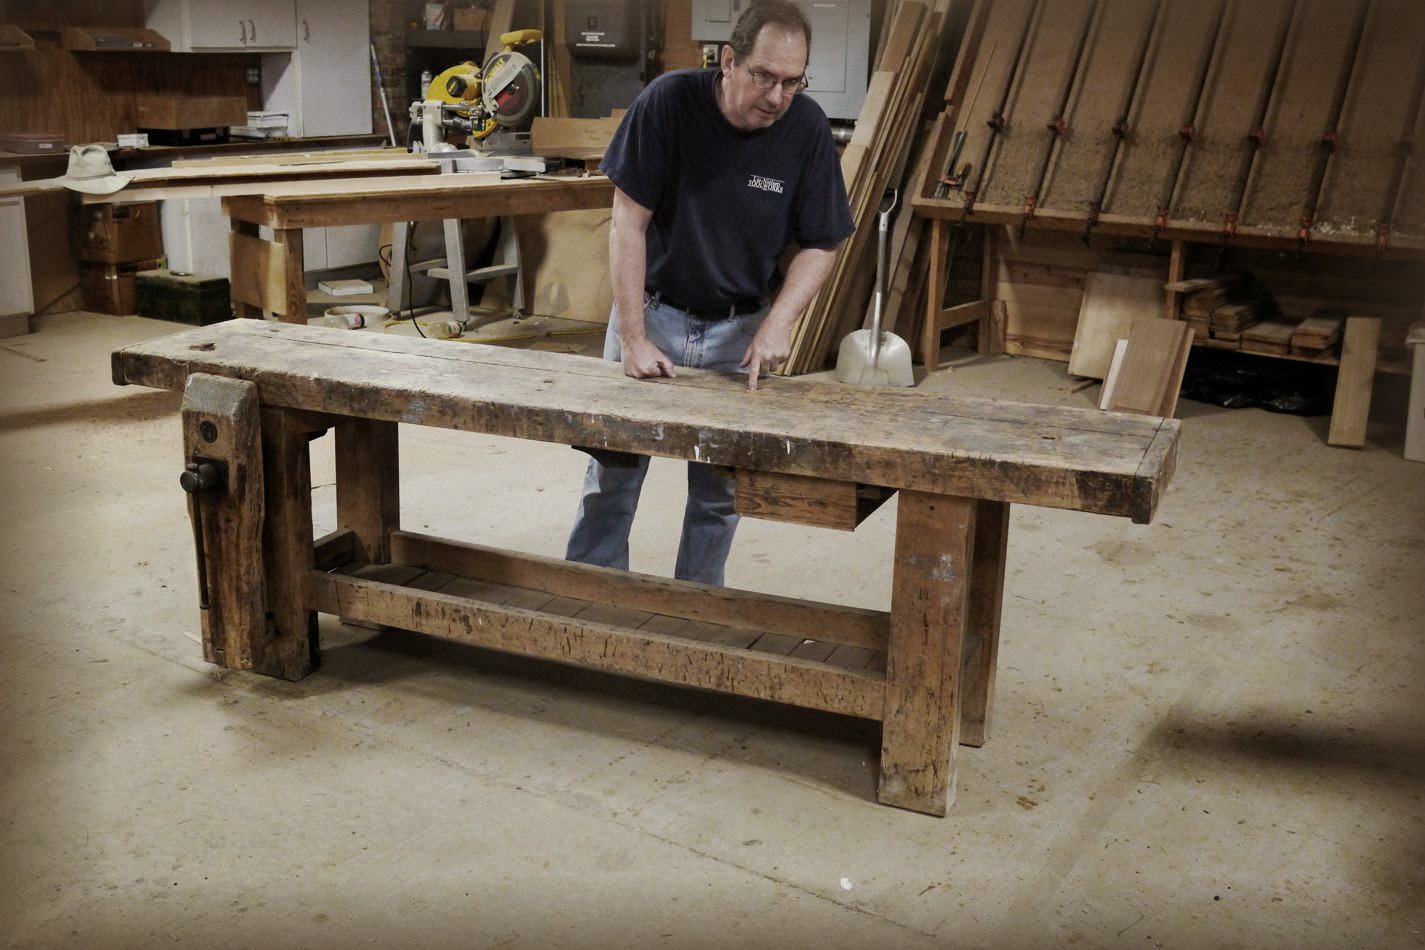
The other bit of fun we had at Childs' was poring over a French bench that came out of the La Forge Royale factory in Paris. Bo brought this bench over last year and installed it in his shop in Barnesville.

I've got my hands on a couple products from Feron and Company, but this one takes the cake. I first saw this bench on French Ebay, then later when I brought it to Childs' attention, he sent one of his buyer's to the owner to snatch it up. Last week I got to take a close look at the bench and see just how this factory put this bench together.


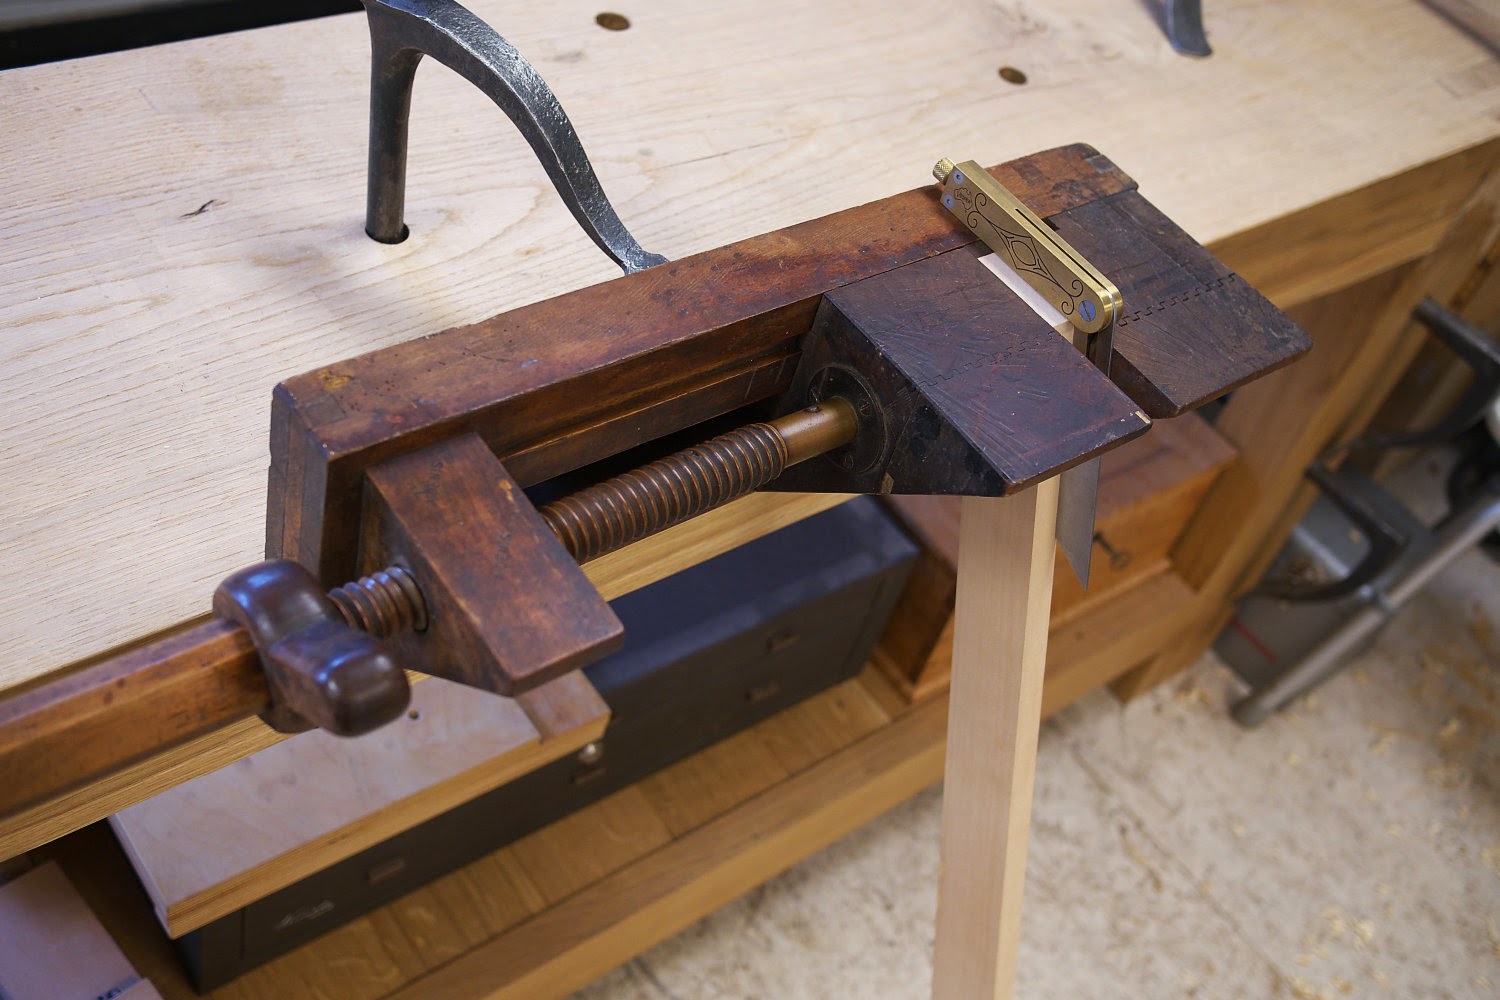
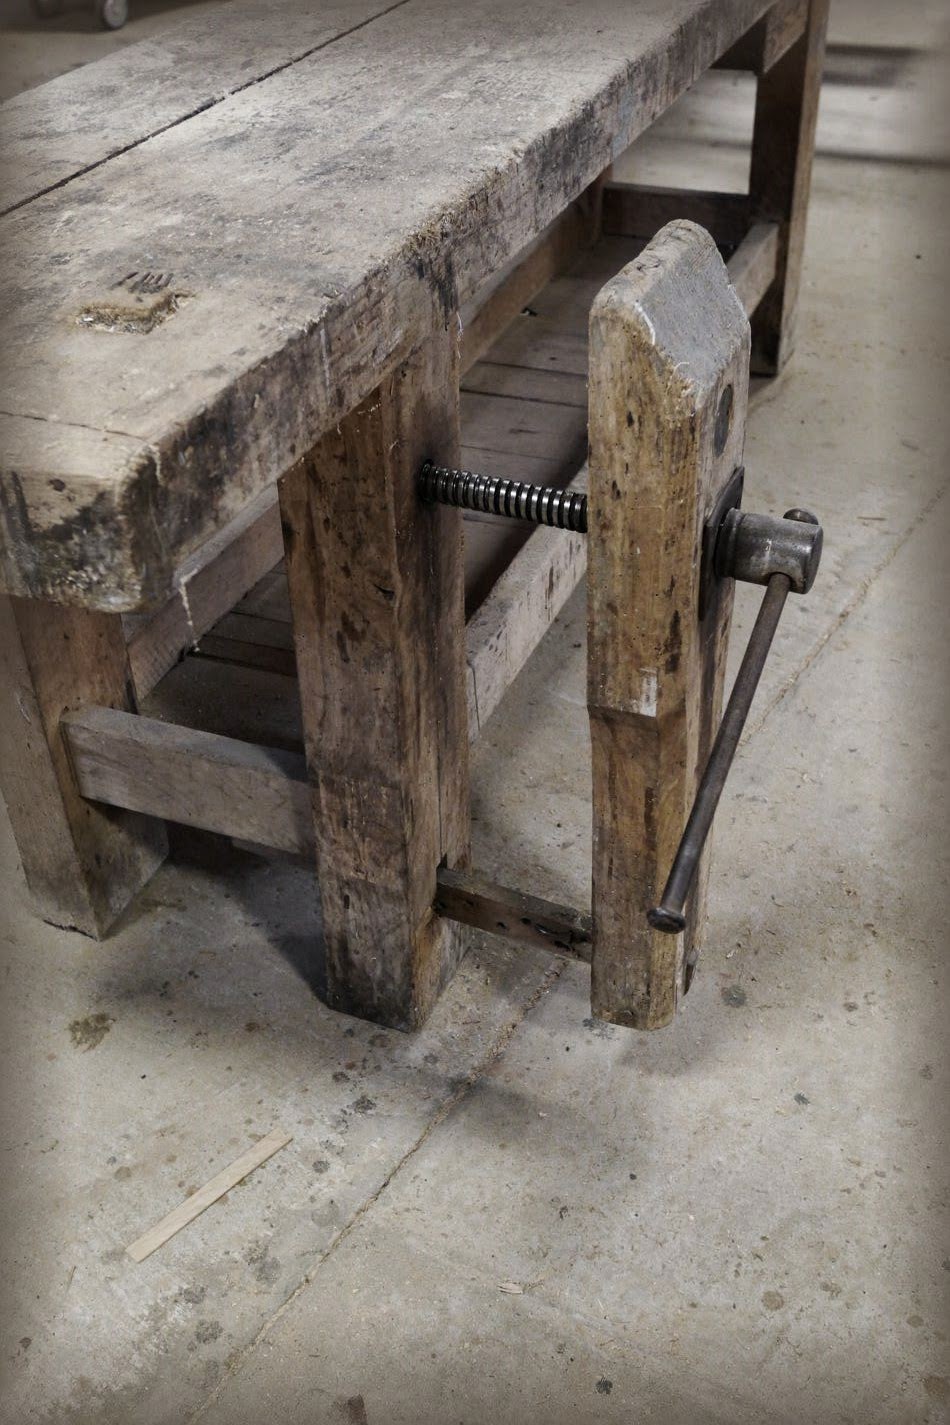
The top is 18" wide, more or less. Only one leg is flush with the top's edge (right rear, the one next to Ron's leg in the above pic) and the base itself was 7/8" narrower on the leg vise end. None of rails are flush with the legs. The end cap is nailed on. No tail vise on this bench (although Feron & Co. offered several benches with them.)


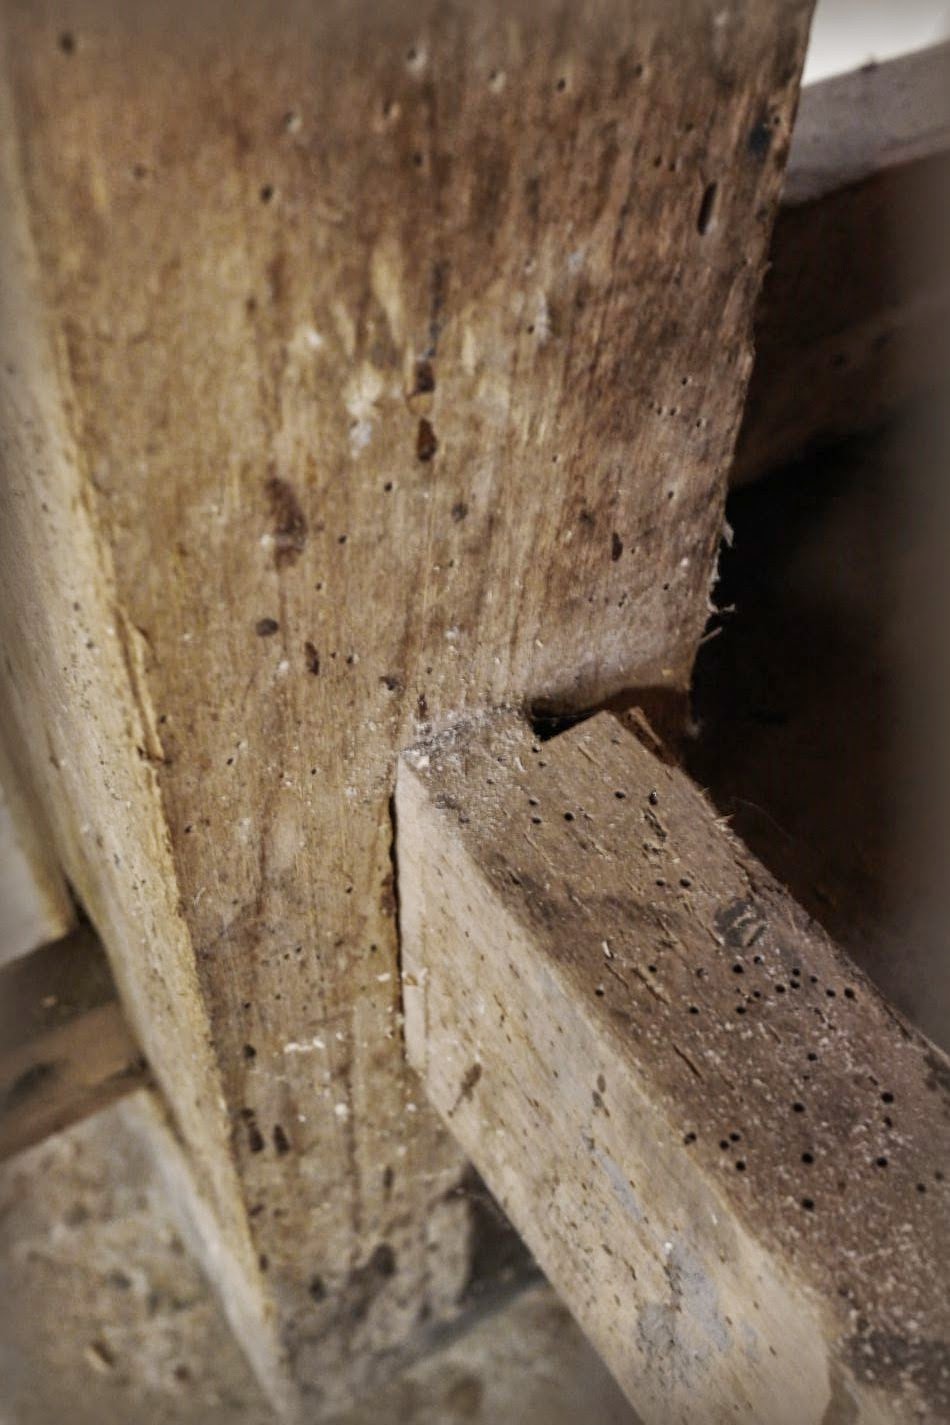
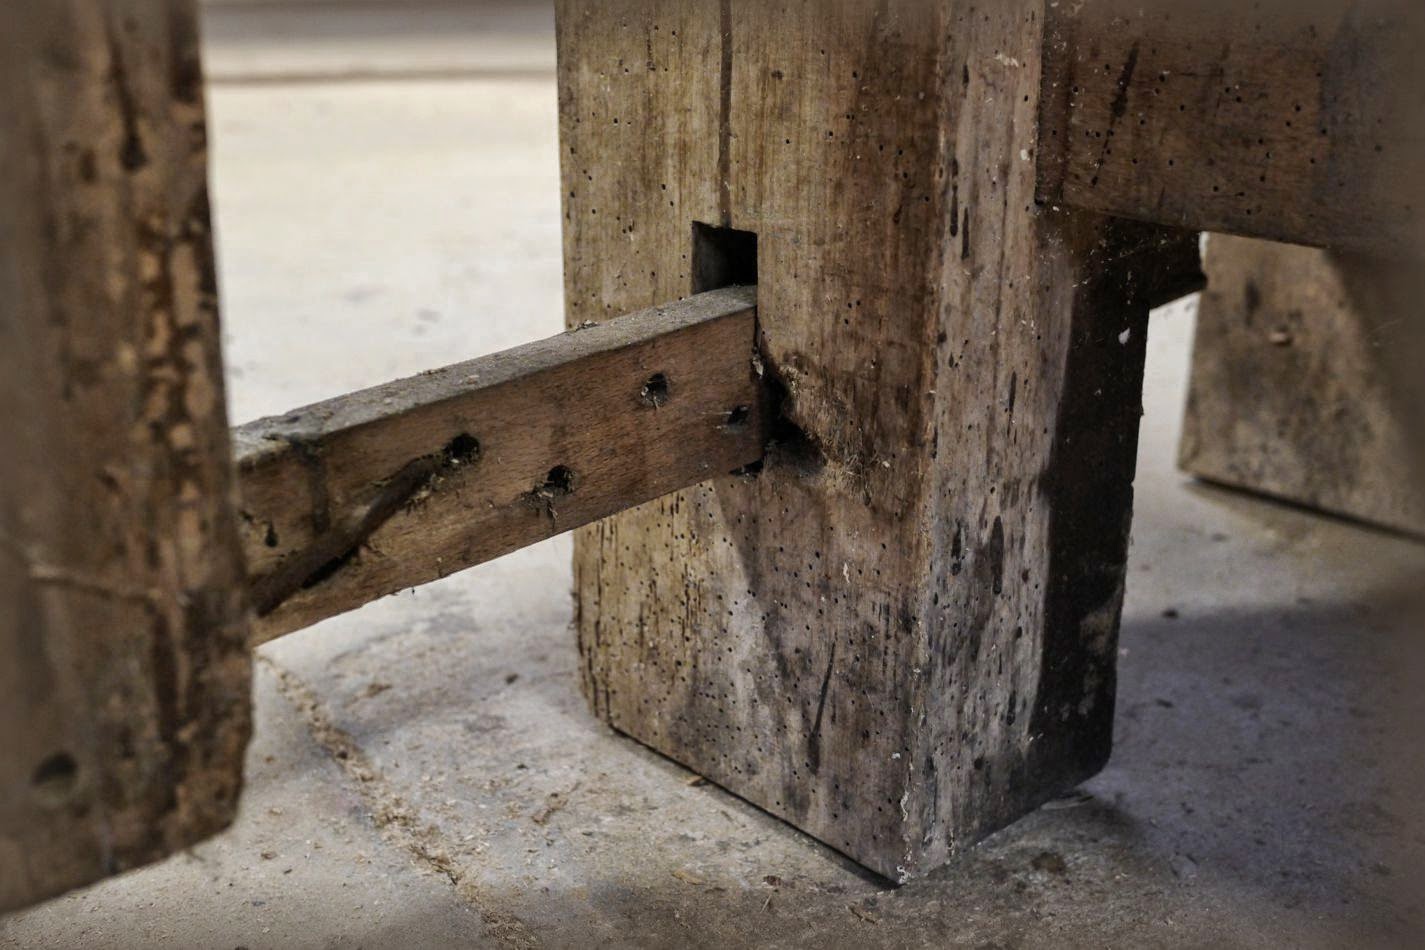
The rails were joined to the legs with a single faced, full width tenon. I didn't see any evidence of pegs in the joint, especially given the open shoulder.


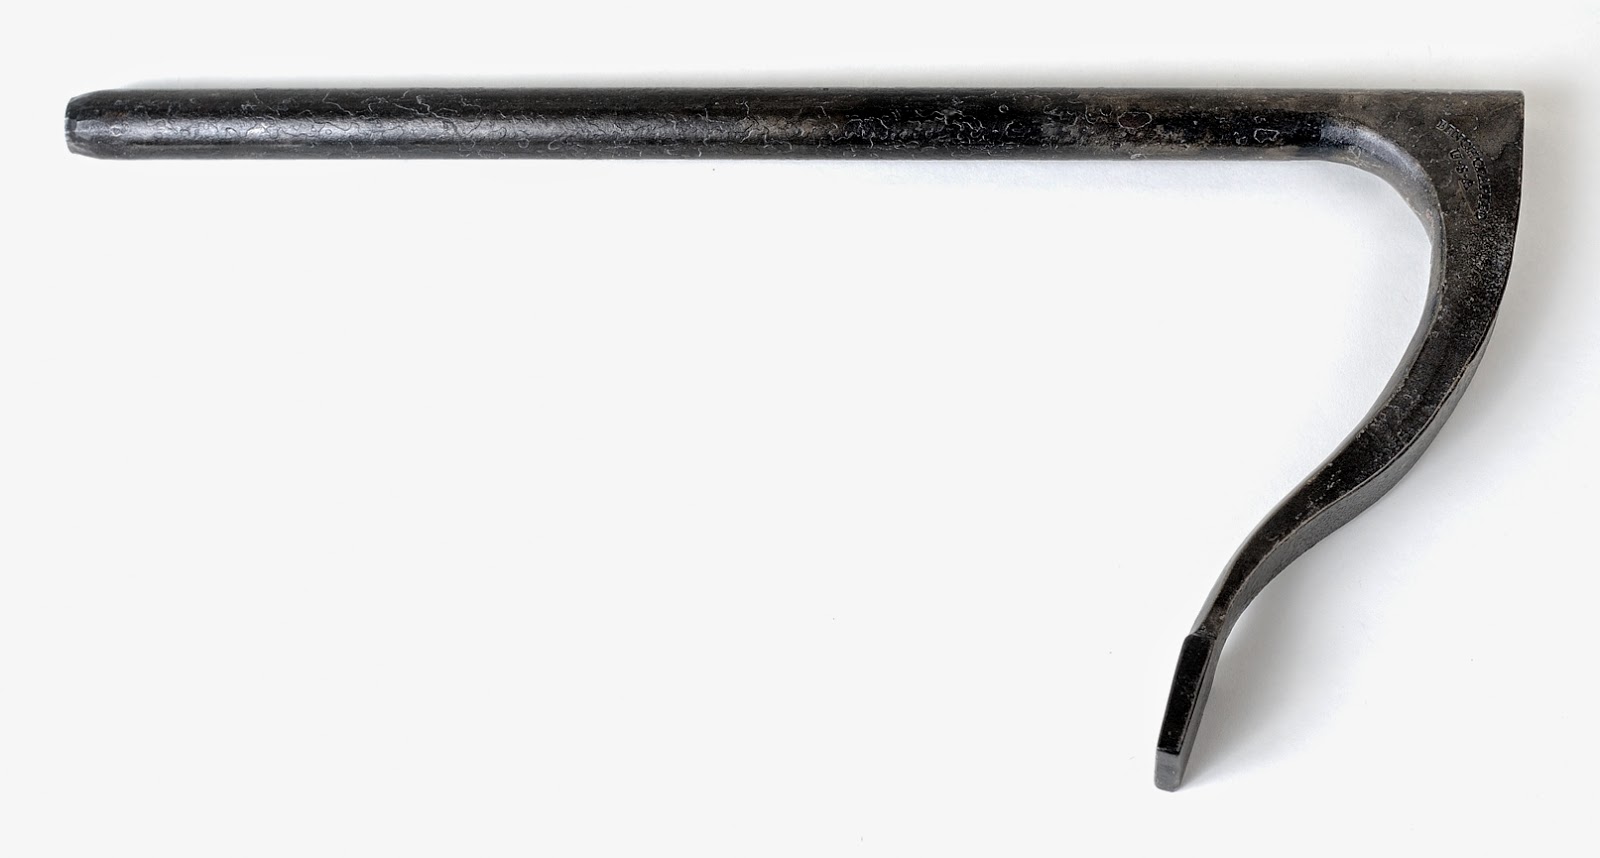
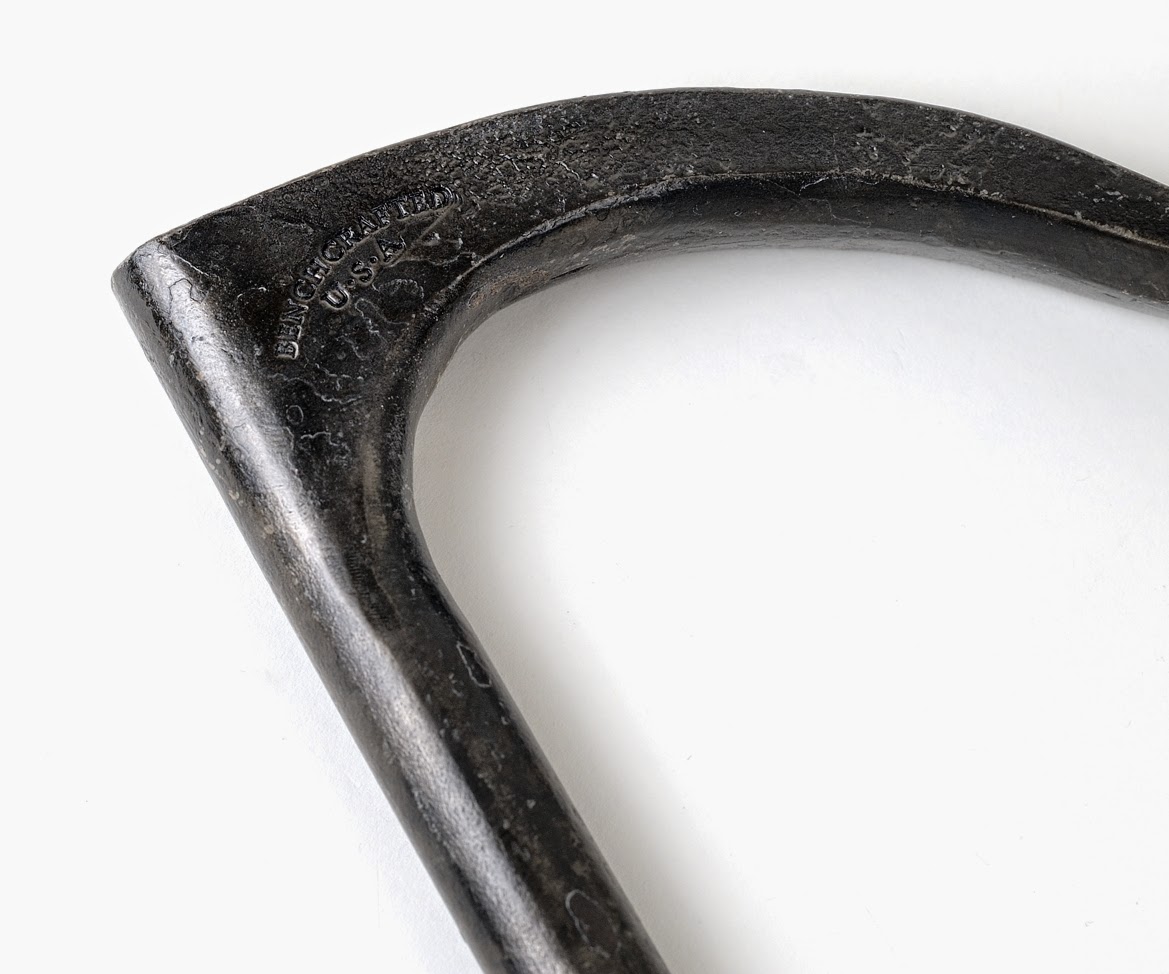
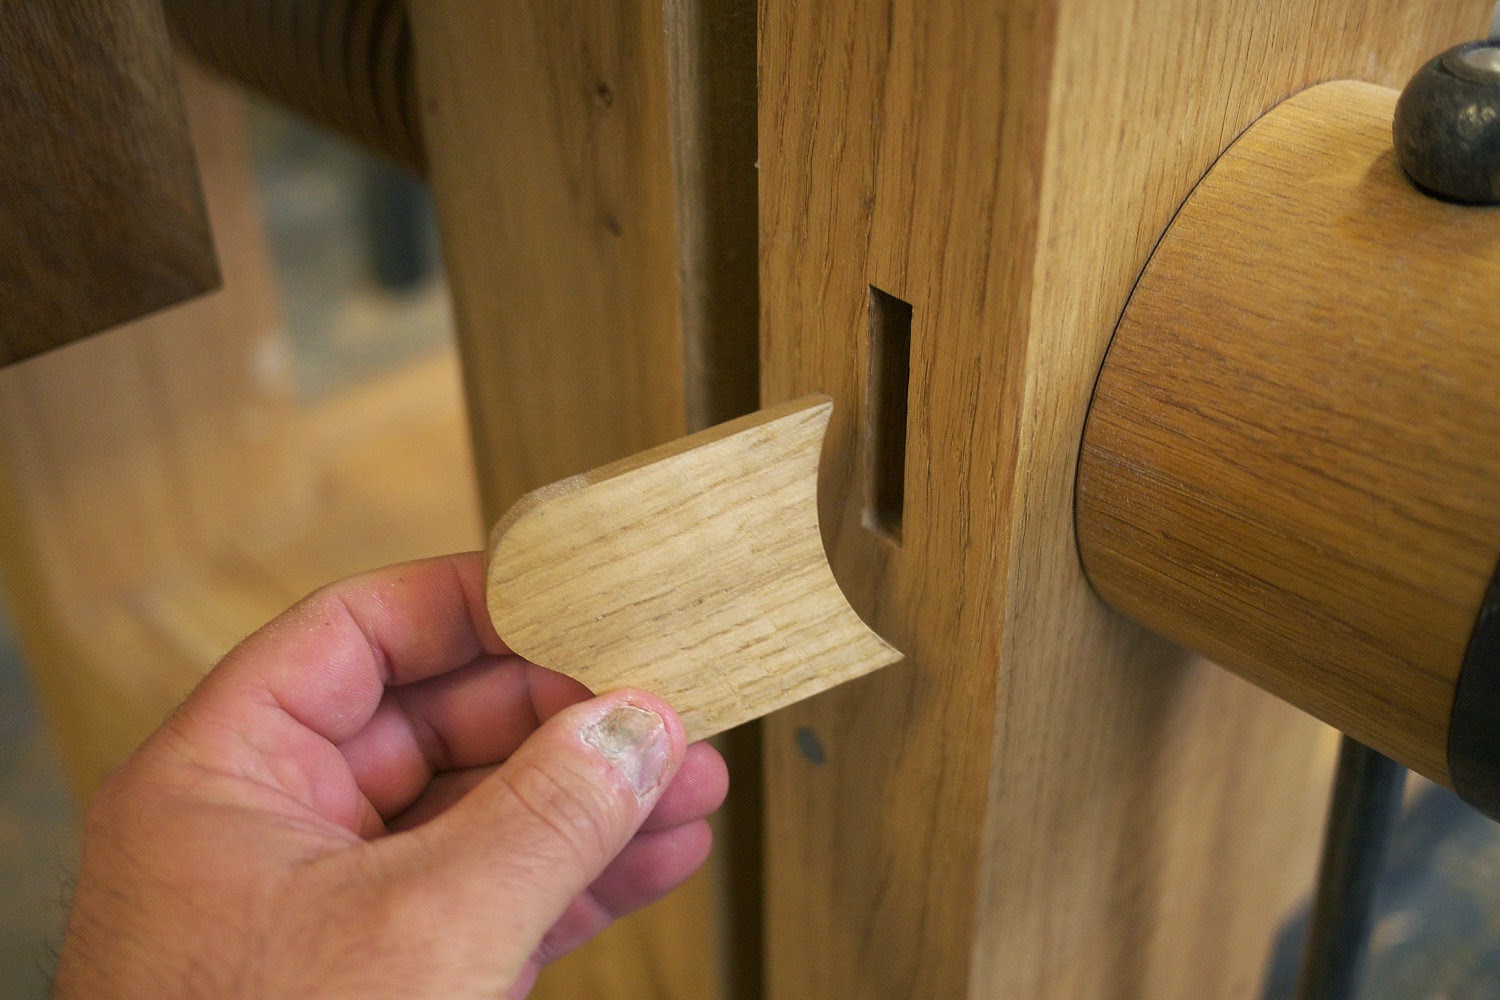
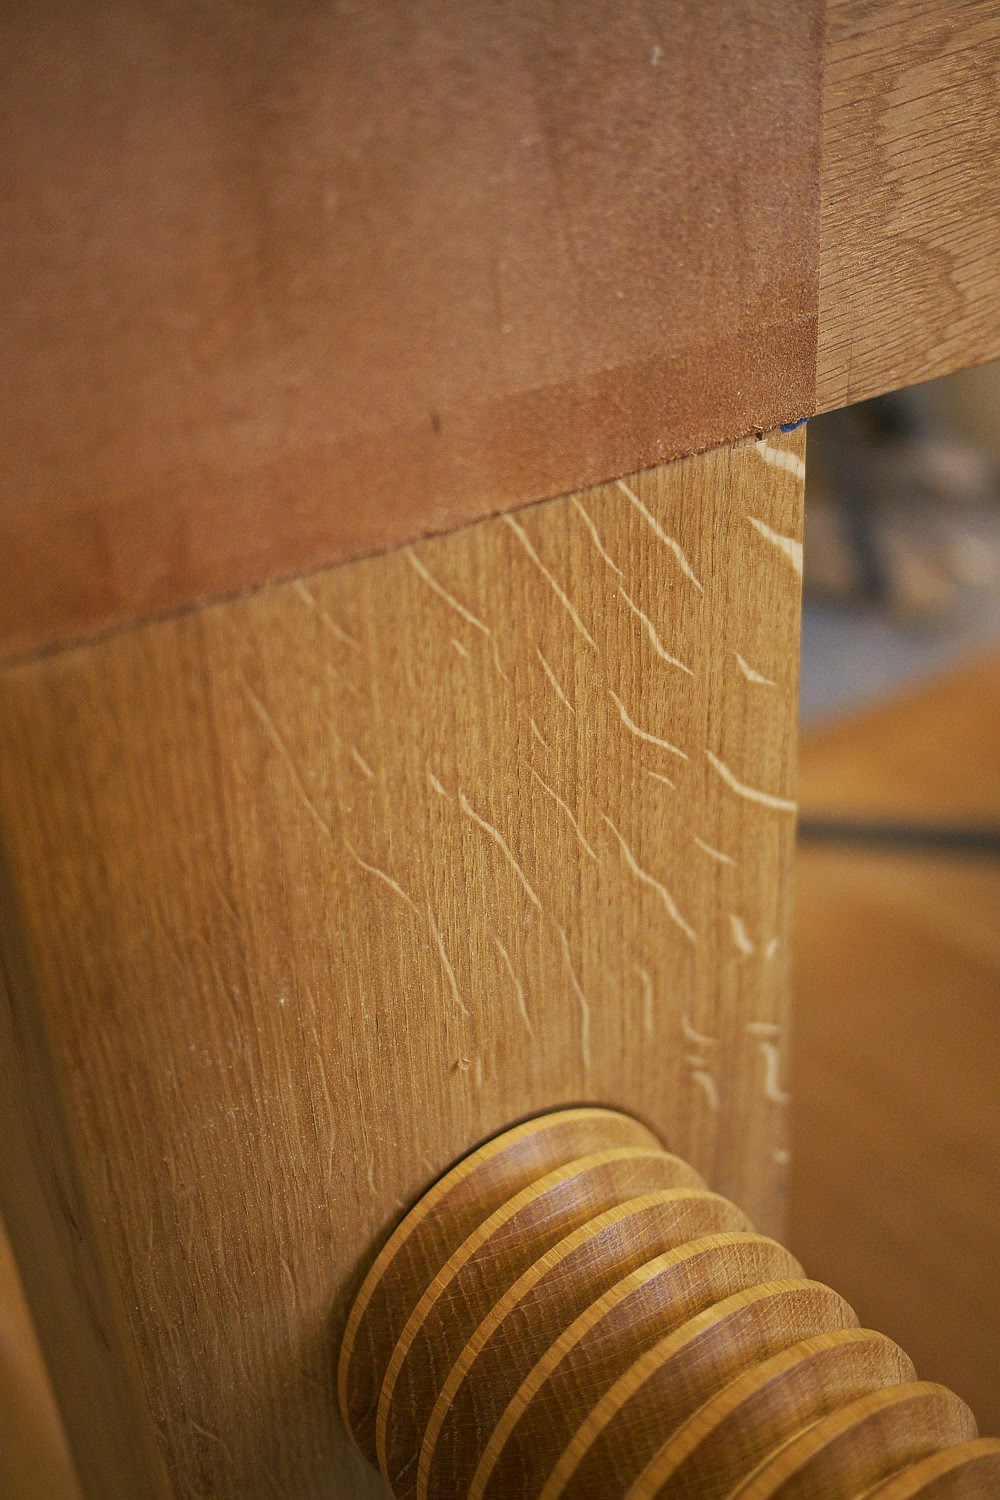
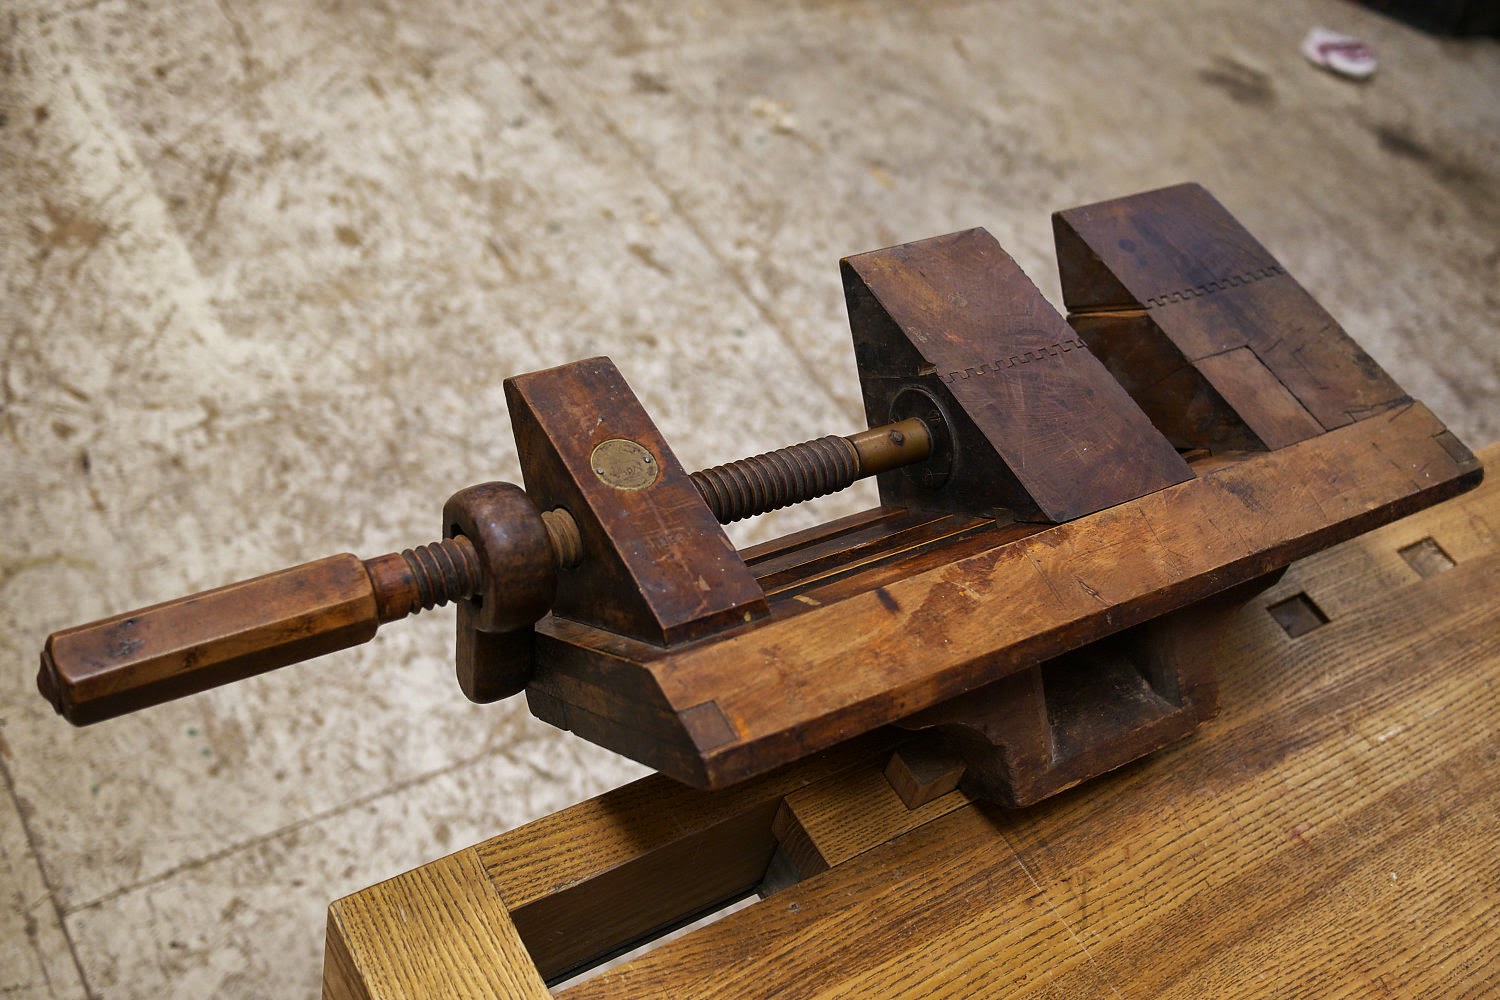
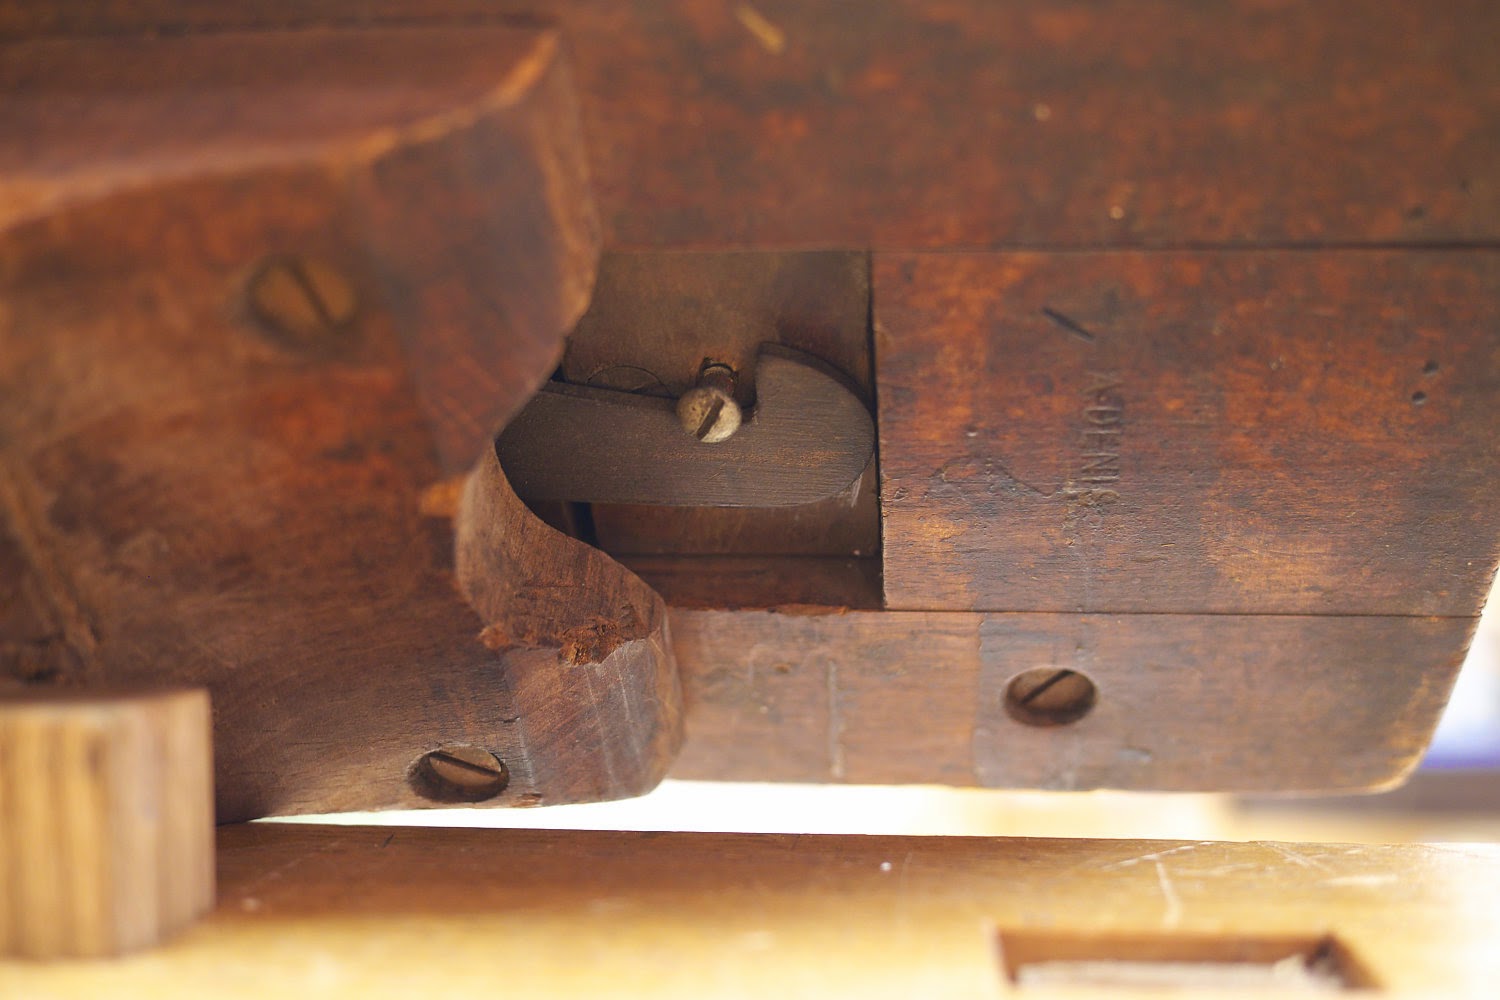
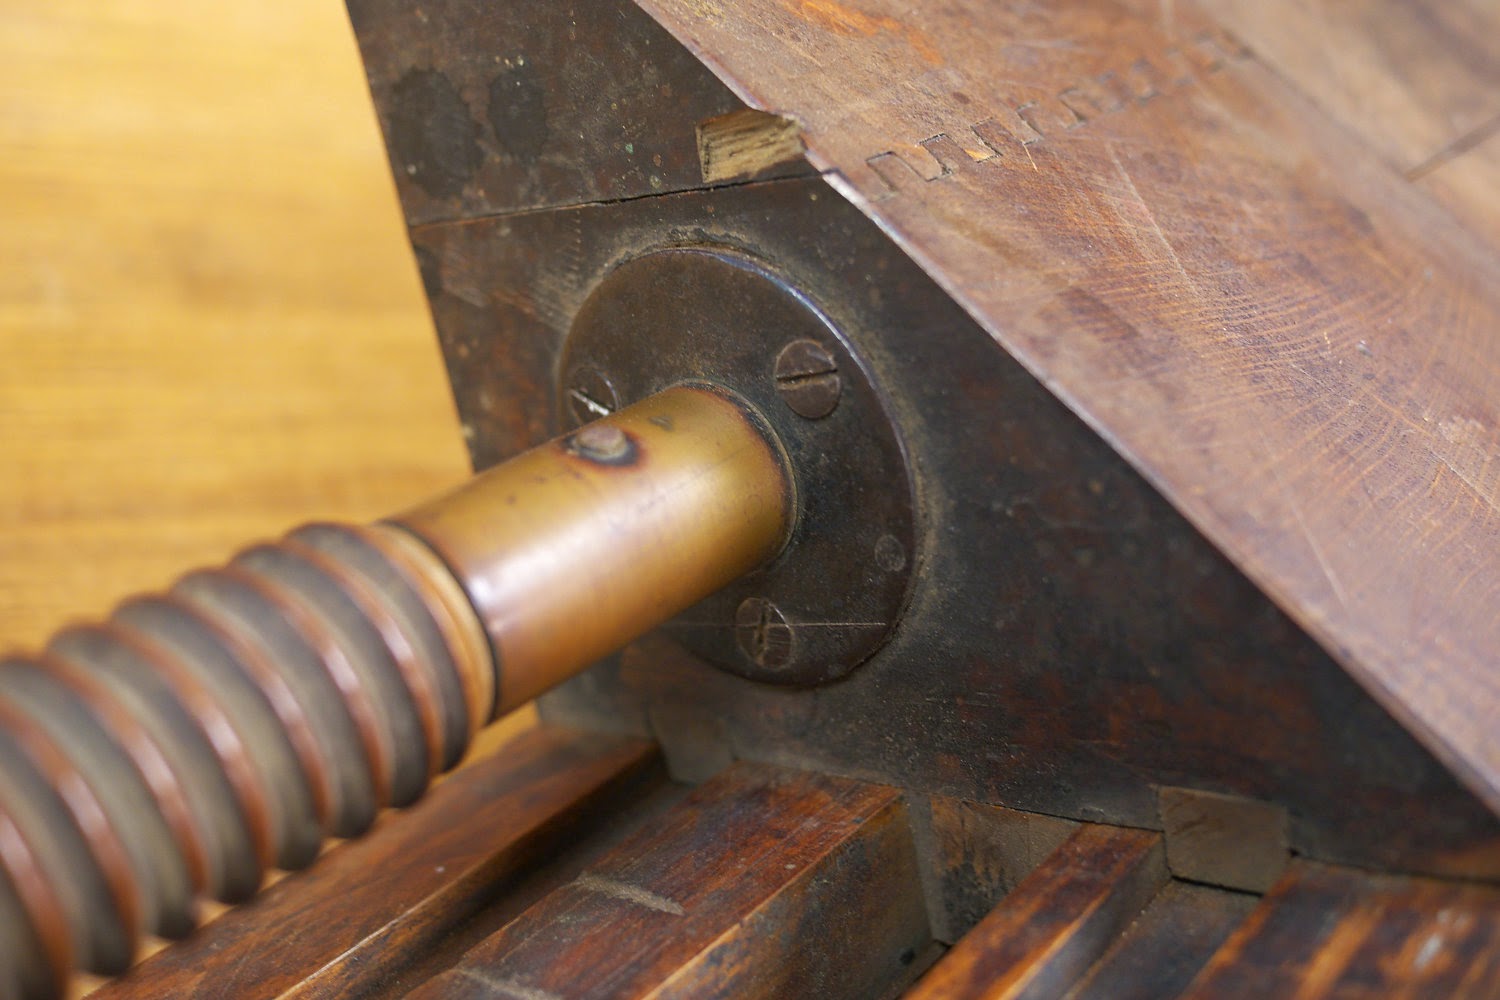
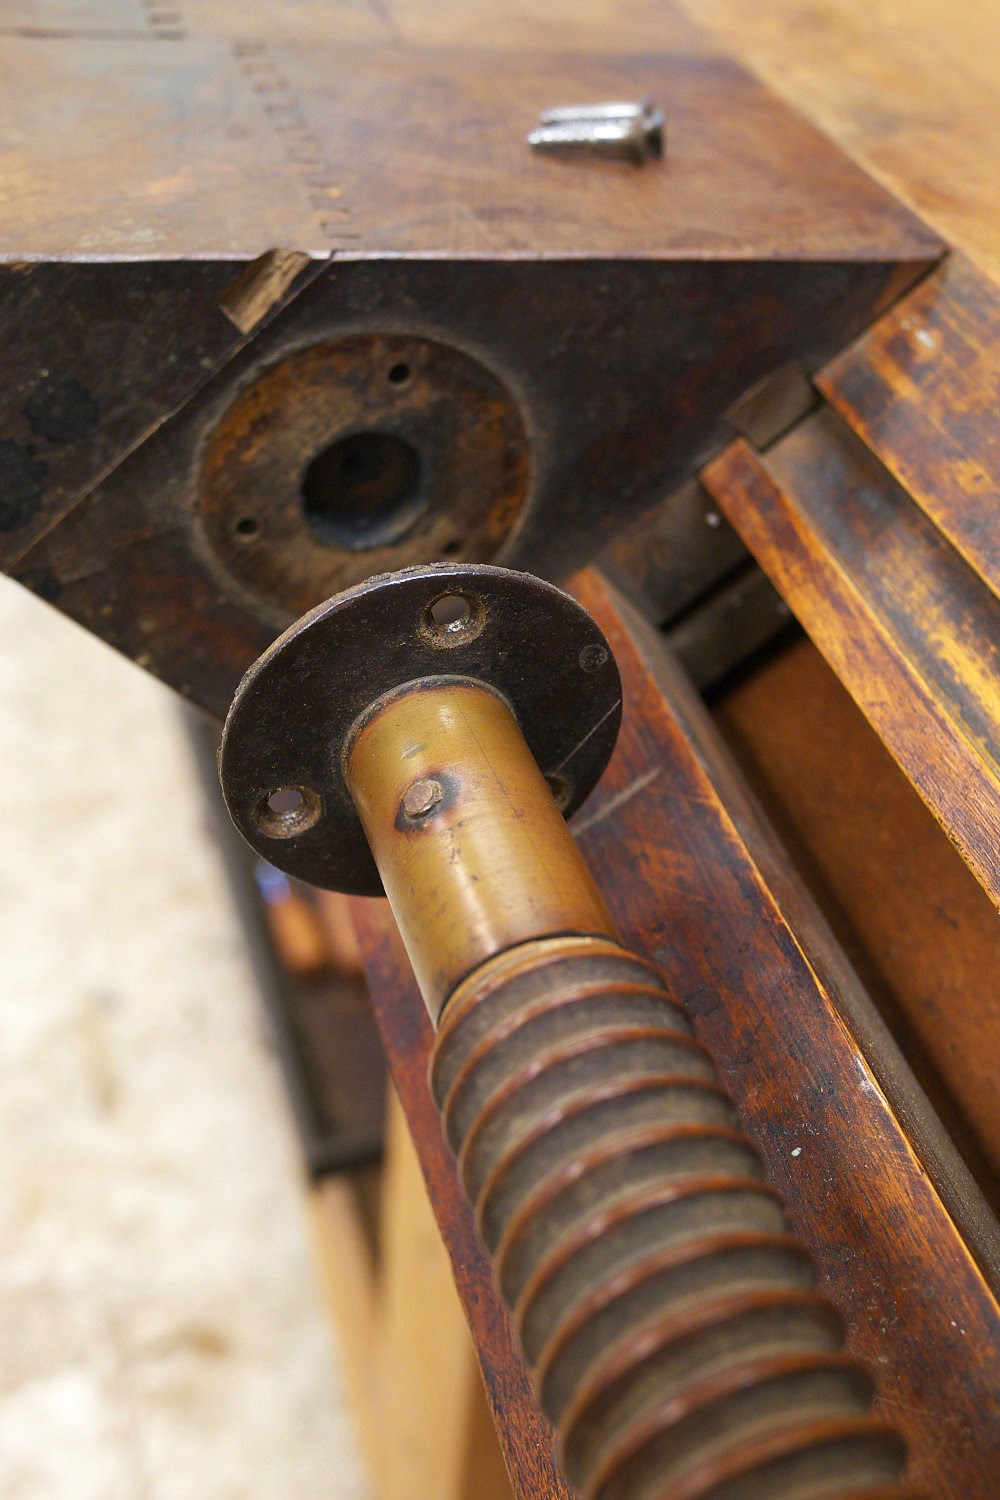
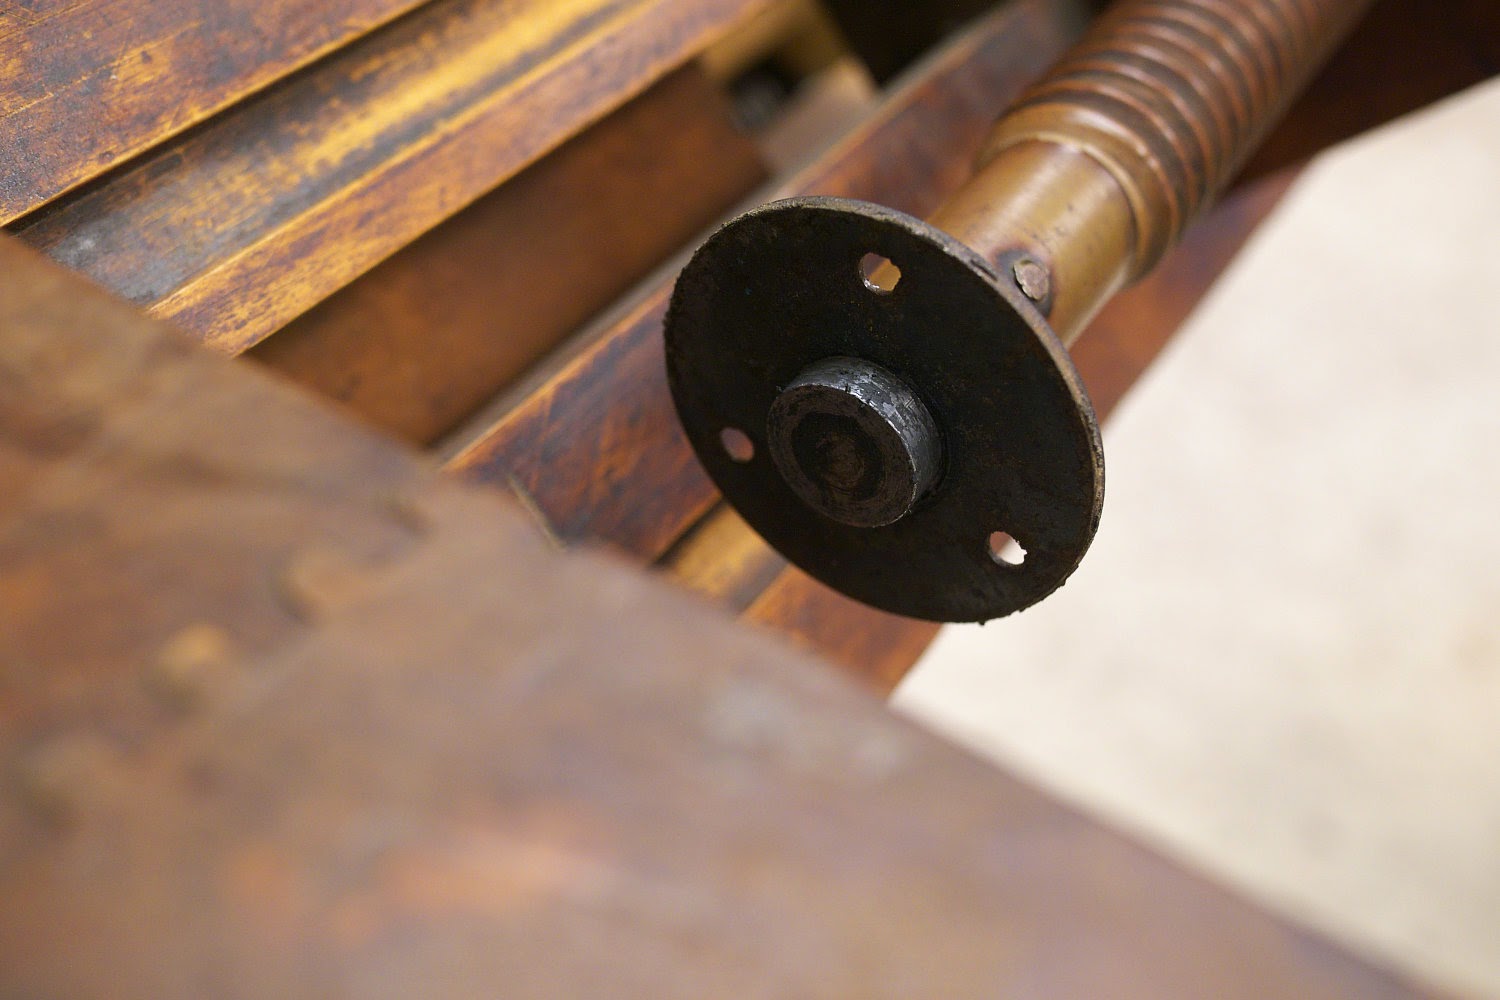
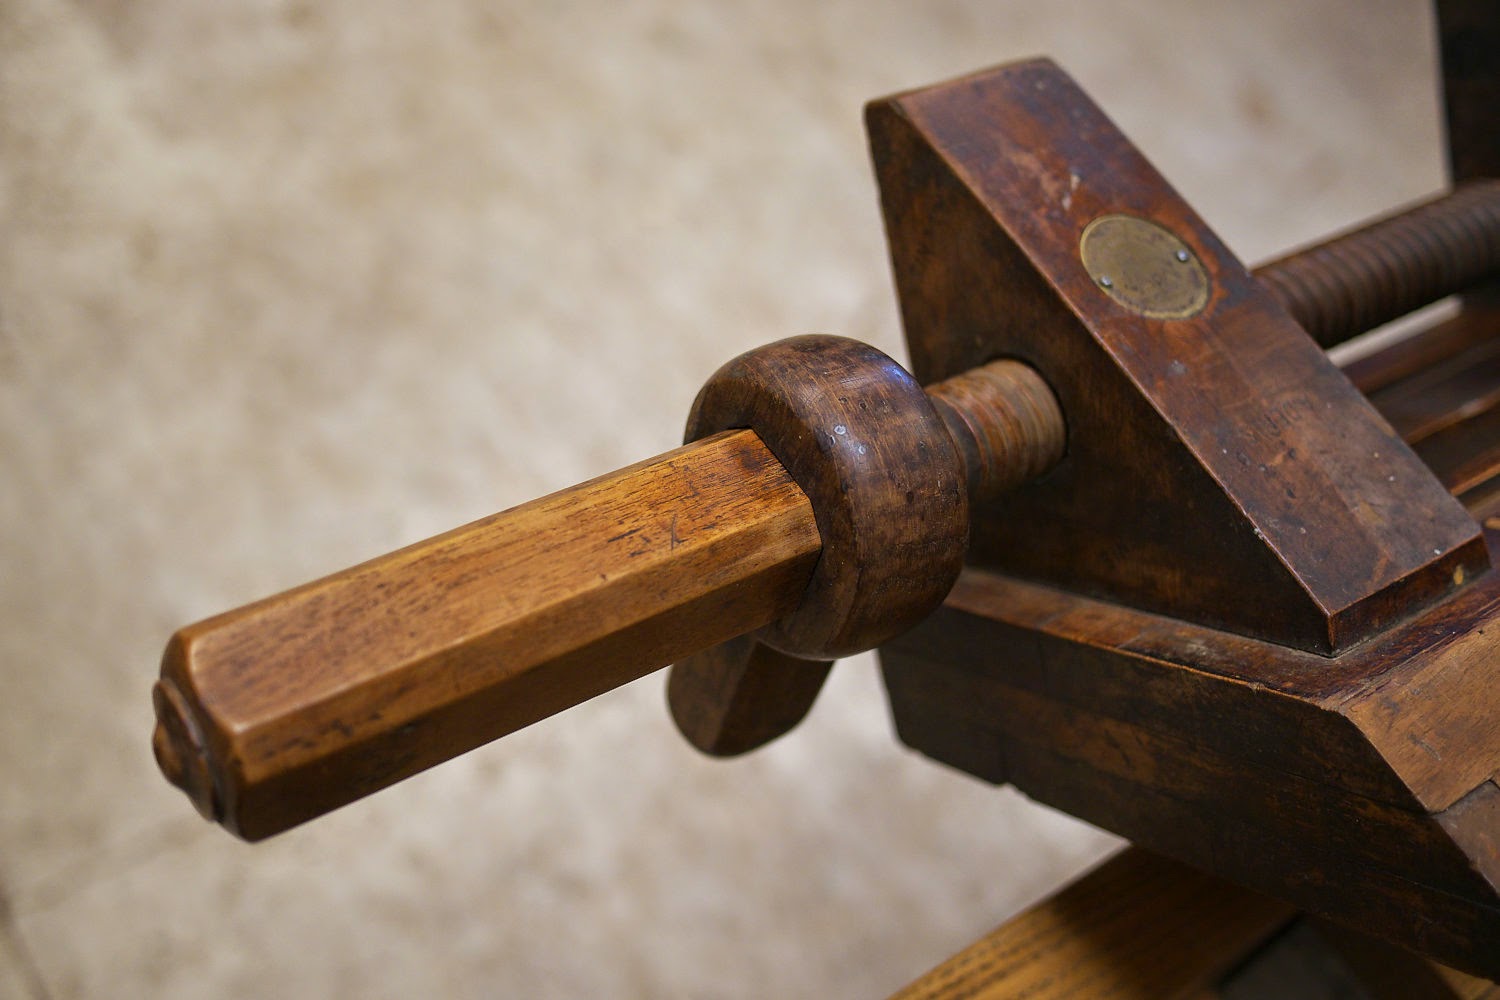
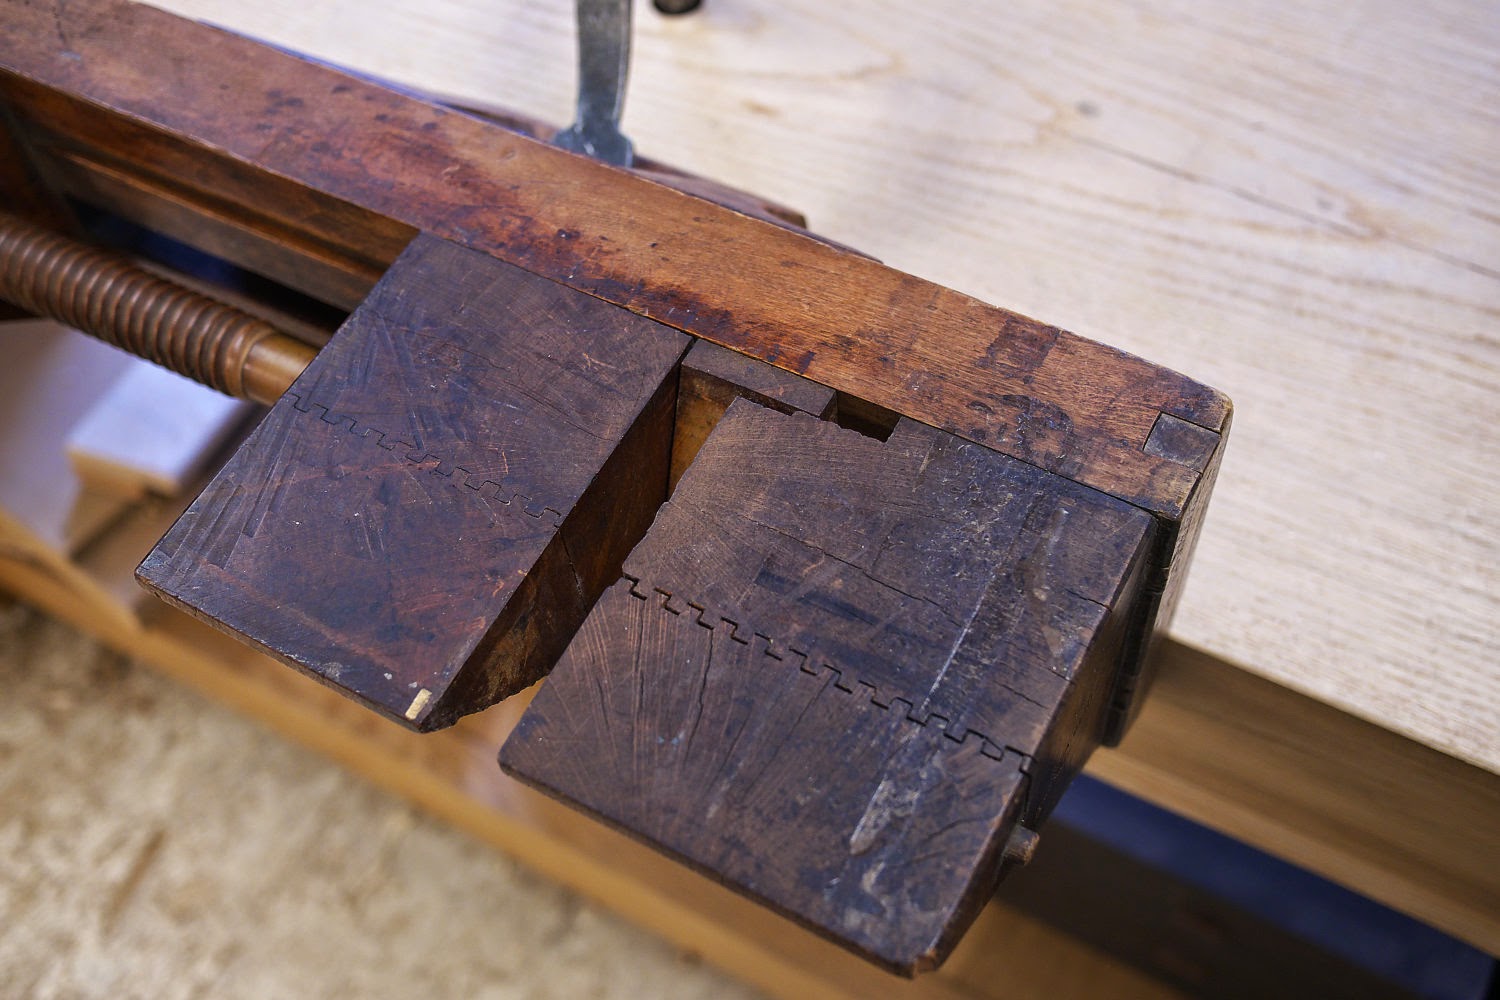
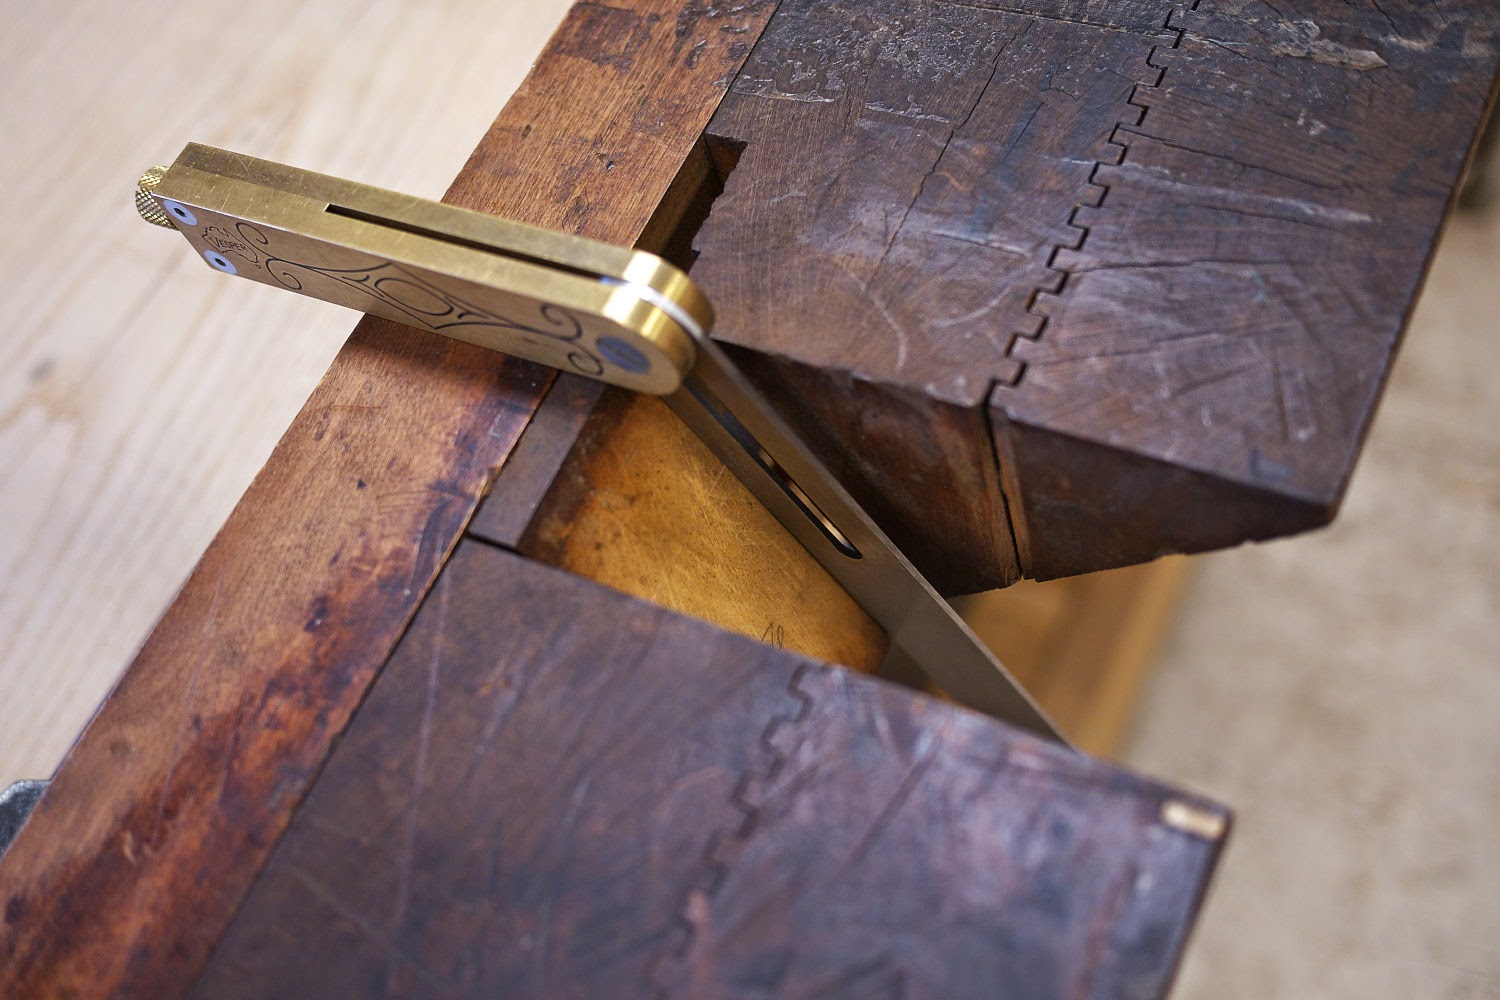
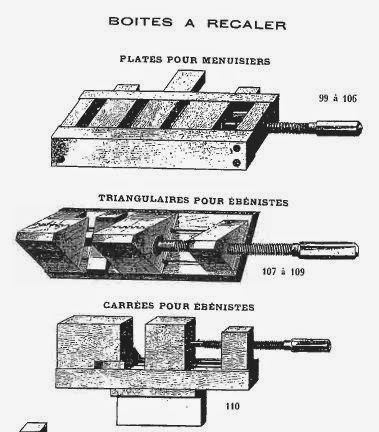
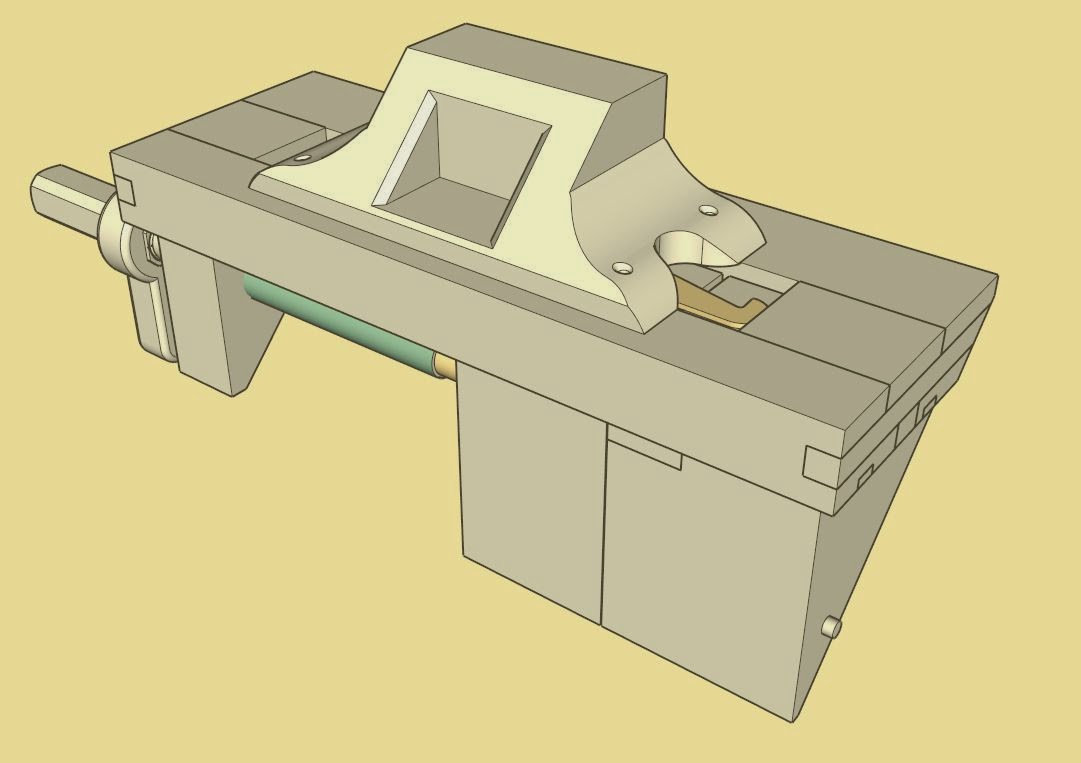
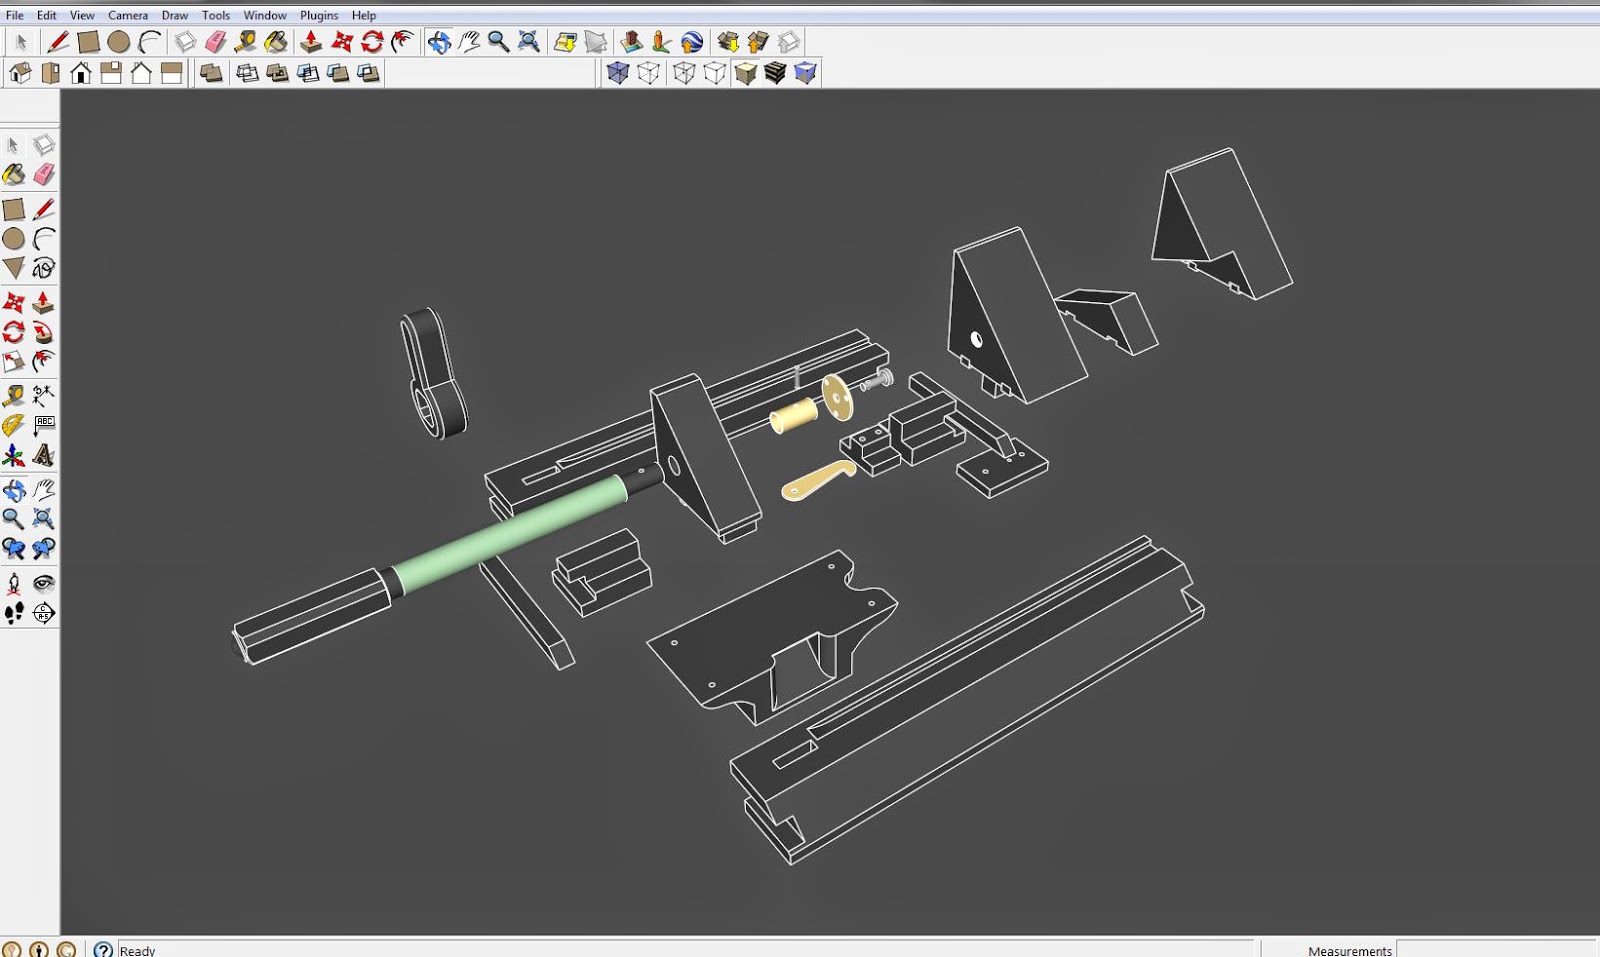
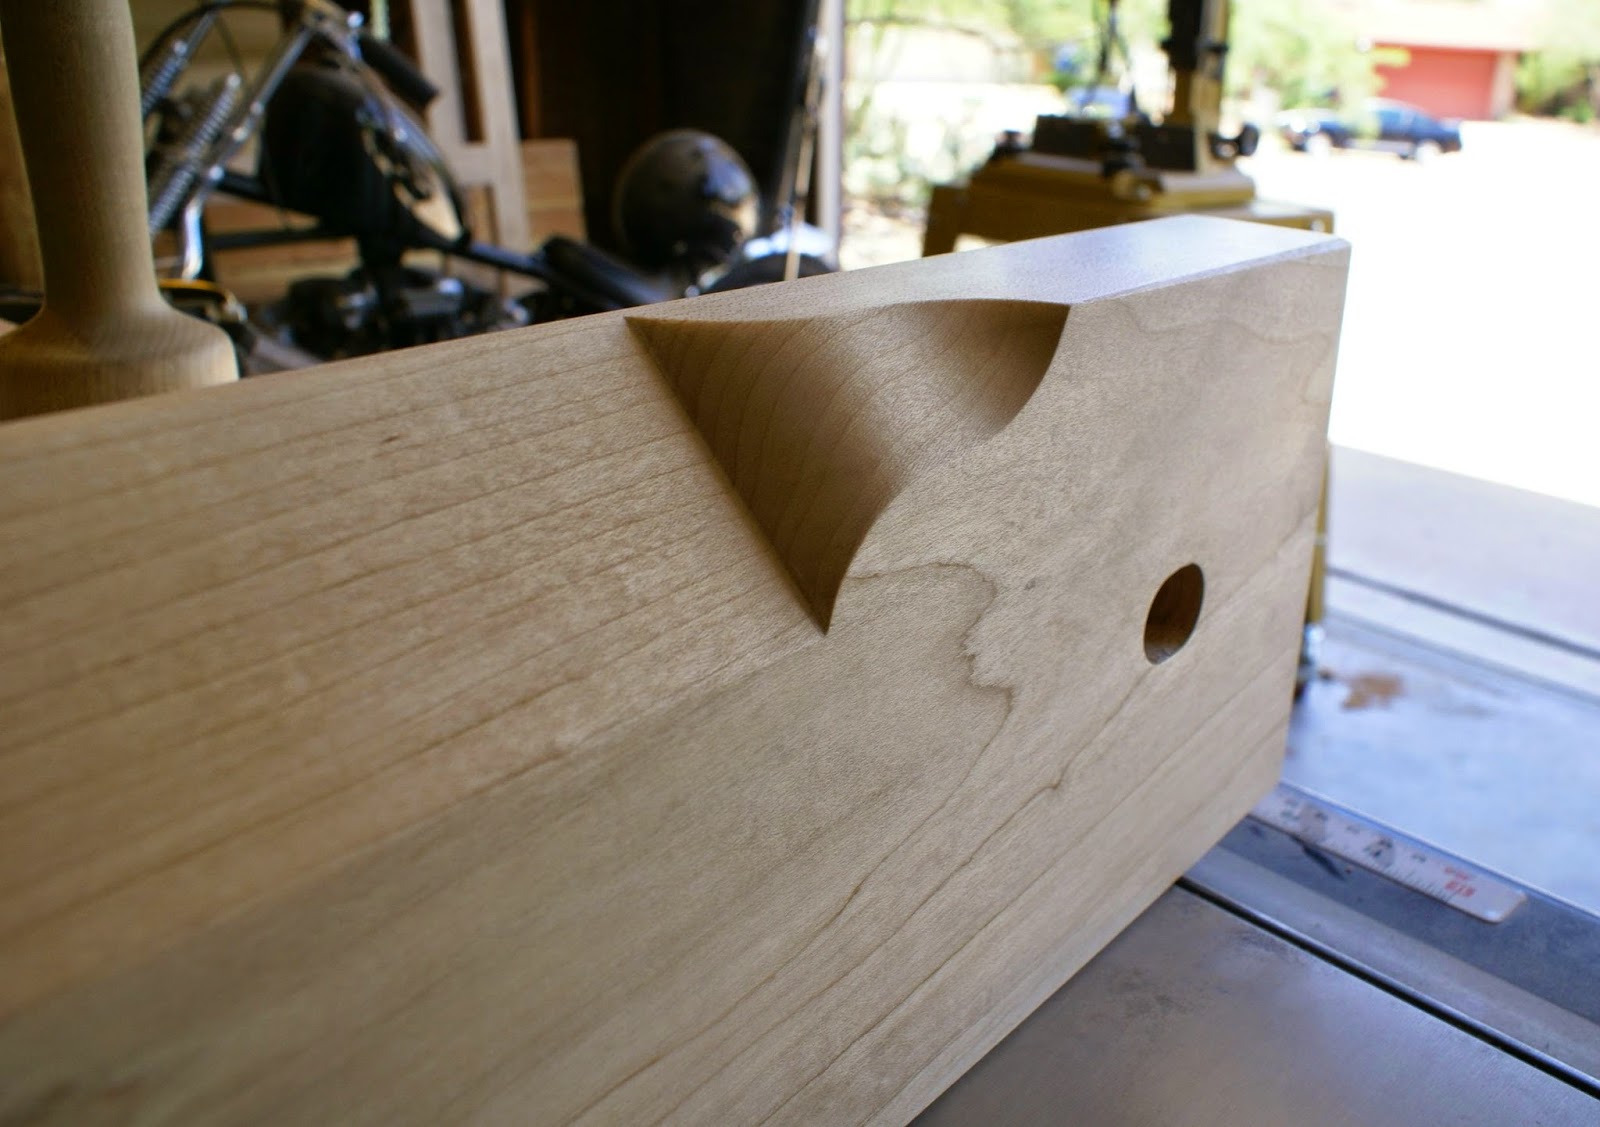
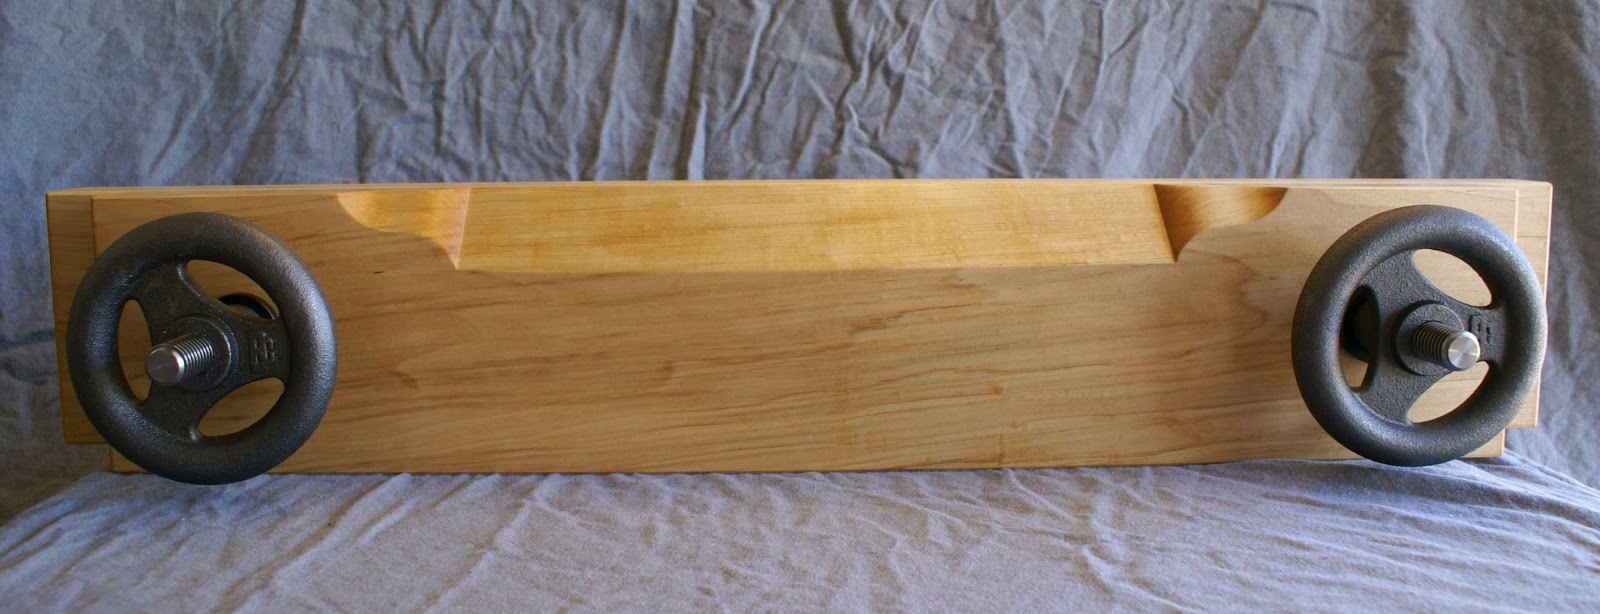
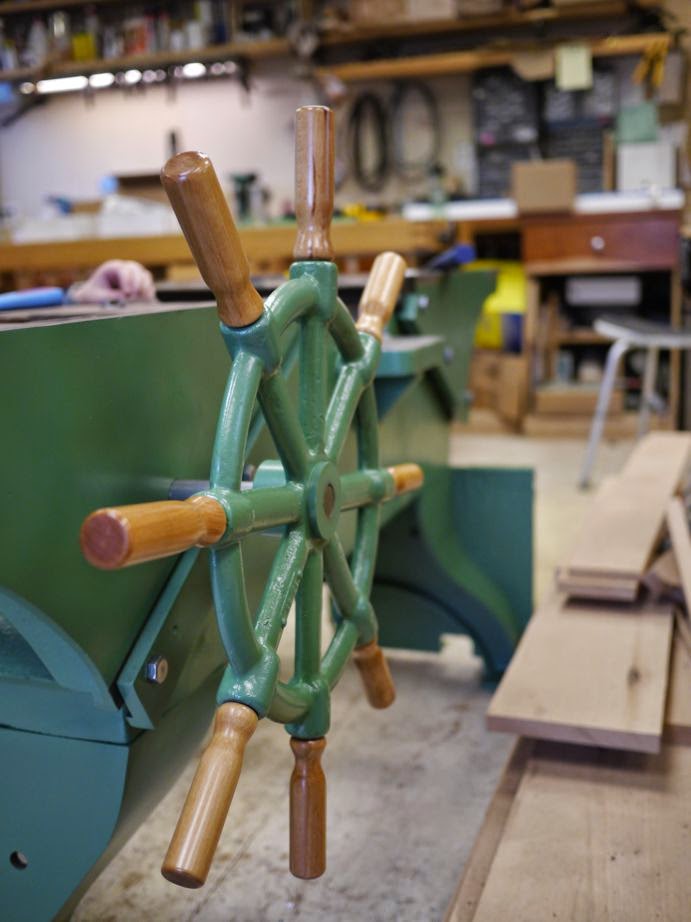
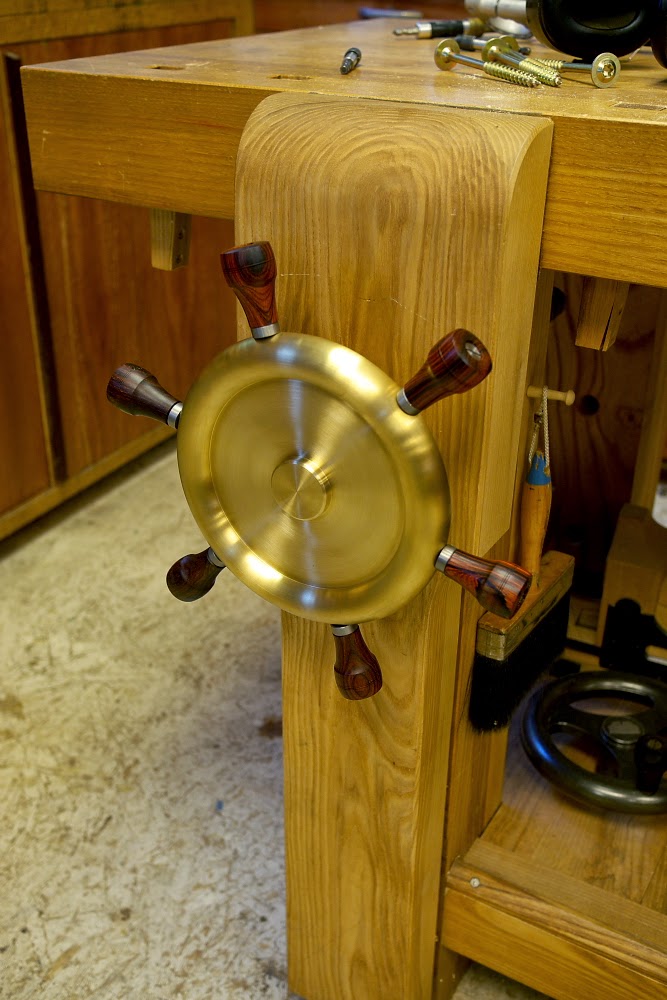
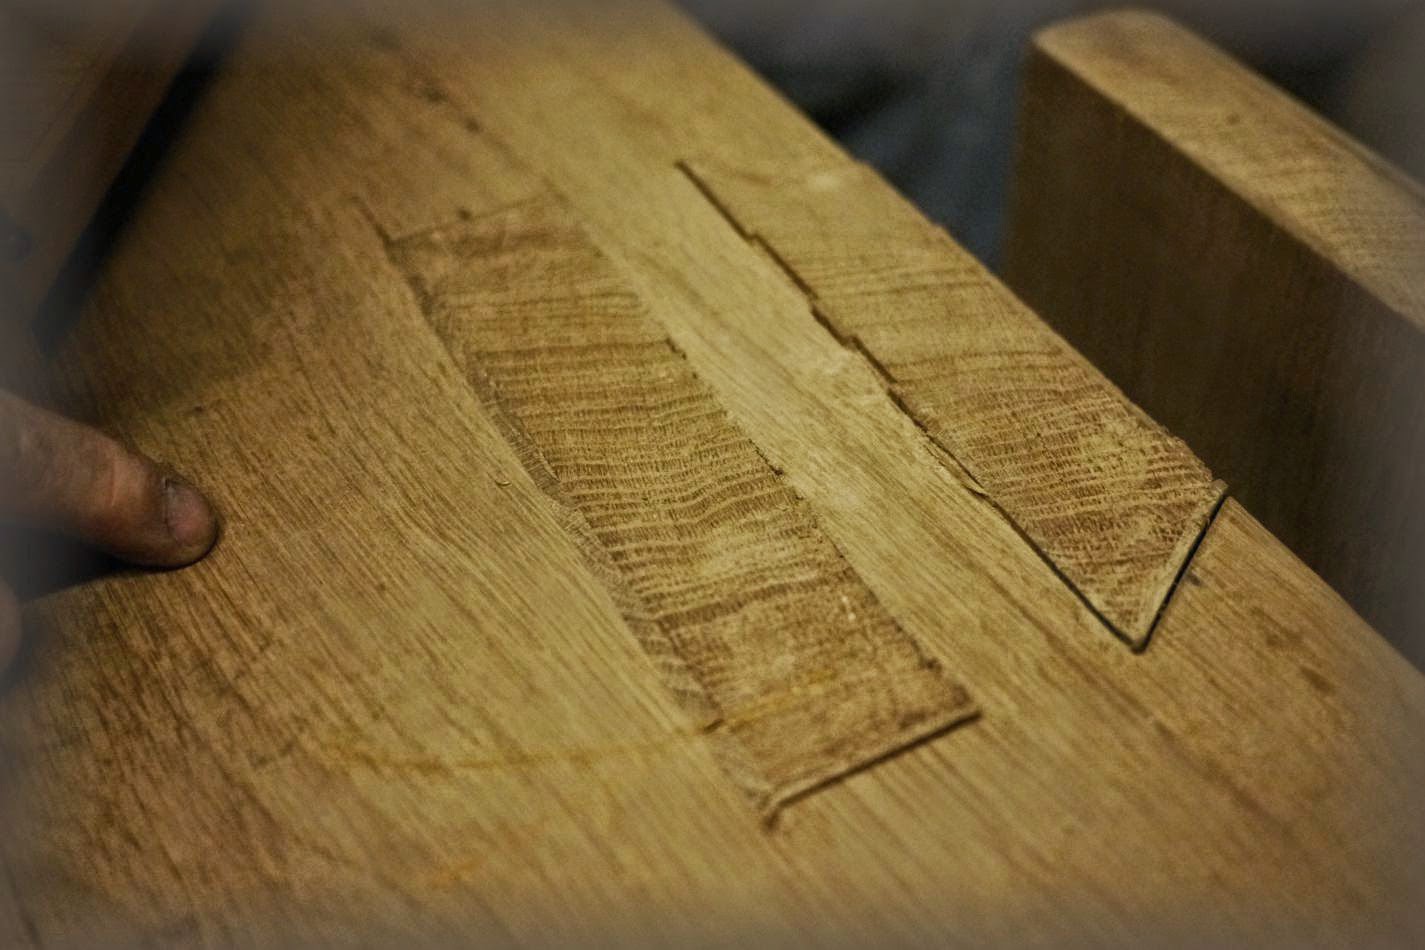
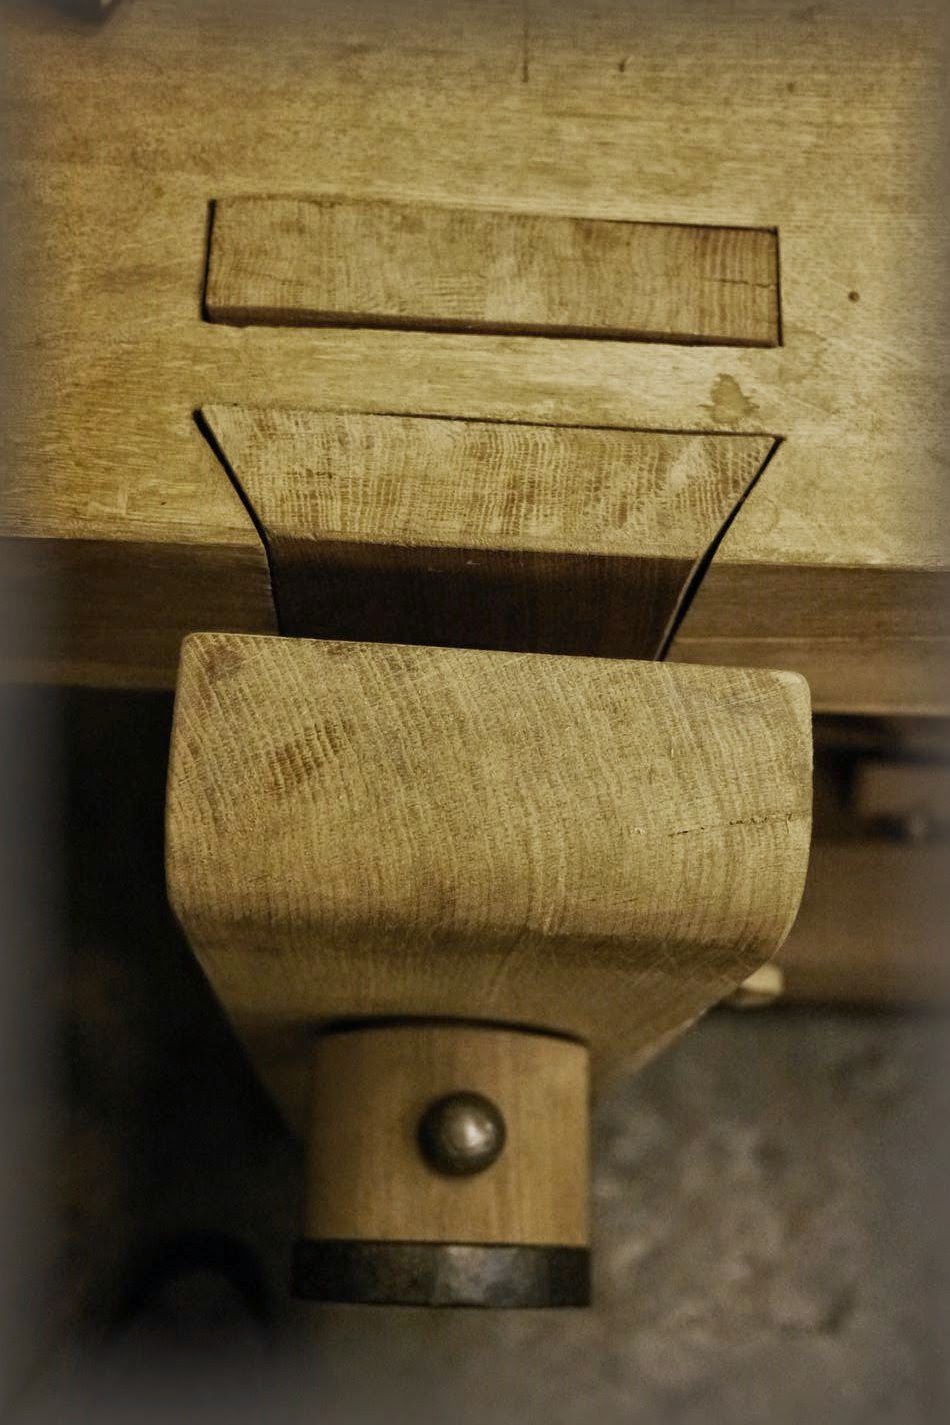
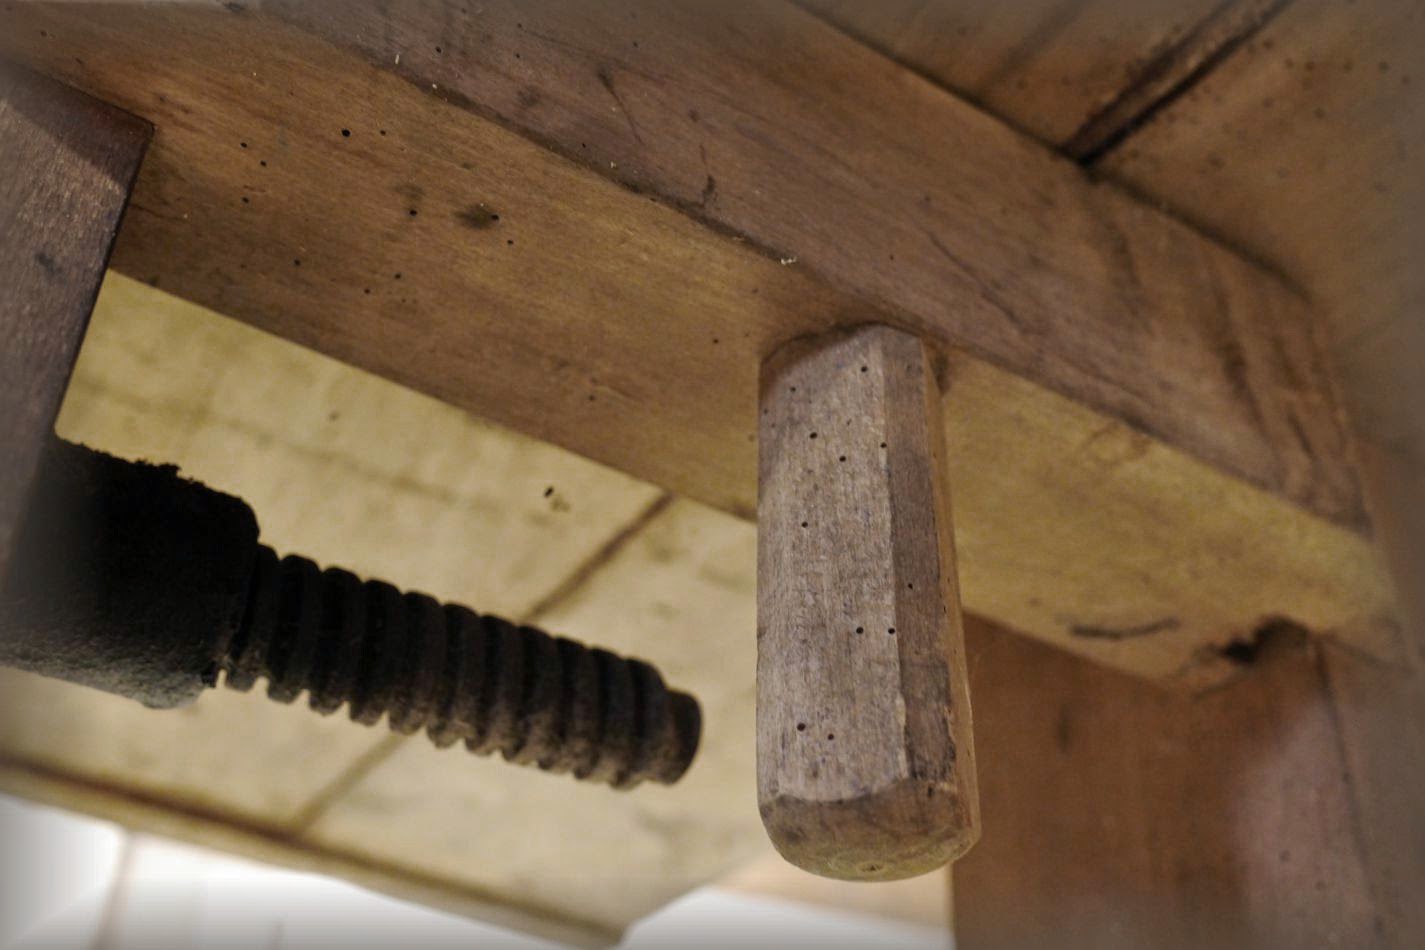
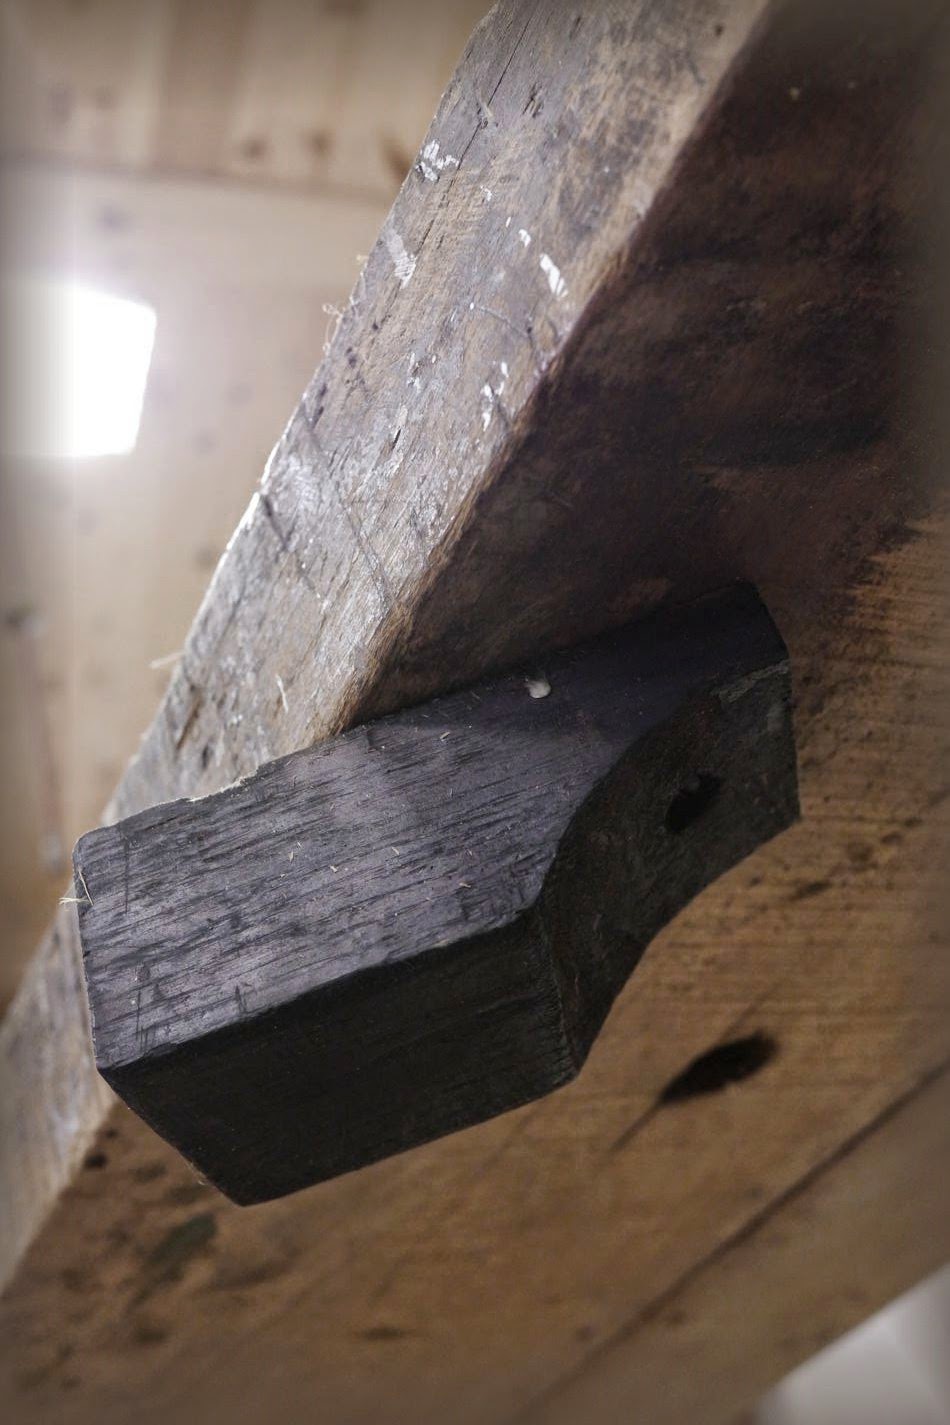
What was particularly satisfying to discover was the top attachment method. This protuberance has show up in many engravings and catalog images, but until now, we didn't know for sure what it was. As speculated, its a threaded handle for locking the top to the upper rails.


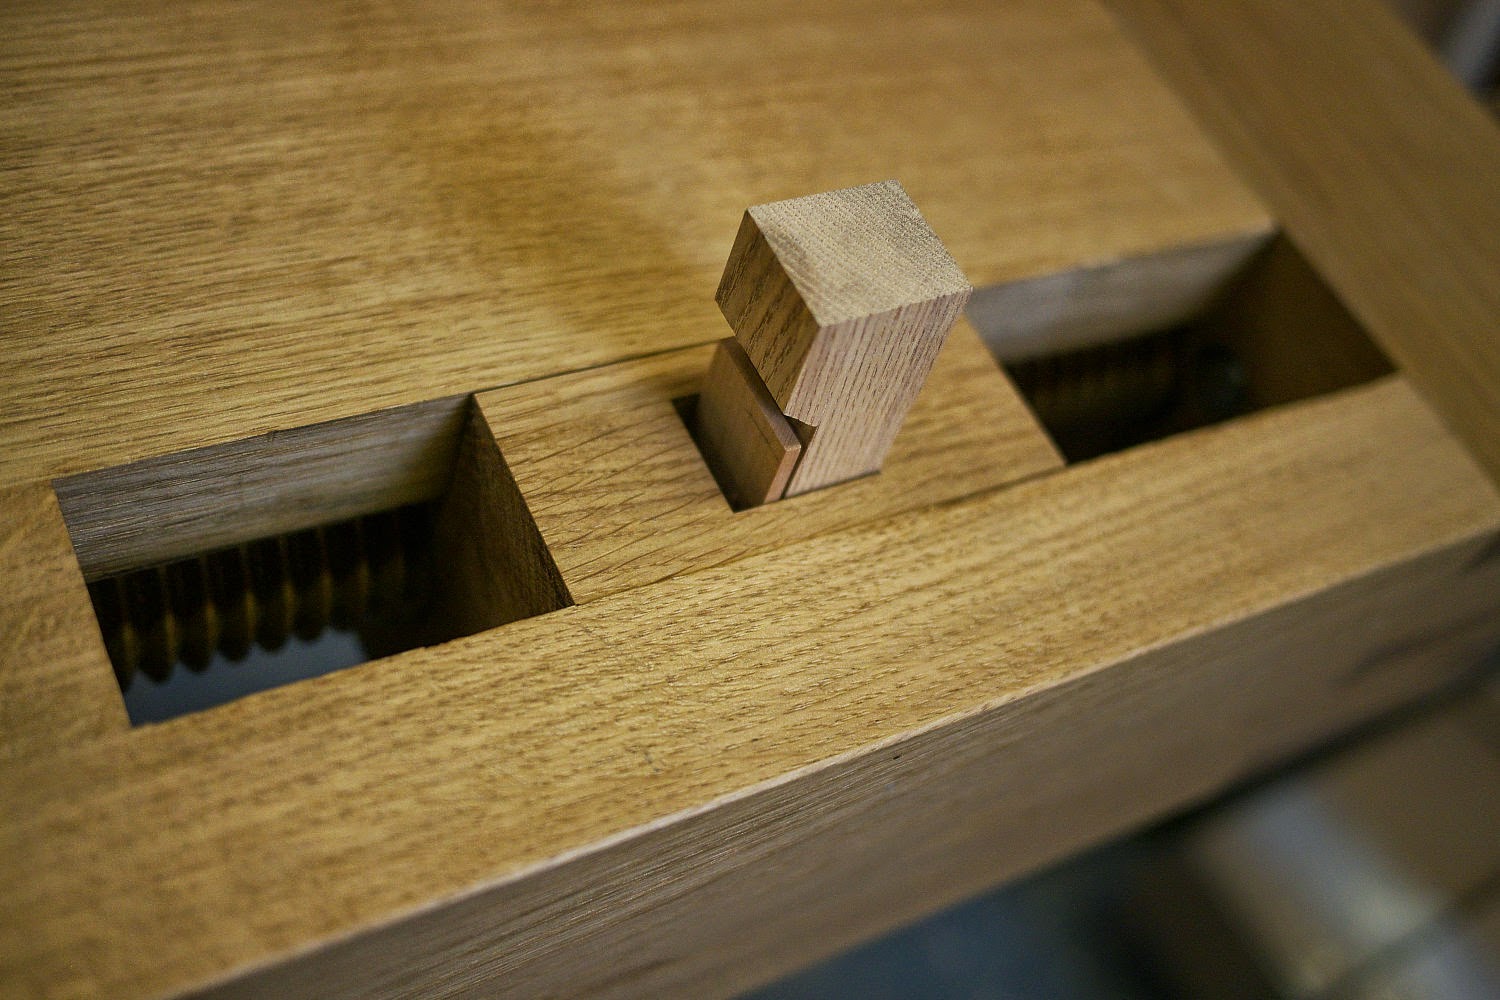
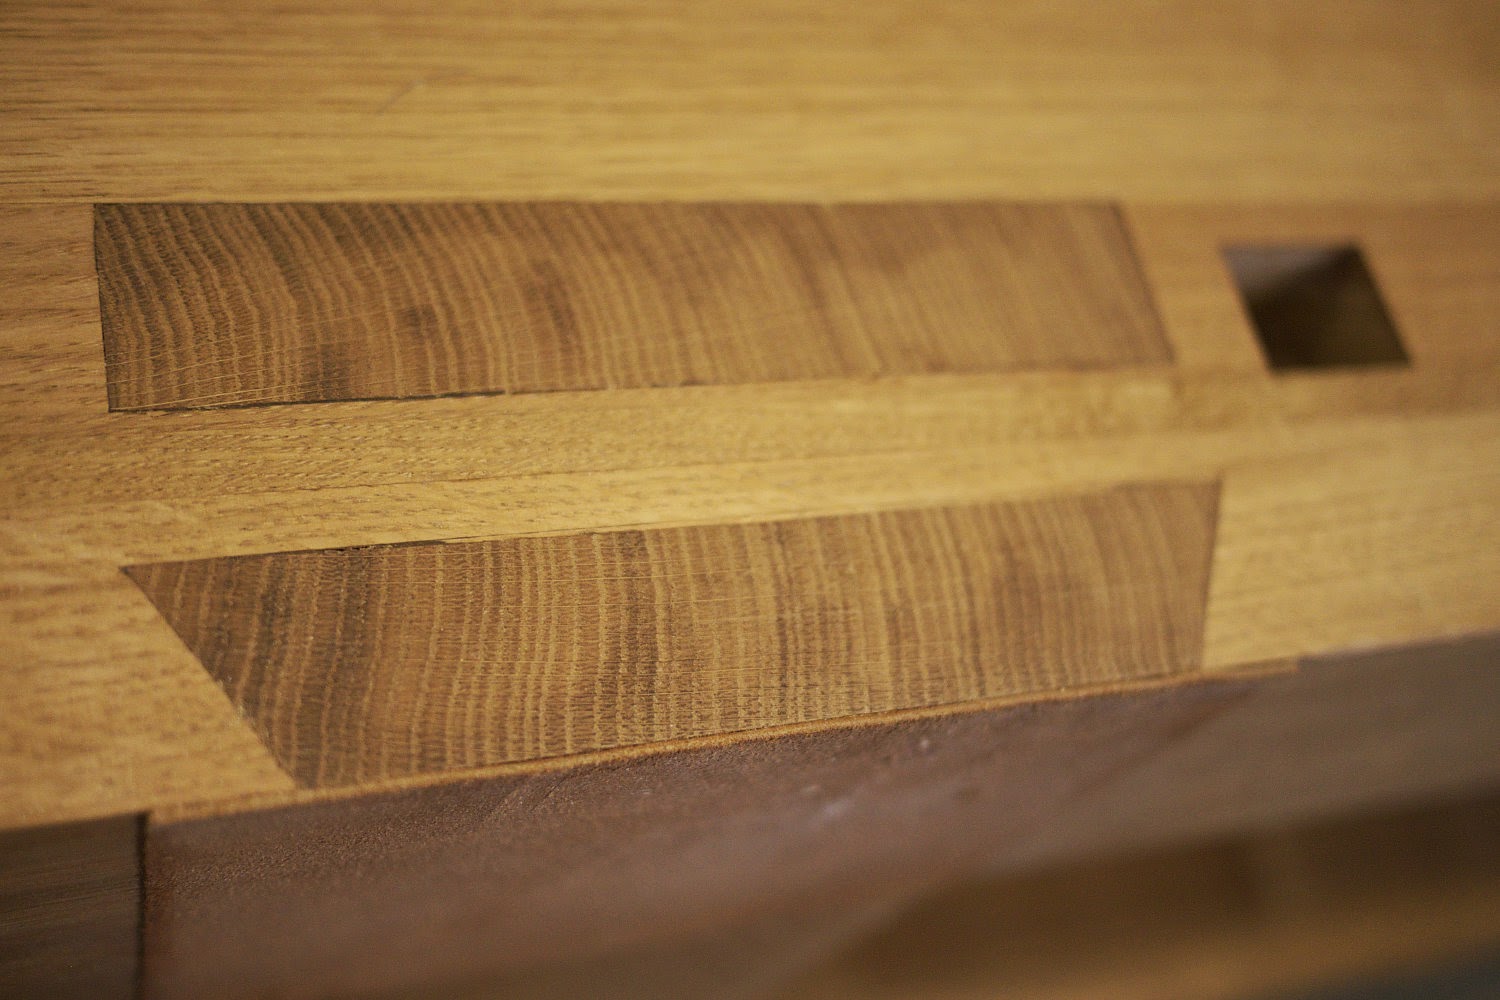
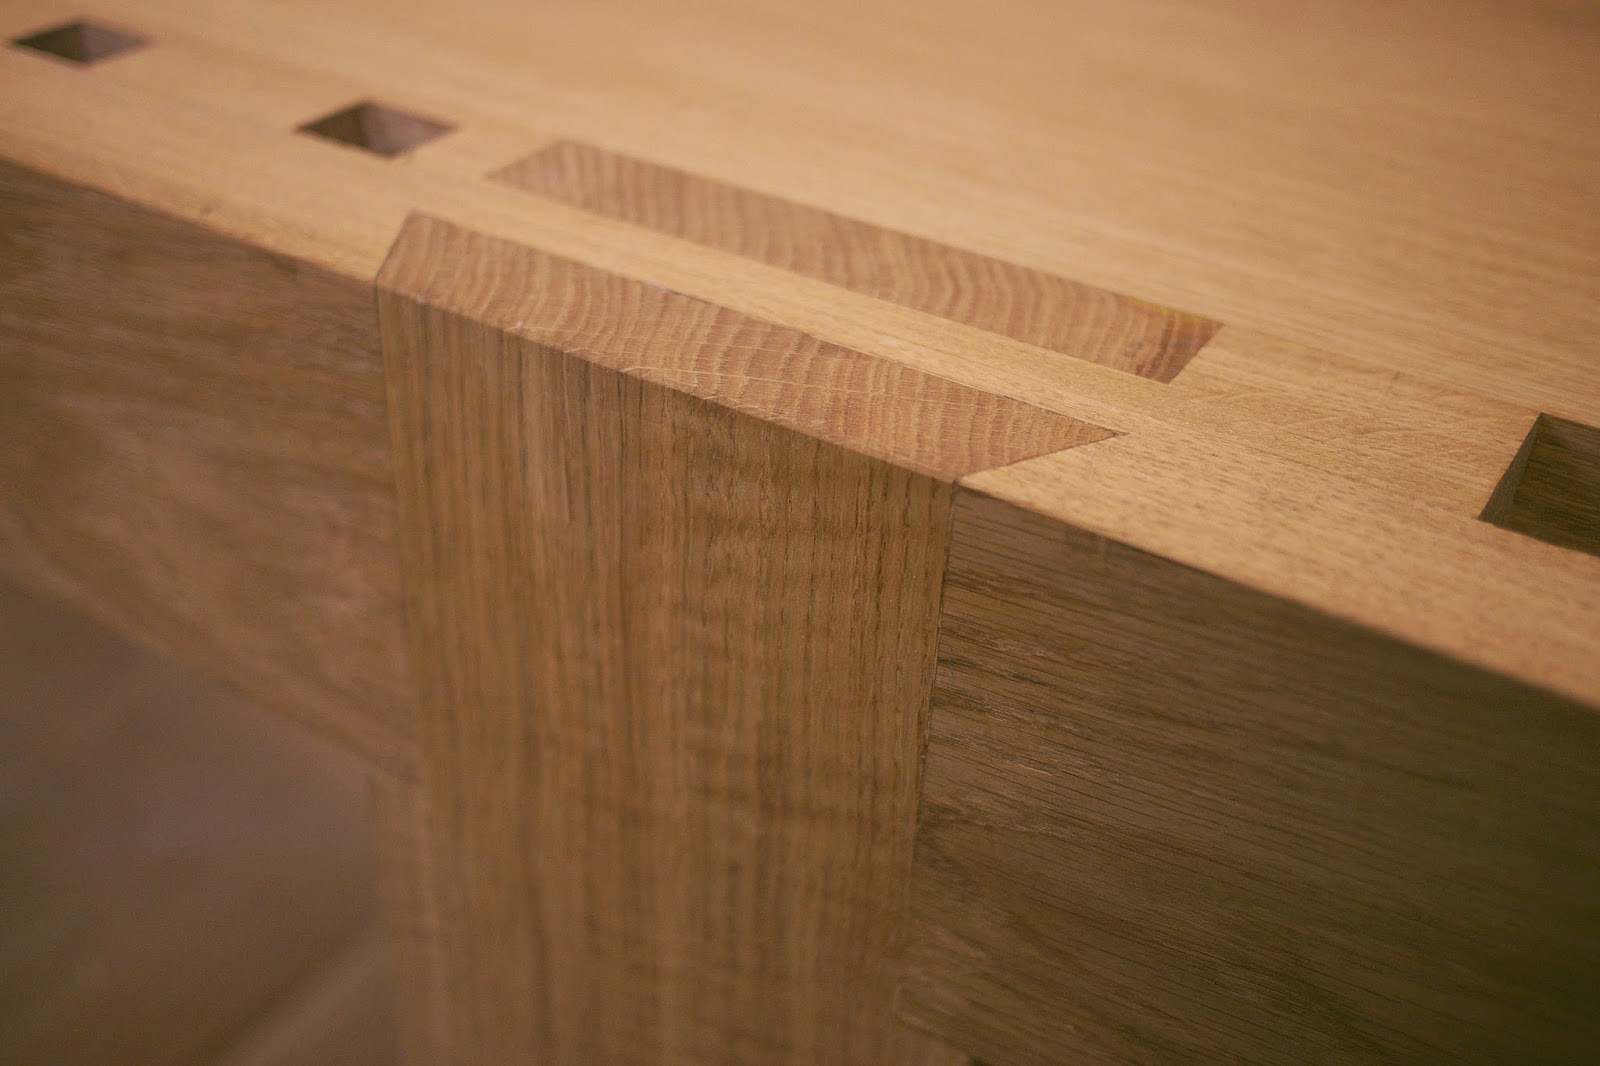
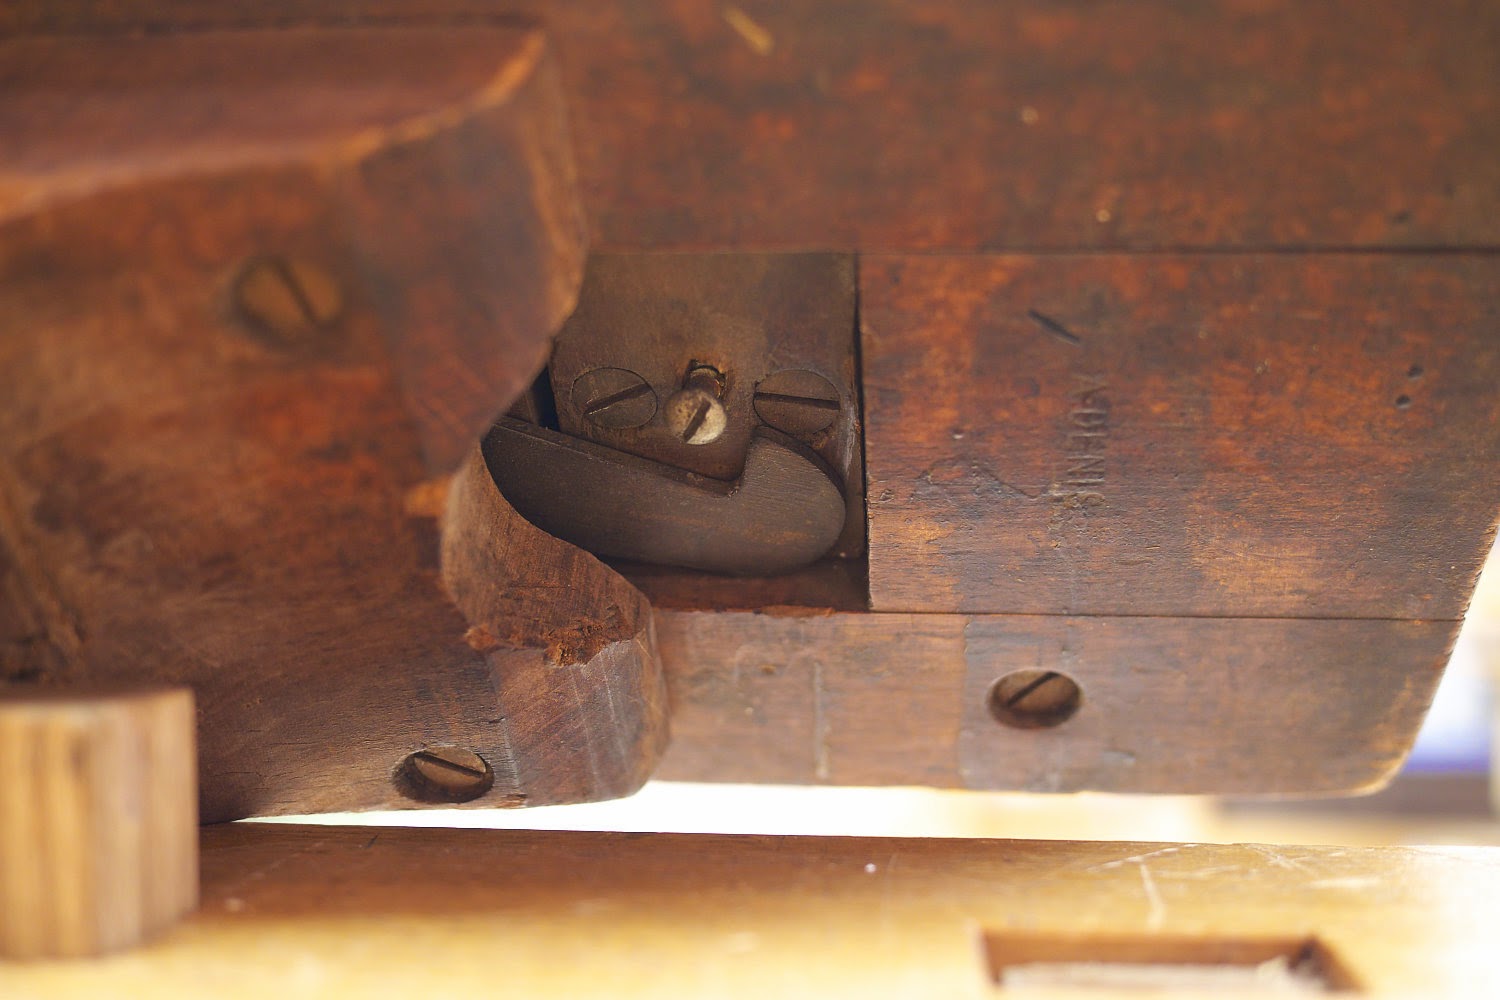
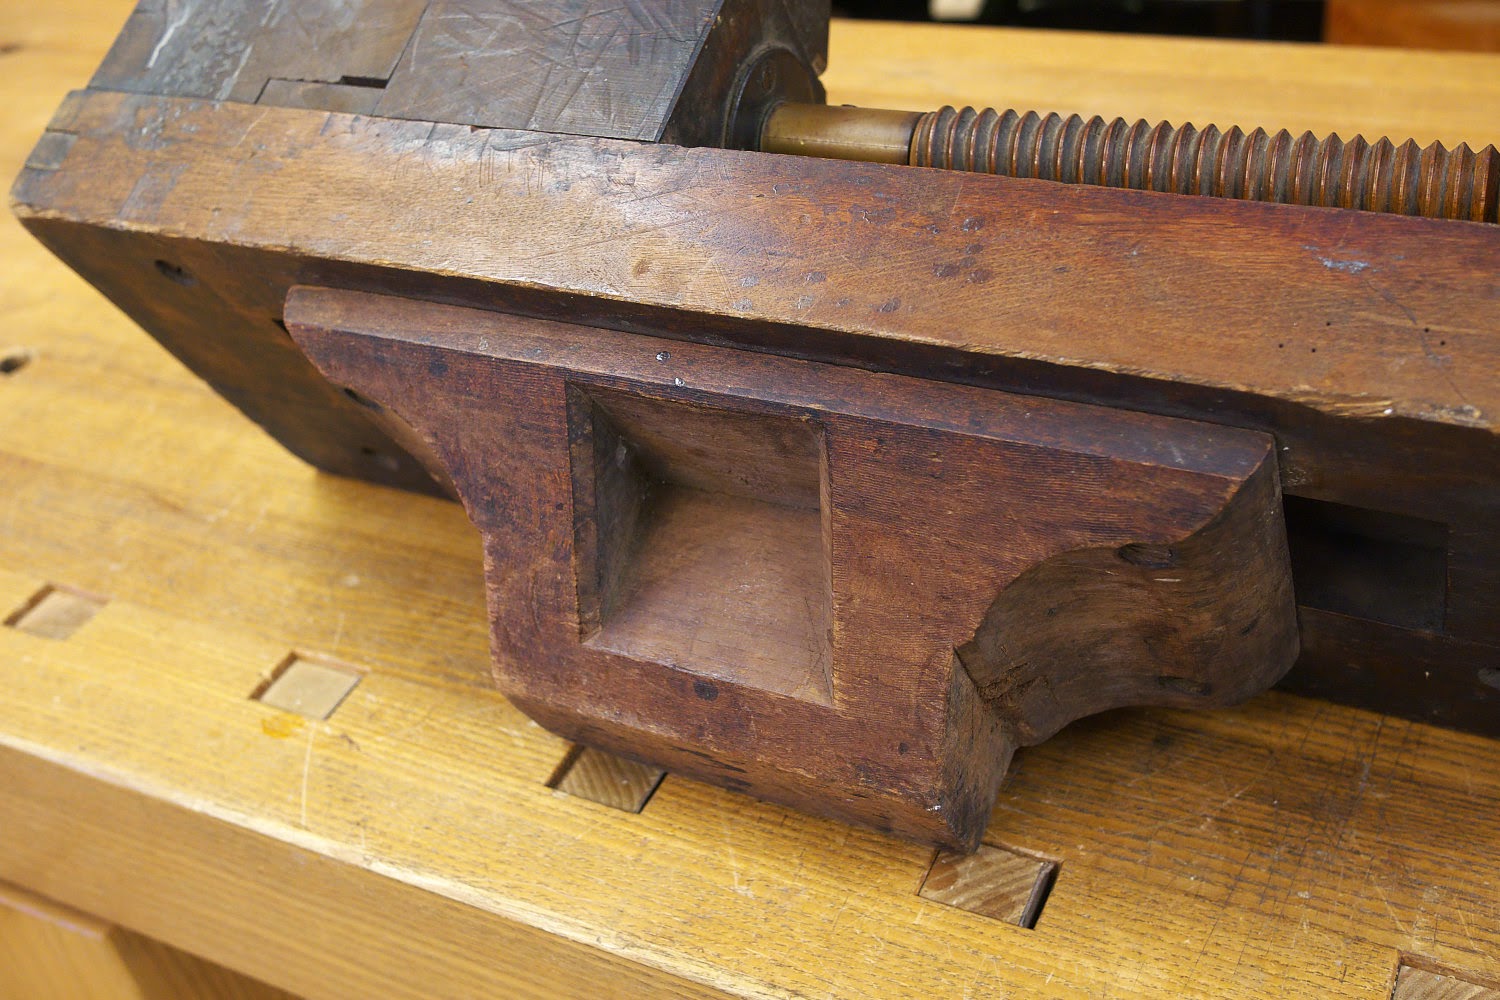
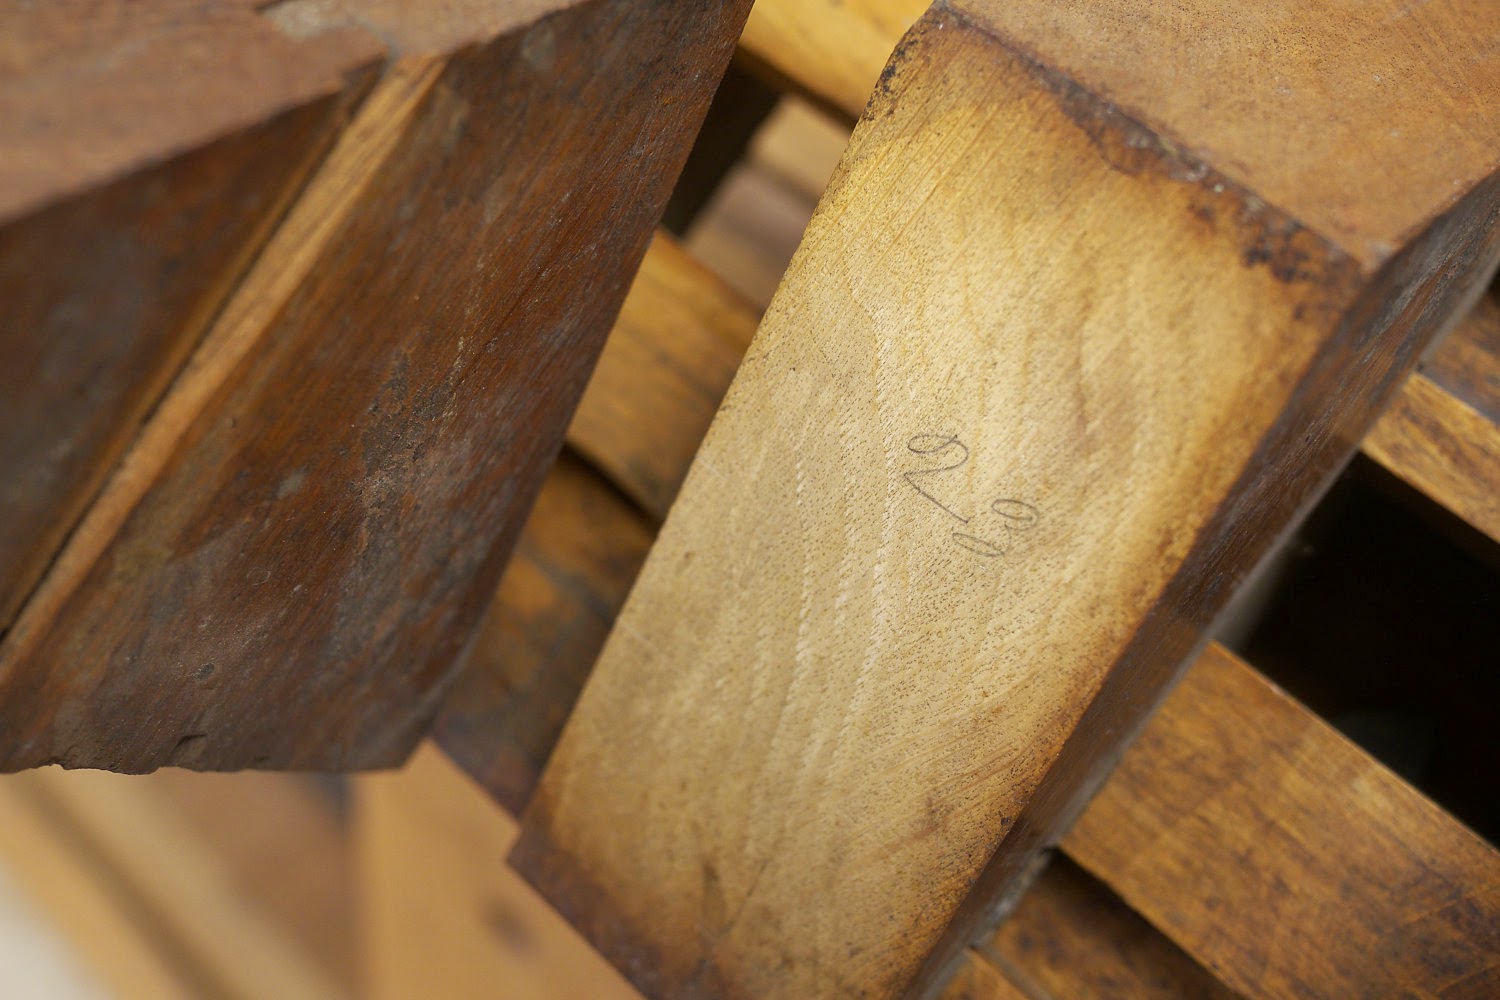
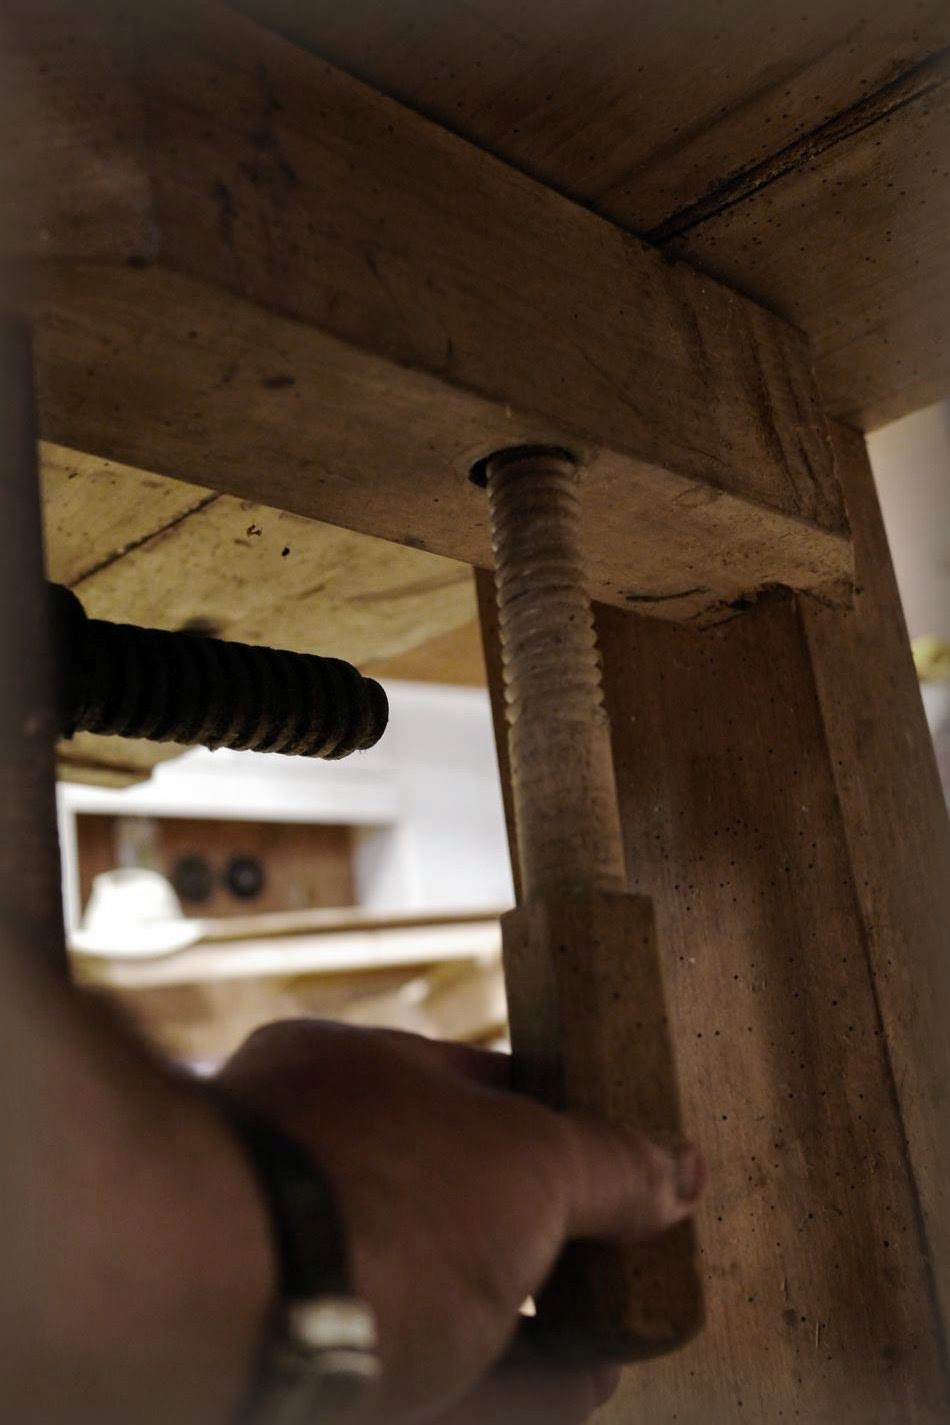
Note in particular the joinery of the upper rail where it joins to the inside of the legs. There's a double tenon where the outer tenon laps onto the side of the leg, and is beveled to a knife edge at the end grain. The inner tenon engages a mortise in the leg and is cut short to keep the top of the leg from blowing out. The shoulders are overcut, perhaps to let the top move. The gap between the rail and top was not huge, maybe just an 1/8" or so. This offset rail is to allow the leg vise screw to pass by the threaded handle. The rail on the opposite end of the bench is more centered on the legs.


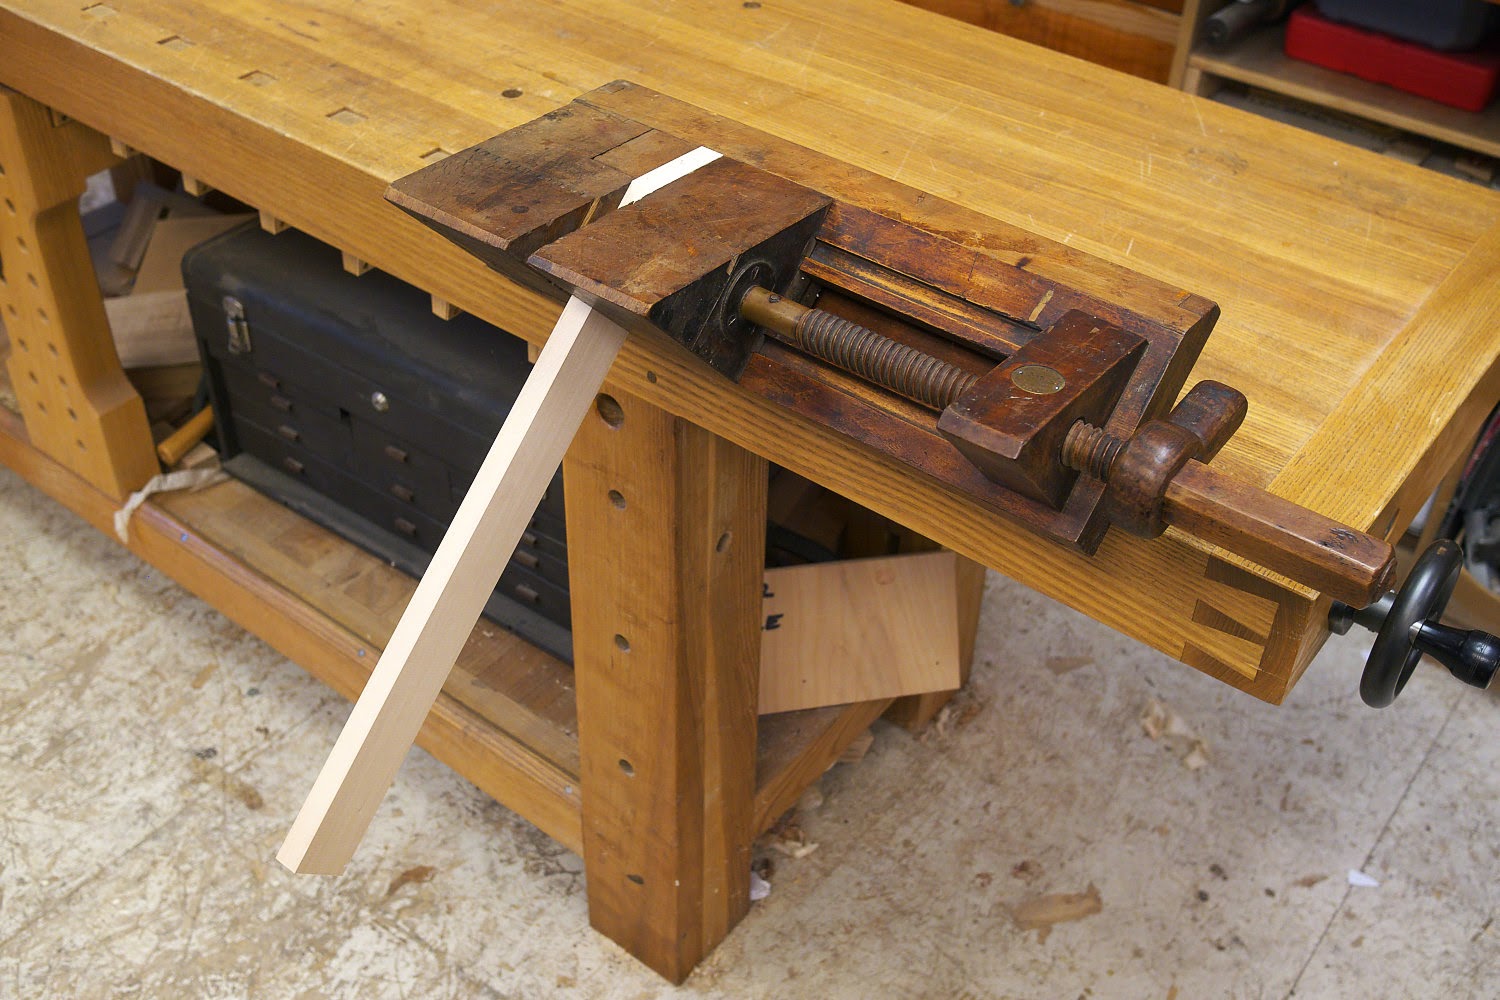
If you've ever wondered how strong a leg vise is, wonder no more. A heavy nail was being used as a parallel guide pin, and someone closed the vise to the point where the nail was folded around the guide. Feron manufactured St. Peter's Crosses, so this bench must have been a lower priced model. We couldn't find this exact bench model in the La Forge Royale Catalog.


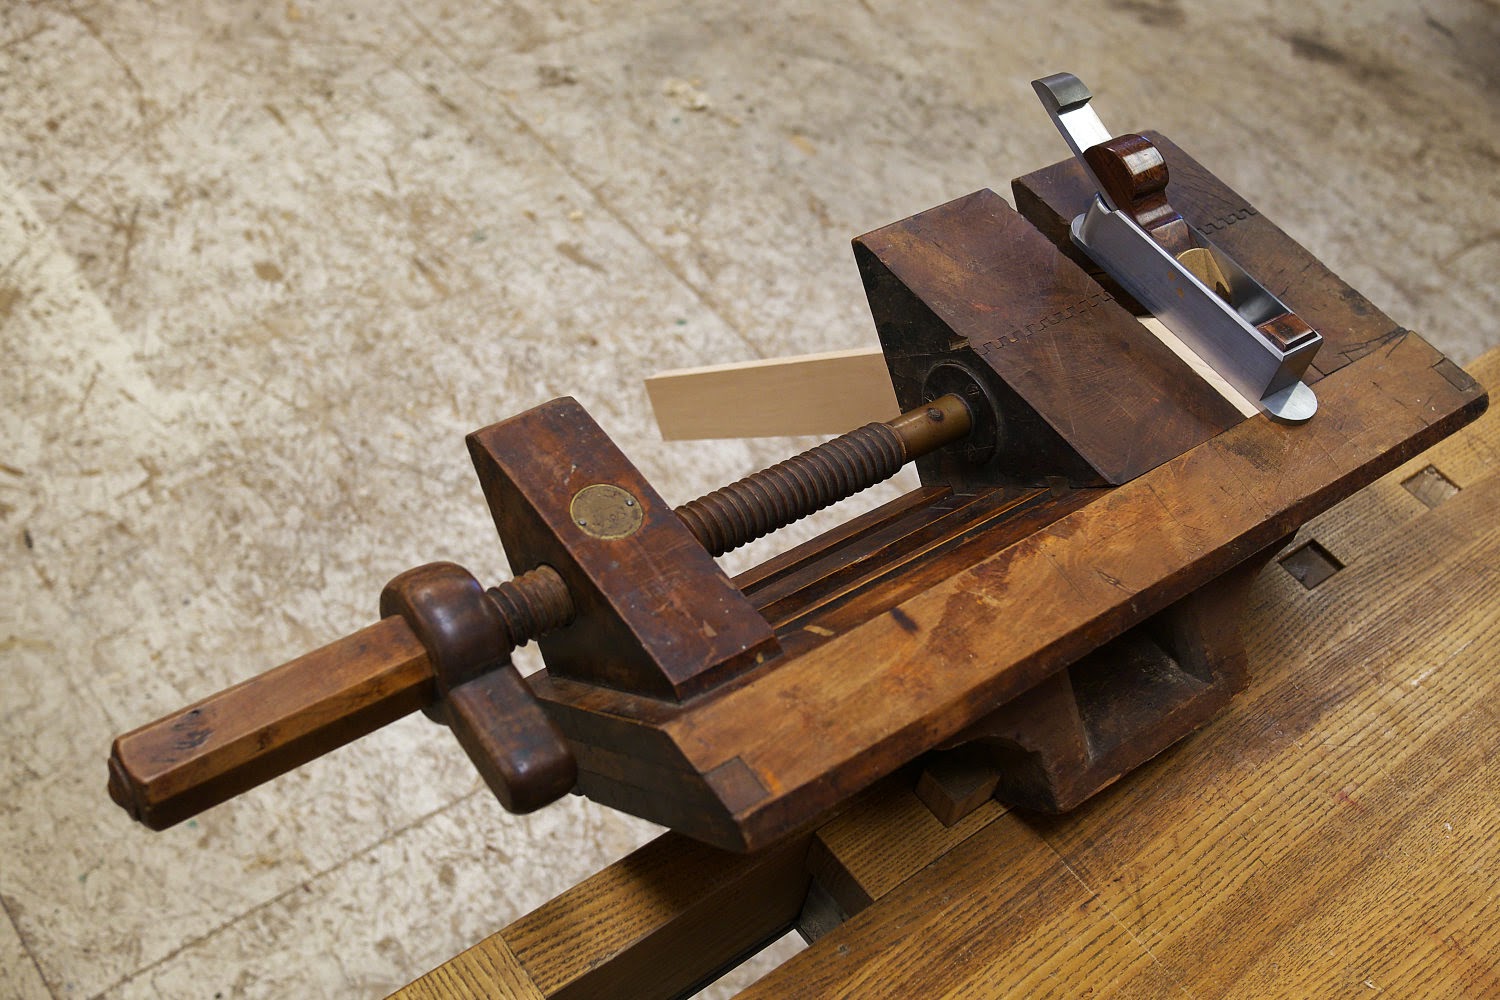
The leg vise hardware was very similar to our Classic Leg Vise, save for a split, square garter that pulled the chop out when opening the vise. This is less common than other arrangements.


The shelf was nailed from the bottom into a rabbet in the rails.


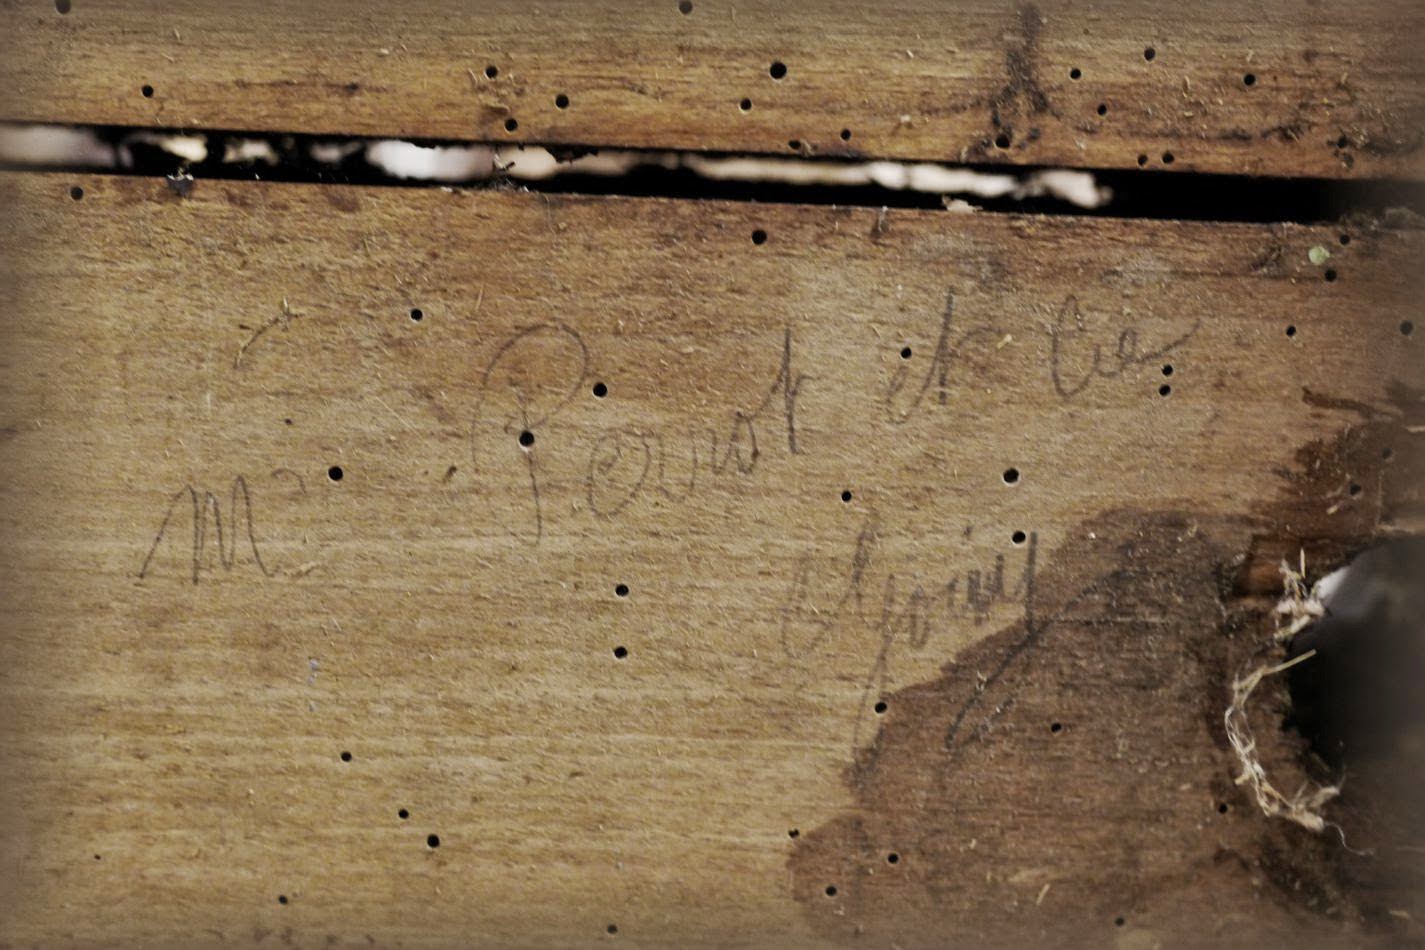
While the bench was on its back I found a signature: "Monsieur Perrot et Compagnie "


To see the whole La Forge Royale Workbench set, click here.

While in Georgia I also spent some time helping a friend work on his FORP bench, using decidedly less than massive slabs. But I'll let him tell you about that.


Northfield #2 Surfacer

$
0
0

The woodworking machinery room at McKinley Junior High was full of dull-green, heavy iron equipment, but what I remember most was the enormous planer. It must have stood what seemed to me, six feet tall, with its own coal-fired powerplant stoked by tiny, but robust men wearing nothing but loincloths, soaked in sweat and marinating in black grime. When Mr. Dickey fired it up I saw the dwarven men grasp the giant handles of the gear cogs and turn the works, first very slowly to overcome the inertia of the massive iron, then gradually increase until the beast was ready to consume. The floor shook, my chest quaked, and I wondered how many bad students the machine had eaten in the last 50 years. And when the board my father had sent me to school with that morning emerged smooth from the opposite side, I couldn't wait to see the machine run again.


Over the past month I've been working on my own green beast of a planer. A Northfield #2 single surfacer. This machine came out of the same high school vocational education program as the 12" Northfield Medium jointer that I restored a few years ago. That was a gem of a machine, and I miss using it. But it went to a good home. A group of friends helped move that machine into Chris Schwarz's Lost Art Press shop. It's almost as satisfying knowing Chris is using it as myself. Almost.


I was planning to sell this machine as-is, but I just couldn't resist taking it to a finer level. I have a soft spot for these machines, and the nostalgia and satisfaction that comes from a solid restoration.

When I picked up this machine from the high school in Minneapolis where it was originally purchased I drove through Northfield, Minnesota (the home of Northfield Machinery) on my way back home. I asked Jeff Machacek to take a look at the machines. Jeff is the brains behind Northfield, and knows every nut and bolt on every machine the company has produced since the early part of the 20th century. He grew up in the plant, watching workers pour foundations down to solid bedrock for some of the heavier machine tools at Northfield.


I asked Jeff to take a look at this planer since it has the optional (and more expensive) segmented rubber infeed roller (a big plus for taking light final passes.) I wasn't sure how much wear was acceptable, but Jeff gave it the okay. He also gave the thumbs up to the cutterhead bearings. So I didn't replace those parts. It's not everyday you get to have Jeff inspect your machine, in person, for free. It's just the kind of guy Jeff is. I've bought a few parts from Northfield over the years, and Jeff does his best to talk me out of buying most parts. So when I can, I support Northfield, even though many of their parts are quite expensive. I think it means a lot to them to see folks bringing old machines back to life. Really, these machines are built to last many generations. With proper use and lubrication, this planer could still be cutting wood well into the next century and beyond.


To get the machine to the state its in now, here's what I did:

- Disassembly of the multi-gear drive mechanism, motor and variable speed mechanism, thorough cleaning, degrease, re-lube and re-grease.
 - Fabricated a new design chipbreaker of steel. This 1957 machine had the old design made of brass with segmented spring steel tabs, and some were worn beyond repair. Jeff said that was not the greatest design, so I made a new one based on Northfield's current #2 chipbreaker.
- Disassembled the direct-drive motor, cleaned the rotor and stator, remove dust from windings.
- Cleaned, polished and stoned the beds, outfeed roller and bed rollers to remove any burrs.
- Disassembled the starter, cleaned and polished the contactor points.
- Wired up a new Furnas Nema 1 start/stop station. (The planer came from the school with one those enormous stop-sign-style floor-mounted control stations. I wasn't going to have any of that.)
- Complete removal, cleaning, and restoration of the bed height adjustment mechanism.
- Cleaned and lubed bed raising screws.
- Relube of all ways and new grease added to zerk points.
- Degrease, clean, lacquer wipe down, spot prime and top coat all painted components.
- Adjusted bed parallel  to cutterhead within .001"
- Installed a new set of knives.
- Adjusted all feed and cutterhead components to factory standards.
- Reapplication of safety stickers provided by Northfield.
- Installed two new Northfield badges
- New owner's manual from Northfield.
- Northfield shavings hood with 6" connection

Machine Specs:

- Nom. Capacity: 18" x 8"
- Three-knife cutterhead with high speed steel knives from Wisconsin Knife Works
- Minimum stock thickness 1/8"
- Max stock thickness: 8"
- Direct drive cutterhead (no belts involved). Motor specs: 5hp, 3Phase, 220/440V, 60 Hz.
- Feed motor (separate motor powers the feed rollers) 1/2 hp, variable speed, 20 to 50 lineal feet per minute
- Furnas Magnetic controls, push button start/stop station
- Floor space: 55" x 36"
- Weight: 1600 lbs.

I should say that I'm not in the machinery restoration business. This is a superfluous machine in my shop at the moment. I simply restored this one so I could offer it with a clear conscience. Who ever liked being on the buying side of an "as-is" deal? I've been there with nearly every machine I purchased. If I can eliminate that aspect with this one, all the better. I've restored a few machines over the years, and I can say that I'd be thrilled to have this machine in my shop. If you're pricing out similar machines, you likely won't find them. You can buy a slightly larger planer from ursus horribilis, pay more, contribute to the decline of American woodworking, and still wonder where the extra 600 pounds went. Mentioning the price of a new Northfield would just be silly, but if that interests you, take a peek. One thing you'll find is that Northfield hasn't changed this machine in decades. There's a reason for that. Simple machines that are finely adjustable, and hold their settings. I don't like to fuss with my machines, and so far every Northfield I've set up has been dead on ever since. Nothing interrupts my workflow in the shop like having to fix or adjust a finicky machine.

I should add that Byrd tool has made Shelix heads for these machines. They are not cheap. However, given the price of a comparable (Asian) machine, the price is quite reasonable.

Also, if you're afraid of 3-phase power, don't be. It's quite easily attainable. I can help. 
 
Price is $3200. If you're interested in the planer, drop me a line at jameel@benchcrafted.com
Update: SOLD


Greg's Chairmaker's Bench

$
0
0

Professional chair maker and teacher Greg Pennington has finished a chair maker's bench using our Classic Leg Vise. It's beautiful. Take a look at Greg's blog for more.

"The Benchcrafted vise works just as sweet as the video you see on their website."

Studley Chest Exhibit - Ticket Sales Open

$
0
0

Over the weekend the folks at The Barn On White Run opened up ticket sales for the upcoming exhibit of the Studley Tool Chest and Workbench.

The exhibit takes place in Cedar Rapids, Iowa, next May 15-17, 2015.The same weekend as the Handworks event in nearby Amana, Iowa.

As toolmakers, we can't help but be excited! Yeah, its a year away. But if you're like us, you'll get all excited about attending, then forget to buy tickets. You can only buy them online, and when they are gone, they are gone.

Why are we posting about this? Seriously? It's the Studley chest and bench. And its going on exhibit. I can't wait to walk into the exhibit hall and see that gem all aglow under the spotlights. It's going to be magical.

Buy tickets here


The Benchcrafted Hand Forged Holdfast

$
0
0


Based on an extant French holdfast, the Benchcrafted holdfast is hand forged from carbon steel. The holdfast is made in America. 

Made completely by hand using traditional blacksmithing methods, our holdfast grabs quick and releases just as quickly.

Design to work in a 1" hole, the 7/8" diameter shaft is 18" long (13" under the pad)  with a total reach of 8". The pad is 1-1/2" wide. Best used in thick Roubo-style tops.The bench in the video is about 5-1/2" thick. For any holdfast to work properly, the hole must be perpendicular to the top surface.

These are different than the holdfast described and illustrated in Roubo. The pad is more of a square shape, and the profile of the arm terminates in an angular facet on the underside. It's a cool, yet time consuming detail to execute. There are certainly less expensive ways to make a holdfast. We made these because our prototype worked so well, and we liked the look. Simple as that.

Many holdfast shafts are sized to be just a smidge smaller than the hole they were designed for. Our's is 1/8" smaller. Why does this work? The extra room allows the shaft to bite easily into the hole instead of just slipping in and out. Loose tolerances here are the key. A quick bite with rapid and free repositioning after a light tap.

We have just a handful of these, as they are made by one person, and entirely without the aid of machines. So once these are gone, we may or may not make more.

As with all holdfasts, a non-smooth surface on the back and front of the shaft  aids greatly in helping the holdfast to hold fast. These holdfasts have one coat of oil finish to protect against rust, and as such the surface is a bit slippery. You should scuff the aforementioned surfaces with some medium grit (150) sandpaper before use.

Price: $189 plus shipping.

To order, send an email to info@benchcrafted.com. State how many you would like, include your shipping address, and preferred Paypal address and we'll send you a bill.


FORP Update and a French Oak Masterpiece

$
0
0

Earlier this week we traveled to Chicago to catch up with Jeff Miller in his bowling-alley turned furniture-making magic castle.

When we arrived at Jeff's he was busy ripping some styrofoam on the sliding table saw, packing up a couple cherry side tables for a customer in Las Vegas. I commented that I hoped he'd built the chairs in the winter. He replied "I never thought about the humidity levels out there". And you know what? He doesn't need to. Jeff could fit a piston-tight drawer in January, ship it off to Da Nang in July and never get a call back. He's that good.

So when we walked up to Jeff's FORP bench, it was not unexpected when our jaws fell to the floor like a cold steak. But they fell nonetheless.

First off, Jeff departed from the Plate 11 bench a bit by incorporating a wagon vise and a row of square dogs. Jeff has probably installed more Benchcrafted Tail Vises than anyone we know, so its no surprise that his wooden wagon vise shares some features with our vise.


The dog block is tapped to receive the 1-3/4" X 3-1/2 tpi left-hand screw. To install the block into its cavity, Jeff milled some wide rabbets into both the front laminate and the front edge of the rear top section to receive the block, which in turn has rabbets that engage the rabbets in the top. The block slides up from below, stops against the upper rabbets, then two rails are slipped into the lower rabbets in the block and screwed into the top from the inside. The components are massive, which lends great stability to the entire vise. I was shocked when I operated the vise. I felt no resistance along the entire travel of the vise. It was frictionless. And it was wonderful.


The head of the screw itself is fastened to the end cap via a steel two-piece garter that resides in a counterbore behind the shoulder of the screw's head. Jeff tapped the garter for machine screws, the whole assembly goes in from the outside, while the screws pull the garter tight from the inside face of the end cap. When the vise is assembled, there are no visible fasteners, and the garter is completely hidden. If Roubo had designed a wooden wagon vise, this would be it.

The vise hardware was made by Lake Erie Toolworks and smith Peter Ross.


The leg vise is beautifully and meticulously crafted. Jeff played his cards right and waited until winter to fit the forged ring, and many of the other critical elements on the bench.


Jeff fit his leg vise garter perfectly. It slips in and out without friction, and tightens up sweetly as you insert the last quarter inch.


Jeff's bench was truly inspirational to behold. One of the finest benches I've ever seen.

It was a great morning spent in Jeff's shop, reminiscing about FORP almost a year ago now. We're looking forward to getting together again next year to do it all over again. Yes, it's official, FORP II is a go. We've got the wood, and we've got the go ahead from Wyatt Childs. He's thrilled to be hosting the event again. The same group of people will be gathering in Barnesville, GA to make more incredible benches from this incredible material. Myself, Jeff Miller, Raney Nelson, Chris Schwarz, and Don Williams, all have agreed to return.

Please don't send us emails at this time asking for more details. We simply don't have them. We will be posting the official announcement early this fall, and will give advanced warning before we do so. As with last time, it will be first come, first served. 

Crisscross Parts Goofs

$
0
0

Due to an oversight at the factory in Shengzen, we've been shipping out the incorrect type of retaining ring that snaps onto the Crisscross' pivot pin. We just discovered it last week.

The correct e-style retaining ring is pictured above, installed on a pivot pin, installed in a Crisscross.

And here is the correct e-style ring on its own:


The incorrect type of retaining ring is pictured below.


This is the ring that has been mistakenly shipped with several Crisscrosses.

Here's the deal. Both rings work just fine with the Crisscross. We use the e-style ring because is presses onto the pin easily without tools, or with a flat blade screwdriver. The other type with two holes requires a special tool to install, or if you're Jeff Miller, a couple toothpicks and some string.

If you have the incorrect rings, and would like a replacement set of e-style rings, drop us a line at info@benchcrafted.com and we'll send you some. If you have the special tool, go ahead and use the wrong style, it won't matter.

Oh, and that bit about Shengzen was a joke. Seriously. Our hardware kits are carefully assembled by a local family-run fasteners supply house. This was a simple typo (our error) that caused the mix up.

The only thing we offer that's made in China is a mean cup of English tea. Earl Gray. Hot.

A Few Holdfasts

$
0
0

We still have a few of our hand-forged holdfasts left. These are not on our website, but only for sale through the blog. More info here.


A Miter Jack Of Excellence

$
0
0


Last month we received an email from a tool collector who sent us some pictures of a beautiful miter jack manufactured by the La Forge Royale company. The collector asked if we'd like to see the tool. We said, "absolutely". The gentleman replied, "I'm just up the street from you, I can come over at your convenience."

I wasn't sure if he was pulling our leg. Turns out he wasn't actually just up the street. It was more like just across the creek.

Earlier this week we got together to pore over this gem of a vise.

First off, a little history. La Forge Royale was under the direction of at least two men that we're aware of. A Mr. Lemainque, and later, Mr. Feron. It was the latter's catalog that the Midwest Tool Collector's Association reprinted in the 1980's, and from which we derive all of our images of this firm's wares.

This vise comes from the earlier period under Lemainque. The vise itself is stamped at least 5 times with A. DENIS, likely a previous owner of the vise.

I've used miter jacks for many years, and have built several versions to handle everything from full size case mouldings to diminutive parquetry for musical instruments. They are powerful fixtures that are more versatile than shooting boards (although more complex to construct.) They also require a more advanced technique to master. Get ham-handed with them and it isn't long before you've planed away all your accuracy. One big plus of the miter jack is that it places the workpiece in such a position that you can use a typical bench plane in a normal fashion, not on its side as in a shooting board. I prefer a low cutting angle, since most of the work is on end grain or some angled variant of such. I'm usually not a fan of bevel up planes, but for miter jacks I love them. They have a low center of gravity which feels grounded on the angled ramp of the jack. I usually use my Lie-Nielsen 164. You can also plane a miter from virtually any direction, which is especially helpful when planing moulded pieces to avoid blowing out the moulded elements. Tweaking the angle is also easily accomplished by subtly shifting the workpiece off-angle in the jaws. It doesn't have to sit dead flat on the ramps.

But enough about how miter jacks work. They work. If you don't have one, build one.


The first mystery we tried to unravel was the configuration of the clamping block, with its bold cyma reversa profile. With the jack in position for planing 45 deg. miters the inside of the block is parallel to the planing surface, and the bench it rests on.


With a holdfast position close to the front of the bench*, the jack can be held somewhat securely. However, I don't think this method would withstand the rotational forces encountered in use. 

*For illustration only. I don't have a hole in this bench close enough to the front, so the jack is positioned too far away from the front edge of the bench to be functional.


As I looked close at the sides of the block, I found some V-shaped notches in both sides. With the jack position for 45 degree planing, these notches matched up perfectly with the square dogs in my wagon vise.


The jack sits firmly on the bench held between dogs. A holdfast in the pocket would improve the stability even further.


While turning the vise around countless times I noticed the bottom of the mounting block was left with a toothed surface.


Underneath the fixed jaw I discovered a metallic hook and screw to engage the hook.


I pivoted the hook into position, then operated the vise.


A secondary, but much smaller jaw was now traveling along with the main jaw. What was this for? I didn't have a clue.


I looked closer at the screw itself. It's beech (as is the entire vise), precisely made, with a straight section to which is pinned a brass sleeve that engages a garter screwed to the moving jaw.


The end of the screw is made of steel, and I surmise that this bit of hardware also engages the pin through the brass sleeve. I couldn't investigate this further without doing harm to the vise.


The handle of the screw is fitted with a detachable lever, presumably to increase torque or speed when adjusting the vise. The lever would not engage the octagonal handle past this point. It may have been intended to slide off entirely. Note that this feature is not pictured in the catalog image.


I soon returned to the clamping block. The opposite side (above) has its face at 45 degrees to the opposing face, and parallel to the face of the opposing pocket. That places the pocket above at 45 degrees to the opposing pocket.


In other words, when the vise is placed along the front edge of the bench, the pocket is now parallel with the top of the bench, and the entire vise can now be held very securely to the bench (since the clamping block and body of the vise form a massive rabbet) with a single holdfast. The vise is now positioned for 90 degree (square) planing.

But it wasn't until I started operating the vise in this position that the smaller moving block started making sense.


As I opened the jaws, I had forgotten that I left the metal hook engaged. The small block moved with the larger and I immediately recognized its purpose.


I grabbed a bevel square to check.


The angle was 22.5 degrees. Beautiful.


Actually it was more like 23. And here's the eerie thing. The number "23" is written on the small block's ramp. Perhaps the maker or owner wrote that on there as a reminder of the actual degree of the ramp? But why not correct it?


One last detail I couldn't figure out. This little dowel sticking out the end of the fixed jaw. It's not pinning anything. The top half of the jaw is just finger jointed to the bottom half. No other joinery here.


So if this post hasn't motivated you to build one of these, what's your excuse? I'm going to build a reproduction at some point, even though I have perfectly serviceable jacks in the shop.

Special thanks to the owner, who is letting me examine the vise for a few more days. Without a doubt, a very sweet miter jack.


LA SCULPTURE SUR BOIS

Looking Back and Forward

$
0
0

Six years ago this month I finished my first "Roubo-style" bench. It contained the very first Benchcrafted vise. I chronicled that build on my now-retired luthiery blog.

As I look back on the past six years and ahead, I'm reminded of why we started making vises. As with many woodworkers, I get inspired to build from many directions. But it's using the tools themselves that provides the most meaningful feedback. In short, the best research I can do for Benchcrafted is to spend as much time in front of my bench as possible, using the vises, and breaking habits so I can further refine and develop our tools. Benchcrafted has always been, and will always be about the core traditions of the craft of woodwork. The more I do this, the more I find myself returning to traditional ideas and methods, regardless of my perception of speed or efficiency. Why? There is a "groundedness" in tradition. A safe harbor. A place where we can return to when we press the reset button of unnecessary advancement and improvement. With current advances in CNC machining and the wide availability of off-the-shelf precision components designed for precise movements in the industrial arena, and tempted as we are to borrow from these arenas, we inevitably steer back to rudimentary ideas, paring our designs down to the simplest, purest forms of antiquity with the fewest moving parts. This principle reveals again and again that the old ways in general are best, especially when working with a material that has been around longer than civilized man. Wood has not changed, and it could be argued that man, in all his technological and scientific advancements has lost the aspect of purity and simplicity which allowed the ancient Egyptians to erect structures that modern man still can't quite explain.

I always have, and always will consider myself a woodworker first. Making vises is a product of that work. And it should be. I never want to make vises strictly as a money-making venture. It must always be driven by the craft. So I spend as much time in the shop as possible. Everything we sell is used nearly every single day in my personal shop. I wouldn't have it any other way.

My 8-year old Roubo bench has undergone a few retrofits over the years, but its still my main bench. It's now outfitted with the latest version of the Glide leg vise, and our Tail Vise. I've also increased the size of the dog holes to 1", to accommodate our larger hand-forged holdfasts. Other than that, its the same as the day I finished it. A massive wooden clamp that does what it needs to quickly and without fuss. There is nothing more irritating than fussing with vises when building furniture. Ironic as it may seem, it's my goal that our vises become transparent in use. I don't want our vises to be enjoyed. I want them to become such a seamless part of your workflow that your mind is not occupied with their function at all, but that it become more of an extension of your body. You don't consciously have to think about breathing.

So what's in store for the next few years? We do have some new products brewing, and hope those make it to production. Stay tuned. In the meantime, I've got a flame birch side table about half done that I'm itching to work on.


La Forge Royale Miter Jack Hardware Kits

$
0
0


The La Forge Royale miter jack drawing is just about done. I've spent the last couple weeks taking it apart piece by piece and accurately measuring every part, to the nearest 1/64". This vise was very carefully crafted, and even after about 100 years or so (that's a wild guess, but probably fairly close) the things functions sweetly.

We've decided we're going to make a short run of hardware for this vise. If you think you'd like one, post a comment below (please don't email us, use the comment form) It will help us gauge how many to make.

When we get the first batch of bits together, we'll build the first one and document our construction sequence. We won't produce measured 2d drawings for the vise, but simply post the Sketchup drawing when its ready, in a week or two. If you don't know how to pull dimensions and move things around in Sketchup yet, you might want to learn. It's easy. We recommend Bob Lang's Popular Woodworking video course. It's excellent. 

Here's what will be included in the hardware kit:

- Hardwood screw and tapped nut block. The nut block will be milled to final thickness, but oversize in length and width. You'll take it to final size, and cut the joinery. We'll likely use hard maple since its widely available. But we might use beech too, like the original. Thick beech is available, you just have to look harder.

- Brass ferrule and garter, steel garter pin, cross pin. The ferrule, screw tenon and steel garter pin will be pre-drilled to accept the cross pin. We'll provide instruction on how to assemble it, since you'll have to assemble these parts after the entire vise is built. Once the garter is in place, the screw can't be removed from the nut block without driving the pin back out.

- Steel Hook. This is the part that engages the half miter block and allows it to move in tandem with the moving jaw.

- Screws. These will be flat head, slotted, and likely unplated to fit with original.

Our version will be slightly different than the original. Here's how.

- The original jaws are fingerjointed. We didn't include this in the drawing. If you want to fingerjoint them, nothing wrong with that. But it's probably not necessary. I think an excellently prepared and glued lamination will hold up just fine. In fact, both fingerjointed surfaces in the original are loose.

- The screw pitch in the original is 5tpi, 1-1/8" dia. We'll try and duplicate this. But to keep costs reasonable we're going to source stock brass tubing for the ferrule. This may dictate that we alter the size of the screw a bit. It won't matter to you, since all the threading and tapping will be done.


Cut A Giant Lamb's Tongue And Out Pops A Moxon Vise

$
0
0


Customer Luke Addington sent us a link (with the nice note below) for his sequence on how he built his Benchcrafted Moxon Vise, including his steps on cutting his dead crisp lamb's tongues. Until I looked myself, I swore he uploaded himself and his maple blank into the Sketchup master program and cut those curves using "intersect with model". Incredible work Flynn, er, um, Luke.

The full sequence here.
______________

Hi Mr. Abraham,

I just completed my Moxon vise and I cannot tell you how happy I am with it. Thank you very much for providing such incredible hardware. It works like a dream. I opted to carve the stopped chamfer & Lamb's Tongue and made a little step-by-step tutorial. I don't know if this would be useful to anyone but here it is just in case (with pictures of the completed vise):

Thank you again, I am looking forward to a lifetime of dovetails with this vise.
-Luke Addington


La Forge Royale Miter Jack Sketchup Drawing

$
0
0


We uploaded the Sketchup drawing for the La Forge Royale Miter Jack this morning. A couple things about the drawing.

There are no plan views, or elevations, etc. We want to make this affordable as possible, so you'll have to pull dimensions off the drawing. Plenty of tutorials out there if you're unfamiliar.

There are two scenes in the drawing besides the main view. One is an explosion so you can quickly identify and measure the parts. The other shows each part that takes a fastener and what that fastener is.

You'll notice that the screw is colored green and has no threads. The nut block also has no threads. We're still working out the specs on these, so didn't bother drawing them. That's likewise true for the tenon and brass ferrule. Still some tweaking to do on those. But again, that's meaningless if you're buying a kit.

As typical with parts explosions, some of the components look really complicated to make, like the body spacer, for example. Lots of the geometry on these parts will get milled out once the base is assembled and you cut the groove for the splines on the end. We'll show the process.

We're partnering with Lake Erie Toolworks to produce the screw and nut block on these. Nick does flawless work, and he's meticulous about making sure the threads on his screws contact flatly with the threads in the nut. It's finicky work. We've already sourced enough quartersawn 10/4 hard maple for the nut blocks.

In the coming weeks we'll have pricing info up. If you're interested in a kit (no obligation) please respond in the comments section here, NOT in this post. We will only make so many kits, this won't be a stock item.

La Forge Royale Miter Jack Sketchup Drawing

Demo Vises For Sale

$
0
0
UPDATE: Both SOLD Pending.

We recently refitted one of our demo benches with updated vises. So we've got the previous version vises available.

First up is a second generation Glide (pictured below). This retailed for $339 in 2011. The vise has very little use. In fact, you'd be hard pressed to find any wear on it at all. Price is $200, including a pair of ash roller brackets (yes, this vise requires a traditional parallel guide, which you'll have to build into your chop.) But If you'd like to buy a Crisscross with this (without sounding like a salesman, we do recommend it), price will be an additional $99 (Solo) or $149 (Retro.)


The tail vise from this bench is also available. Originally sold for $359. Since we only refitted the handwheel and screw assembly, the rails, sliding plate assembly and hardware are all new. Price is $220.


If you'd like to buy one or both of these vises, drop us an email at info@benchcrafted.com and we'll send you an invoice. Make sure to include your full shipping address so we can calculate shipping.


Mark Your Calendar: French Oak Roubo Project Part Deux

$
0
0

The arrangements have been made. Contracts signed. Wood procured. We've even struck a deal with the local meteorologist to all but guarantee comfortable weather.

The French Oak Roubo Project will happen again the week of November 8-14, 2015.

We've been working out many details over the summer and can say with assurance the following:

1. The original crew will be back. Chris Schwarz, Don Williams, Raney Nelson, Jeff Miller, Ron Brese, Will Myers, and Jon Fiant will all be back. Of course Bo and I will also be there, although I can't promise you won't find us fishing in one of Bo's ponds for lunker bass. 

2. We're making room for more. There are eight benches in Plate 11. Since this is FORP II we're going to double that. We'll have 16 spots available for participants. We actually built 16 benches last time around, but this time the original crew will work on everyone's benches, in the hopes of getting more accomplished during the week. 

3. Another huge bench. Bo complains that one 16' Plate 11 bench isn't enough (some people!) So we'll try to build another one for him while we're there. We had loads of fun getting Bo's bench put together last time. Lowering the top onto the base with the fork truck was thrilling on the last day. I want to duplicate that.

4. Schwarz will talk Sunday night during a meet and greet about bench history, the art of the green bean casserole, and how to live without a modern sewage system. There will be refreshments (no casseroles though.)

5. Lunch. Catered lunch everyday from a local chef who studied in France and at the CIA (the other CIA.) Some of you might end up staying at her B&B. Excellent. We may also break out the grills in the evening if we feel up to it.

6. Hardware from Benchcrafted, Lake Erie Toolworks, and Peter Ross. Same as last time.

7. Personalized letterpress labels from Wesley Tanner

8. Pig Candy. 

As for price, it will be a little more. Some of our costs have gone up in the past couple years. It won't be a deal breaker for anyone, promise. 

We'll open registration on Tuesday, September 2 at 10am CST (we'll do a blog post then to announce.) To register you'll simply send an email to jameel@benchcrafted.com saying "I'm in" and we'll send you all the nitty gritty. To be fair, it will be first-come, first-served only. 


La Forge Royale Miter Jack Hardware Update

$
0
0

The La Forge Royale Miter Jack hardware is officially in production. Based on response, we're going to make 100 kits. Here's what's included:

1. Hard maple screw, threaded at 1-1/8" x  4 tpi

2. Hard maple nut block, tapped to match the screw, oversized in length and width so you can cut joinery.

3. Brass ferrule. We sourced the same size as the original, 15/16" O.D.

4. Brass garter

5. Steel hook

6. Steel garter pin

7. Groove pin

8. All the screws you need to build it (not pictured). These will be plain steel, or black oxide.

All the metal bits (except for the groove pin and steel screws) are made by us in our shop, to the exact specs of the original.

Price is $198 plus shipping

For this we're going to offer pre-ordering. We'll post the "Buy Now" button to our store page tomorrow, Tuesday August 26 at 9am. We hope to have these ready by late fall, and well before Christmas. That's the goal anyway.

We're going to include some sort of brand with the kit. Still working out the details on that.

We've also updated the Sketchup drawing to show the grain direction of each part. See the red arrows on the parts explosion (Scene 2).

Nick Dombrowski's crisp work (in oak!)

Buy Winthorpe, Buy!

Now In Stock - The New Glide and More.

$
0
0


Here at Benchcrafted we're always tweaking our designs to make them as sweet as we can. Of course the dilemma in all this is that we risk slighting past customers when we change a product. Here's how we see it. Our past offerings were the best we had to offer at the time. There are companies out there (big ones usually) where planned obsolescence is part of day to day business. Not us. Here, we design and build for the long run, but now and then we get ideas that are genuine improvements and we can't sit on them. Our motivation is to make great stuff, and share it with our fellow woodworkers.


About a year ago we started experimenting with a Glide Leg Vise in our test shop. I've always been intrigued by ship's wheels, and the ergonomics and physical dynamics of why they work. A large wheel gives lots of leverage, and the handles provide an efficient way for a human  to transfer their energy into turning the wheel. If the wheel were without handles, one would have to grip a rather thick section of wheel and use enormous amount of energy just maintaining that grip. My Northfield 16" jointer adjusts by means of a large cast iron ship's wheel. I can rotate it with a single finger on one of eight handles as it moves hundreds of pound of cast iron.


We had a reject bronze Glide wheel from a previous run so we drilled and tapped the rim of the wheel to accept six of our rosewood (now Dymondwood) knobs. We were immediately struck by the improved ergonomics of this arrangement. Spinning the handwheel for gross adjustments was simply of matter of flicking one of the knobs. The wheel, as usual, would spin for several revolutions. We also noticed another improvement. With no knob mounted to the front of the wheel, the entire vise was lower profile--no more bumping a leg into the knob or catching a pocket as you walk by. With knobs oriented symmetrically about the perimeter, the wheel was also balanced, allowing it to spin more smoothly.

But as cool as the six-knob bronze ship's wheel looked (batten down the hatches!) and functioned, we found a problem. Six knobs was three knobs too many, so we removed every other knob. Bingo. This placed a knob at 10 o'clock and 2 o'clock or any point in between. In other words, there was always a knob within easy reach at the top of the vise. Perfect.


But we weren't finished. On the heels of releasing the Classic Leg Vise we decided to swap out the standard single-lead screw (that we've always used on the Glide) for the double-lead screw we use on the Classic. The results? A turbo-charged Glide. One revolution of the wheel now yields 1/2" of travel, vs. 1/4" of the previous Glide. And there's no change in the feel of how the vise holds, due to the effect of the larger lever when adjusting the vise with the knobs (I still grab the rim from time to time.)


The Glide M features our fully-machined cast iron handwheel that is designed, cast, and machined entirely in the USA. The handwheel is outfitted with three Dymondwood knobs turned and finished to a high level in the USA, and mounted with our proprietary fasteners. The Glide M automatically includes a Crisscross mechanism (choose Solo or Retro.)

Price is $439 with a Crisscross Solo, and $479 with a Crisscross Retro.


With the added costs of the additional components, we weren't comfortable with the higher price of the Glide M.

The Glide C features a cast-iron handwheel that we're leaving un-machined to save on cost. The wheel has the same weight and feel in use as the machined Glide M wheel. Both vises perform identically. The difference is entirely cosmetic.

The Glide C uses acrylic-infused Beech knobs. The combination of the un-machined wheel and the Beech knobs not only mean a less expensive vise, but also a more traditional look. I have a Glide C on my ash Roubo bench at the moment. I love the look.

In case you're wondering, we do have a Tail Vise C in the works, so you'll be able to completely outfit your bench with matching vises. And yes, the Tail Vise C will also cost less than the current Tail Vise (which will become the Tail Vise M.)

A word on the infused Beech knobs. These are incredibly tough. They are as durable as solid acrylic, but with the feel and look of wood. They won't split or move. If you know the infused mallets made by Dave Jeske of Blue Spruce toolworks, these knobs are the same. In fact, Dave turns all of our vise knobs from the same stuff. They are impeccable in every way.

Price is $369 with a Crisscross Solo ($40 less than the previous "Glide Crisscross"), and $409 with a Crisscross Retro.

Retrofitting your bench with a Glide M or Glide C

The Glide M and Glide C components are not interchangeable with previous versions of the Glide. We've never encouraged upgrading parts of our vises anyway, since that relegates the obsolete parts to the recycle bin. To us it makes more sense to sell your current vise, give it to a friend, donate it to a school, or hang it on your mantle as a piece of industrial art (okay, maybe that's going too far).

If you do upgrade to a Glide M or C, and you currently have a Glide and Crisscross installed in your bench, you'll have to attach the new nut, patch your square acetal bushing mortise and cut a new, round mortise for the round acetal bushing. The existing tapped holes on your chop should work just fine with the Glide M or C.

We'll be uploading the new installation instruction (see our downloads page) for the Glide M/C which also include the Crisscross instructions. We're constantly revising and improving our instructions to make your installs as smooth as possible.

Split Top Roubo Workbench Plans

Its been about two years since we did away with the Split Top Roubo's parallel guide and replaced it with a Crisscross. Unfortunately we haven't had a chance update the STR plans to reflect this.Yes, we've been lax on this and it has caused a bit of confusion. Apologies. We do address the changes in the Glide installation instructions, and the STR Construction notes (both of which have been recently updated to further emphasize the changes.) The bad news is we lost our hard drive that contained the plans as we were updating them, and believe it or not, we also lost two backup drives as well. Computers! The good news is we're back on task and working diligently to get the plans totally updated as soon as possible. They will be better than ever.

See our stuff at WIA in two weeks

We had hoped to return to WIA this year, but the location and timing unfortunately did not work out for us. Maybe next year. However, if you're planning on attending WIA, Plate 11 Bench Company will have one of their benches outfitted with a Glide M, as will the Sterling Tool Works booth. If you're in the market for a finely made bench, Mark Hicks does excellent work and will build you a complete bench, or furnish you with a kit of parts ready to assemble. And Chris Kuehn's Saddle Tail is hands down the best dovetail marker I've ever used. Crisp and precise machining, beautifully made. I have the whole set, including the leather holster.

You can order a Glide M now through our Store page. The Glide C is still in production and will be ready to ship in 3-4 weeks. Watch for an announcement here in the next couple weeks. Tail Vise C's are also still in production and will be ready to purchase, we estimate in a couple months.

Later this fall, Glides will be also available through several of our dealers.


The French Oak Roubo Project Part Deux—Registration Open

$
0
0

In the autumn of 2015 a small group of Roubo enthusiasts will gather to once again build benches based on the famous Plate 11 engraving from L'art du Menuisier. And once again, you are invited.

Like last time (read our original announcement here for FORP I) we will get to work with amazing slabs of French oak, in the pastoral setting of Wyatt Child's brick-and-pine joiner's shop in rural Georgia. Child's shop is outfitted with machinery perfectly suited to process these large slabs quickly and efficiently, from the Woodmizer bandmill to the 36" Oliver Straitoplane. Would Roubo have used these machines to process his own bench parts? If he were with us in Georgia last summer, I don't think there'd be any question.

The Enthusiasts

Bo Childs Our gracious host and gentleman extraordinaire
Benchcrafted  Us, obviously
Raney NelsonDaed Toolworks' infill plane maker, yes, he's still alive
Jeff MillerChicago furniture maker and woodworking ergonomicist
Chris SchwarzGrits provider and pocket hole technician, he also writes now and then
Jon Fiant The Human Saw Stop. Also builds custom workbenches to order in his Atlanta shop.
Ron BreseLocal Fishing Guide
Will Myers So good hecuts mortises with a butter knife. Also teaches at Underhill's Woodwright's School.
Don Williams The guy who used to work at a famous place that rhymes with "Smythsonian"

The Format

This is the same crew from FORP I. Almost all of us built a bench to take home during FORP I, and were occupied doing our own work during the week (when we weren't in production mode) but this time around all of the enthusiasts will be there to help and assist the participants in building their benches. So for FORP II we're changing the format a bit. You don't need to be an advanced or even an intermediate woodworker to sign up. There will be plenty of help and instruction. However, this event is not a class, and there won't be any group instruction or formal techniques taught unless you ask. But again, plenty of help and expertise will be available. If you're more of a beginner, you will have over a year to advance your skills and prepare.

The Material

Bo has once again unearthed a cache of 24/4 French oak over in the old country and has shipped it over to his shop in Barnesville. These will become massive, one or two-piece tops.  We mill the tops with the Oliver Straitoplane and finish out between 5" and 6" thick. We'll also be using 16/4 French oak for the legs and rails. Some of the material for the tops will be somewhat green in the core of the slab. This is natural for 24/4 material. Roubo's tops were like this, and the tops we made in 2013 were like this. Once your bench is built and installed in your shop, the tops will settle down fine. To read more in-depth info check out Schwarz's French Oak posts over at the Lost Art Press blog.

Location

Barnesville, GA. Child's shop is an hour south of Atlanta just off I-75. Bo's shop is ideally suited for building massive benches, and Bo himself is an incredibly generous and enthusiastic host. You'll find Wyatt Childs a fascinating place on its own, replete with acres of historic French architectural salvage and antiques. It's like walking into Roubo's boneyard. And if you're in the market for building some great furniture after your bench build, bring a trailer. Bo has a warehouse full of tens of thousands of board feet of everything from chestnut to swamp harvested cypress. And they are all flitch sawn and wide.

The Bench & Accessories

We'll again be building the bench from Plate 11 down to the last detail. We'll cut the joinery close with the machines, then fit everything precisely by hand. If you prefer to cut joints entirely by hand, feel free. The leg vise will be made by Lake Erie Toolworks and the iron fittings (ring ferrule, handle) forged by blacksmith Peter Ross, as will the toothed planing stop, all meticulously modeled from Plate 11. One hand-forged holdfast will also be included.

The Plate 11 bench does not use a parallel guide on the leg vise. This may annoy you, or you may not mind. Read Schwarz's take on his blog (see above link). He built his without a parallel guide. The rest of the FORP I participants used a Benchcrafted Crisscross in their leg vise, and it works seamlessly with Lake Erie's screw. If you'd like to use Benchcrafted vises on your bench, contact us for more info.

The Date

November 8-14, 2015

Sunday evening: meet and greet at Bo's shop, presentation on the Plate 11 bench, history, and more. Light refreshments.

Monday-Friday: We build from about 8am-6pm, or until we drop.

Saturday: Last year Bo kept his shop open for anyone wishing to stay through Saturday and keep working on their benches. Hand tools only, no machines.

Thursday night: BBQ at the shop and open house for friends and family.

The Price

$4800. Includes enough French oak to build the entire bench as illustrated in Plate 11, the French oak leg vise screw and tapped leg from Lake Erie Toolworks, the hand-forged ring ferrule, vise handle, toothed planing stop and holdfast from Peter Ross.

Catered lunch included Monday-Friday.

Participants will arrange for their own lodging (we've made arrangements with a couple B&B's in the area for discounted rates.) Participants will also be responsible for transporting their bench back home after the event. Wyatt Childs can arrange for shipping participant's benches as well.

Participants will bring their own hand tools, portable power tools (i.e. drill, router) sawbenches or sawhorses and sharpening equipment. We'll provide a list to participants of what you need.

If you'd like to sign up, send an email to jameel@benchcrafted.com and we'll send you more details. Registration opens at 10am CST today. Any emails received before then will be put at the bottom of the stack (to be fair its first come, first served) Payment is 50% down, and the rest shortly before the build.

The event is limited to 16 participants. 
Update 9/2: We've got 16 participants. Anyone who contacts us now will be put on the waitlist in case someone can't make it. 

To get a feel for what this event will be like, check out these blog posts:

The FORP Official Report Part 1

The FORP Official Report Part 2

The FORP Video

Viewing all 305 articles
Browse latest View live


Latest Images