Quantcast
Channel: Benchcrafted
Viewing all 305 articles
Browse latest View live

More Carver's Vises--Just In Time

$
0
0

We have in stock a handful of Carver's Vises, just in time for Christmas gift-giving. These are literally the last of them until we get enough demand to do another run, which may be never.

This is a sweet vise that I've been using so much lately that I have not removed it from the back left corner of the bench. I use it for detail work, sharpening scrapers, anything smallish that I need better control over. Heck, I even use it sometimes to hold magazines or pictures for reference while I work.

If you're into making charming shop furniture, just for the fun of it, this fills the bill perfectly, especially if you've got some special thickish wood kicking around the shop. We do have beech though, in case you need to buy wood.

If this is your first exposure to the Carver's Vise, click here for everything we've written about it.

After you're done with that, click here for the details on the vise itself and ordering info.

Order buttons are up on our Store Page. Refresh your browser if they don't appear. 

If you order now, these will ship early next week, and should arrive by the 24th. Send us an email if you absolutely need it by the 24th and we will sell you faster shipping.


Nails and Cracks

$
0
0


When Schwarz post his nail cabinet to the LAP blog a few months ago, I knew immediately I would build one. Why? I can't explain. It just struck me. It's a ridiculously easy project, so no challenge aspect there, but it seems lately I'm drawn to shop furniture that makes the place more pleasant to be in. So the back wall of my personal shop is undergoing a change. And this nail cabinet is the first part of the process. Later I'll cover the drywall with oak flooring and hang my new chest upon it.


I'm using Sapele from some 12/4 planks from Midwest Woodworking that Andy Brownell picked up for me a couple years ago. I had to do a bit of resawing, but the stuff stayed put as I sliced of 3/8" thick pieces. Very stable. I'm not a big fan of Sapele, so I thought shop furniture would be a good resting place for this material. I don't yet know if I have enough stock for the drawers, so in the spirit of the original, I may use something else. I do have a long beam of Douglas Fir that came out of an old library in Eugene, OR. It has ridiculously tight grain and would make fine drawer boxes.

If you end up building this project, make sure you err on the side of a tad loose on the egg crate dividers, especially if you use softwood. I have a hard time dropping my luthier's tolerances sometimes. I had a couple of the short grain section pop free when banging it together. Glued them back on in a jiffy though.

I'm also opting for card frame pulls instead of the bin pulls and knobs from the original. I need the labels. I picked up 21 of them from Van Dyke's, on sale for less than $3 ea. in an oil rubbed bronze finish. You can get nice, heavy cast pulls, but I didn't want to spend over $100 just on the pulls. Here's the link. http://www.vandykes.com/product.aspx?p=207415&green=5321A530-741F-5ECE-AFBC-B78CB130B044


Here's some pics of my French Oak bench in the dead of the coldest winter I can remember. The top is crowned (as expected) and the leg tenons are poking through about 1/32". The bench still works, although it does need flattening to perform better. In case you're interested, my top has opened up quite a bit on the worst end. The red arrows point to pencil lines that I drew across the ends of the checks when I finished the bench this summer. The lower check has just about doubled in size. In a month or two I'll wedge the gaps in the leg tenons, then flatten the top. I only ended up wedging one leg when I built the bench, and its the only leg that hasn't poked through the top. It will be interesting to see what the other three do next winter.


Underhill Nail Cabinet and a Sneak Peek

$
0
0


In case anyone has noticed, its been a bit quiet around here lately. Two reasons. The holiday season is our busiest, and we've been hard at work getting our new leg vise in order. So shortly before the New Year, I set down my drafting pencil, engineer's cap and mug of spiced cider and headed out to the shop to use some Benchcrafted product.

I started this nail cabinet purely on a whim. And I finished it with an equal amount of surprise. I didn't know it at the time, but this little cabinet caused a big change in the shop that I hadn't planned. The wall behind my main bench is not exactly inspiring. Unpainted drywall, steel shelf standards and mdf shelves with eight years of accumulated detritus. I wasn't about to hang my new cabinet in that mess.


This is what the back wall of the shop looked like a couple years ago. I desaturated it for your benefit.


So I tore the shelves out (we've already repurposed one in an adjacent building--you've got to have a little Sanford and Son here and there) and piled all the garbage on the bench. I had two or three empty cans of linseed oil on that shelf. Yeah, empty. Too lazy to throw them out? Nope, the garbage is lower than the shelf. If you have the answers, please, I'm searching.


A call to my local lumberyard ---okay, wait, for you kids, local does not equal Home Depot (even though the words home and depot sound local) and no offense to Home Depot, actually, yes, offense to Home Depot---yielded a couple hundred square feet of prefinished natural hickory flooring, which I nailed to the wall and part of the ceiling. Admittedly, not my ideal look.

My first choice? Wide, unfinished quartered white oak run vertically. Cost: much folding money.

Cost on the hickory flooring: $0. (see kids, I told you to be loyal to your local yard)

The hickory definitely has the cheesy "sawmill office" look. But who doesn't like a cheesy sawmill office? All I need now is a circa 1987 Mr. Coffee with sludge rings in the carafe to complete the ensemble (pronounce that as if you was French.)

Now, lest you think I stopped at sawmill office, think again. I went all the way with it. All. The. Way. (I always wanted to try the single-word sentence, three sentences worth, with periods. Never. Again.) I could have stopped, lived with the cheese. But what is cheese without.......crackers. Yeah, cheese and crackers. The age-old combo that can't be beat. Like a guy walking down the street with an open jar of peanut butter, then unexpectedly bumping into a woman carrying an open-air chocolate bar. Or the Wonder-Twins putting out a forest fire by taking the form of eagle and the shape of water bucket. Yes, I combined cheese with its natural partner and Cracker Barrelled my shop.


I couldn't resist hanging up some of my French workholding devices on my new Dean & Deluca-class cheese-and-crackerized southern wall. Lest you think I went whole hog and installed the track lighting just for this, no, they were already there. But get this, I installed them retroactively in the future, during the past. So they were there already, even before they weren't, in anticipation of them not existing anticipatory-ily.

After I finished the decorating, I called in my shop stylist for a Feng Shui check before hanging the nail cabinet. There are some balance issues with my garbage can and scrap bin, but I think the new cabinet's Qi more than makes up for this slight imbalance.


Oh, and lest I forget, here's the sneak peek:


Benchcrafted Classic Leg Vise - First Look

$
0
0


We've been hard at work getting the first run of our new Classic Leg Vise ready for sale. Our goal was to have loads of vises on the shelf ready to go, make a fancy announcement, throw open the gates, sell out, then retire to a private island in the Caribbean. I thinks its safe to say we'll get close to at least one of those. Fancy announcements are cheap and easy.

The reality is, we've been tweaking one aspect of the vise that we wanted to really get right. And its taking longer than we anticipated. But this week we nailed it. All that's left to do is get all the bits of fasteners kitted up and the vises packaged. We hope to be ready to start selling these by the end of the month.

We'll have more info on the Classic in the coming weeks, including pricing and availability. And maybe even a fancy announcement.


French Schools and Shops

$
0
0

Our public library flooded 6 years ago. All the books were ruined. It gave those in charge a chance to rebuild a library to "21st century" standards.

The result? No reference section. No microfilm. No out-of-print books. What was added? Treadmill-powered computers. A cafe with drive-up window (no joke), a young-adult section without books, outfitted with computers and video games, a bay of DVD-rental vending machines.

And the woodworking section? The bottom two shelves of my Jefferson bookcase at home rivals it. The old library had all the bound back-issues of Fine Woodworking, Krenov, Sloane, Nutting, Kingshott, etc. etc. They made no effort to replace any of these books. None. Want to do some research on local history? Look up an obituary? Find an old newspaper article? Sorry, we don't offer that here. But we can supply you with the latest issue of Weekly World News and a Grande Caramel Macchiatto Panchetta Panini.

What does the future look like for libraries? Who knows. But if our's is any example, it's not good. That's why I'm thankful for the internet. Transferal of knowledge is up to us now. Not that my library ever had any info on old French vocational schools, mind you. But if it weren't for the internet, much of this imagery would be out of reach, gathering dust in boxes and cabinets half a world away.

I gathered these images during our research for our Classic Leg Vise. Hope you enjoy them. We love them.

For the full gallery, click here: French Schools and Shops


Ten Feet Of Beech

$
0
0

Customer benches. We love them. Especially when people put their guts into them. If the word awesome hadn't been ruined by generation X, I'd use it here. Cody, your bench is succinct.

Dear Benchcrafted, 


I just wanted to say thanks for your advice and how much I like the vise hardware. The vises are awesome.

I finished the bench a few days ago and I love it. I must say it was quite the project and am glad to be able to say it is finished.

I've got over 300 hrs in time on the build.


The finished dimensions of the top are 10' in length 5" in thickness and 28" wide.

I stuck by the plans where I needed but as you can see sized a few things up.


Many thanks for providing high quality vise hardware to the woodworking community.


Sincerely,

Cody Armstrong


Drawsharps In Stock

$
0
0


After a short period of being a tad low on stock, we've got a new batch of Drawsharps finished, packaged, and nearly ready to ship.

We've made a couple small changes to the way customers receive their Drawsharp. First, instead of gluing the diamond abrasive pads directly to the sleeves, we're now including two pieces of 3m brand double faced adhesive strips for that purpose. This isn't hardware-store variety tape. It's industrial stuff that we chose from a long list of specific parameters that would suit the Drawsharp. And it wasn't cheap. But it offers the distinct advantage of allowing us to get Drawsharps packaged and shipped quicker than before. The other change is to the stud at the bottom of each post. Customers will now assemble this part. We shot this little video to show the process.

Drawsharps are $84 and available on our store page as well as through several of our dealers.

A Case For The Sliding Leg Vise

$
0
0


We've written before about our general disdain for the sliding leg vise. In short, they offer very little added functionality, besides just plain getting in the way.

But last week customer Julio Alonso sent us pics of his short bench equipped with a sliding leg vise, and we're changing our tune.

Juilo's shop is tiny, and his bench is necessarily short. So it often has to serve double duty. In this case we think a sliding, and more specifically, a removable leg vise makes lots of sense. Need to mount a Moxon vise for dovetailing? No problem. Lift the leg vise off and swap it out with a Moxon.

Here's a short video of Julio's vise.


Excuses and Opportunities

$
0
0

First, the excuses. We had hoped to release the Classic Leg Vise last week. Obviously that didn't happen. We were in the middle of machining a large run of Crisscross arms when we discovered a problem. This run of Crisscross arms was destined for Classics, but a small error in our molds meant that hundreds of arms had to be melted down and repoured. The cope and drag were shifted just enough to make the machining impossible. So back into the pot they went. We hope to have Classics ready for sale by the end of this month. For those who are chomping at the bit, trust me, it will be worth it. I've been using one in my own shop for that past couple weeks in a high vise. I'm hooked.

And now the opportunity. Since day one we've always used Cocobolo rosewood for all our vise knobs. Recently the wood was placed on the CITES Appendix II list. Supply is already getting short, and the price has doubled as well. We didn't want to raise prices for the sake of the knob, but we also didn't want to eliminate the look and cache that the rosewood provides.

But before I go further, let me mention a couple downsides to using Cocobolo.

Moisture content. It can be all over the map. Waiting for rosewood to dry is sort of like waiting for a drought in the Louisiana bayou. Wet wood shrinks, and when you're trying to put a metal screw into a piece of shrinking wood, things get tight. We usually have to ream some of our knobs so they spin freely on the screw. We also know that some of our customers have to do that as well. Hey, its wood after all, but we want to do better.

We tried a few options. Indian rosewood (same problems as cocobolo), Impregnated maple (too light colored), even transparent aluminum (too expensive). In the end we settled on a material that was at the absolute bottom of our list: DymondWood.

Yes, that ghastly multi-colored birch plywood-based, resin-impregnated, clown-barf abomination that we've all seen on too many amateur knife-maker's blades.

But we discovered that it doesn't all look like that. DymondWood "Rosewood Burgundy" is remarkably close to cocobolo. And it offers a big advantage over rosewood (aside from being made from a super abundant wood-birch), and that is stability. With its resin-impregnated, multi-ply structure, it basically functions like plastic. It won't shrink on the knob, and won't crack either (not that we've ever had a knob crack, to our knowledge). It also feels exactly like a cocobolo knob in your hand.

So in the next week or so, we'll start shipping vises with our new DymondWood knob. I doubt anyone will even notice. In fact, we passed around two knobs this week here, and only one person picked out the DymondWood instantly. Everyone else had to look close.

One of the knobs below is cocobolo, one is DymondWood.


Classic Leg Vise Research

$
0
0

We spent hundreds of hours developing our Classic Leg Vise, which includes lots of time researching historic forms.

Most of our research takes the form of hunting down early photographs, which appear in everything from vintage tool catalogs to postcards. We also keep our eye out for ancient workbenches in modern contexts, like Ebay, auction catalogs, and lifestyle magazines. The latter is our favorite source, purely for the entertainment factor. Our image collection of bastardized benches is enough to make any woodworker cringe.


But now and then we stumble on a real gem, like the picture above from a school for disabled  veterans.

One thing we found interesting. It seems shortly after Roubo's time, and the advance of the industrial revolution, that at least in France (and its colonies in North Africa like Algeria and Tunisia) the vast majority of extant benches featured metal vise screws, not wood. Why fewer wood screws? I think in a school or commercial setting, the metal screws were probably viewed as more durable, and with mass production coming into play, they could be made quickly and cheaply.

French leg vise screws invariably feature a metal hub and handle. English and American versions almost always use a cast "T" with sliding wood handle. We chose the French version to allow our handle to center up repeatably and reliably (this is nearly impossible with wood) and also because the cast "T" version is already available from other tool makers such as Lie-Nielsen.

We've uploaded some of our research images here.


Hold Fast

High Vise For Sale

$
0
0

We have altogether too many vises lying around. Until we get a showroom, we'd feel better if these devices were making furniture in someone's shop.

This high vise features suede-lined hard maple jaws, a Crisscross Retro (raw iron), and a 2tpi Big Wood Vise (now defunct) ash bench screw with ebony garter. All wood parts finished with a couple coats of oil. High vises are simply awesome for doing chest-height detail work.

$340 plus actual shipping. Update: SOLD

To order, email with your full contact info.

You can see this vise in action below. Its at the 1:34 mark.


The Benchcrafted Glide and Crisscross from Benchcrafted on Vimeo.

Benchcrafted In Europe

$
0
0

We had no idea that Germans could be so fun.

But before you accuse us of uncharitable characterizations, know that we're half German. Our maternal side of the family hails from Bremen and Nienburg, where our ancestors did two things. Two things most necessary for human happiness. Brewing and Butchery. Our great-grandfather Rudolph Beckmann emigrated to Iowa in the early part of the 20th c. and brought his trade with him. That's him pictured below (upper left) among his fellow brethren at the meeting of the Nienburg Brotherhood of Butchers, ca. 1907. Just an apprentice at the time, I bet he looked forward to the day he got to pose with a sixty liter glass of Schwarzbier (get a load of that!) Our brewing ancestors stayed in Germany, perhaps because they knew Americans only drank pale lager at the time, and shortly thereafter, saw fit to make beer illegal altogether. 


So its with no small sense of satisfaction that Benchcrafted is now available in Germany through Dieter Schmid's Fine Tools.

Fine Tools carries our full line of vises and will ship throughout Europe.

For those looking to build our Split Top Roubo in Europe or wherever the metric system is used, Fine Tools now offers a free set of metric plans (in German, and soon in English) along with building techniques and instructions. German woodworker Guido Henn has produced a set of videos for Fine Tools showing installation details for the Glide Crisscross and Tail Vise, as well as an overview of the bench. Nice work, Guido.

Our current 20x30 prints of the Split Top Roubo are also available from Fine Tools for those building with the imperial system.

Further details on Benchcrafted's products at Fine Tools can be found here. 


Drawsharp FAQ

$
0
0


As we mentioned a few weeks ago, we changed the way we package Drawsharps. It seems some folks are having a bit of difficulty using the double stick tape to adhere their diamond pads. So we've added some content to the FAQ to address this issue. We apologize if you've ruined your tape, but the fix is really quick and easy, and in fact is the same method you'll be instructed to use if you've purchased a Rehab Kit. We're posting the FAQ below.

∙ I ruined the double stick tape as I was attaching the diamond pads, what do I do?
 
Glue the diamond pads directly onto the sleeves using gel CA (Super) glue, or contact cement. A couple dots per pad is sufficient. The super glue can be a tad messy if you over apply it. Contact cement is a more relaxed approach. You don't need to specifically use double-stick tape, we simply package it with the Drawsharp for the customer's convenience. If you have a Rehab kit, we instruct customers to install the four diamond pads the same way.

To see a video on how to properly apply the diamond pads with double stick tape, see here

Classic Leg Vise-Pricing and Availability

$
0
0


First off, an apology.

We've missed our release date on this one by more than a couple months. And we know that's frustrating. We make about 99% of this vise from scratch. The rest we source from folks who know how to make certain things better than us. Like wood screws. We ordered the wrong ones. One tiny part held us up. Next time we'll try to keep quiet until everything is really ready (not so easy when you're making something exciting.)

Good, now that that's out of the way, let's talk about the Classic!

Here are the specs:

• Fully machined from steel components
• 2-3/16” diameter hub with integral spring plunger, Parkerized finish
• 15” handle assembly with central v-groove and leather shock washers, Parkerized finish
• 3-½” diameter flange, Parkerized finish
• Roll-threaded steel acme screw, 1” diameter with 4 tpi pitch, double lead (2 tpi equivalent, or ½” travel per turn) 16” of thread behind the flange
• 9” capacity typical installations
• 2-½” diameter one-piece acme nut
• Suede leather jaw liner included (for 8” wide chops)
• Designed and made entirely in the USA
• Includes everything you need to build the vise, except wood

Double-lead Thread
Most modern vises use a single lead acme thread. Depending on pitch, these can function slowly, but with precision and control, or more quickly. Screw pitch and travel should be matched to the vise’s purpose. Fast isn’t necessarily better. Tapping and threading metal for double-lead screws is risky and costly, as the thread is very aggressive, and massive amounts of material must be removed. Our screw is roll-threaded. That means its basically squished into shape under enormous pressure. The result is a stronger thread with a polished, smooth finish.

Face vises are generally used for a relatively narrow range of thicknesses, but when used in wider positions, the convenience of opening the jaws quickly and efficiently is a plus. Ergonomics can accomplish this, as with the massive handwheel of our Glide Leg Vise, or speed, as in the case of the Classic, which uses a double-lead acme screw. The Classic moves as fast as typical wooden vise screws, ½” of travel per turn.

Radiused Hub and Flange
The mating surfaces of the flange and hub are machined to a 5” radius. This allows the parts to nest together and distribute clamping pressure over a wider area, especially when holding slightly non-parallel work.

Balanced Handle
The sliding handle is machined with a v-groove detent centered along its length. This detent engages with a stainless steel spring plunger in the center of the hub, allowing one to quickly center the handle and thus balance it to spin rapidly for quick, gross adjustments. In most cases, one can leave the handle centered after holding your workpiece. The spring plunger tension is adjustable. A tighter setting makes it easier and quicker to center up the handle, but may inhibit the handle from sliding as freely. There is a sweet spot that allows quick engaging with the spring plunger, and free sliding simultaneously. The plunger can be completely disengaged if desired. The spring plunger also allows repositioning of the handle so it’s not interfering with your work or your body. Leather shock washers further refine the handle’s function.


Parkerized Finish
The Classic is made from machined steel, but we wanted it to have the look of darkly patinated forged hardware. To get close to this (and not break the bank) we Parkerized the handle, hub and flange. Commonly used on high quality hunting rifles, Parkerizing (or Manganese Phosphate) is a process which darkens the raw steel, which is first sandblasted, while also providing wear resistance and lubricity. The process is more expensive than black oxide, yielding a more durable surface with an attractive dull black-gray look. A rub down with fine steel wood and a coat of light oil helps give the parts a vintage look, further lubricate, and provide excellent corrosion protection. See our installation instructions for further details.


The Crisscross
The Classic is designed to be used with the Benchcrafted Crisscross for best function. The Crisscross completely supports the weight of the Classic hardware and a wooden chop while completely eliminating the need to adjust a pin (parallel guide). With proper installation, the Classic with Crisscross operates with virtually zero friction. 


Pricing

Classic Crisscross Solo $294
Best choice if you’re building a new bench, or building a stand-alone high vise for use as a bench appliance. Includes the Classic Leg Vise hardware and a Crisscross Solo.


Classic Crisscross Retro $334
Choose this if you’re retrofitting the Classic (w/ Crisscross) to an existing bench, or if you’d rather install the Retro’s mounting brackets instead of drilling deep holes for Solo mounting pins (see installation instructions for more differences between the Retro and Solo installs.)

Includes the Classic Leg Vise hardware and a Crisscross Retro.

Classic Solo Benchmaker's Package: $704
Our usual Benchmaker's Package, only with a Classic Crisscross Solo instead of a Glide Crisscross Solo.

Classic Retro Benchmaker's Package: $744 
Our usual Benchmaker's Package, only with a Classic Crisscross Retro instead of a Glide Crisscross Retro.
 
Classic Leg Vise Hardware Only (no Crisscross) $195
Choose this if you’re building a leg vise with a traditional parallel guide. Examples include: extremely low benches (that can’t accommodate a Crisscross), angled leg vises and face vises as found on English-style benches, twin-screw vises, traditional all-wood tail vises (Continental benches) or vises of your own design. 


Availability 

The Classic Leg Vise will be available for purchase on our store page beginning on Monday, April 28, and will ship at the same time. 


The Temple Of Studley

$
0
0

If woodworking ever rose to the level of religion, there would be mini-versions of the Studley Tool Chest hanging behind the cash register of every ethnic grocery store this side of the Meditteranean.

I don't have a relationship with my tools. But if I did, I would build a temple for them. And that's what Henry Studley did with his tools. He built a sacred space for these objects and enshrined them within, replete with the same sort of embellishments and details that one sees in the great European cathedrals. Gothic arches, turned columns, delicately carved finials, inlays of precious materials, symbolism. An attention to detail that causes one to marvel.

I don't know much about Studley's background, or what type of person he was. But what is obvious from his chest is that he felt a connection with his craft that few, if any of us will ever experience. Is this a good thing? I don't know. For me, I have a different relationship with woodworking and tools. For me they are simply a means to an end. Not an end in and of themselves. At first glance, Studley's chest looks like the latter. But as an object of human skill and creativity, as an expression of his skill as a piano maker, perhaps this does reflect the creative energies of the divine that lurk within all of us. In that light, I have nothing but respect for Studley's creation. If you ever have the opportunity to see the chest, do not miss it.

Last year at 
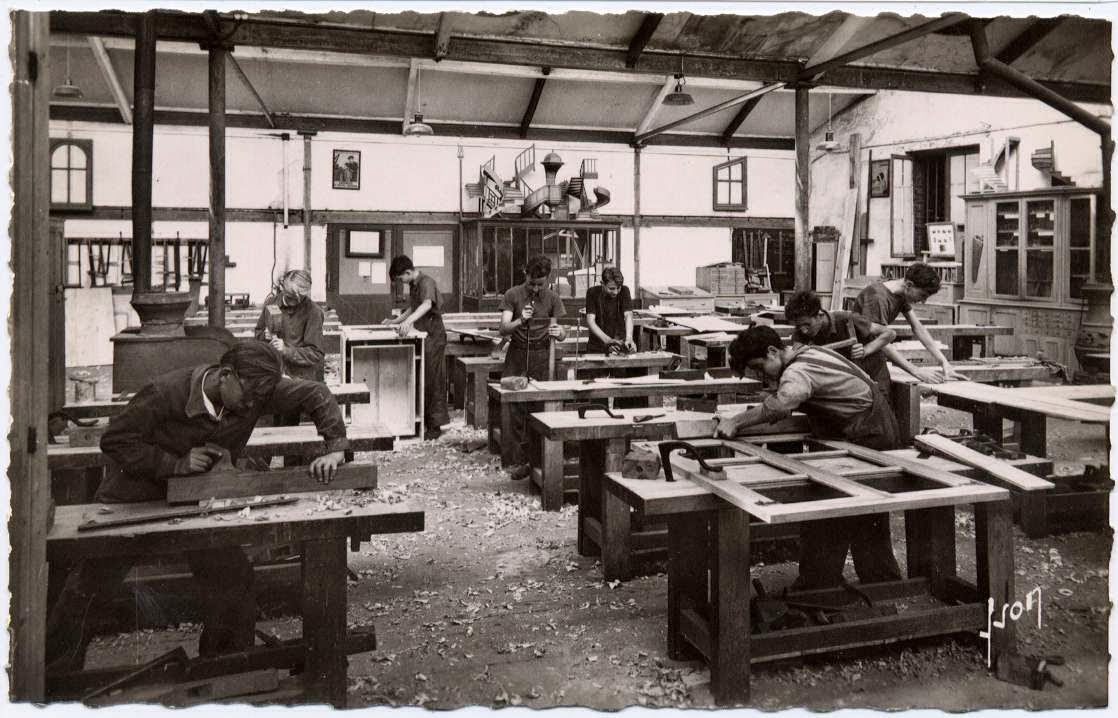
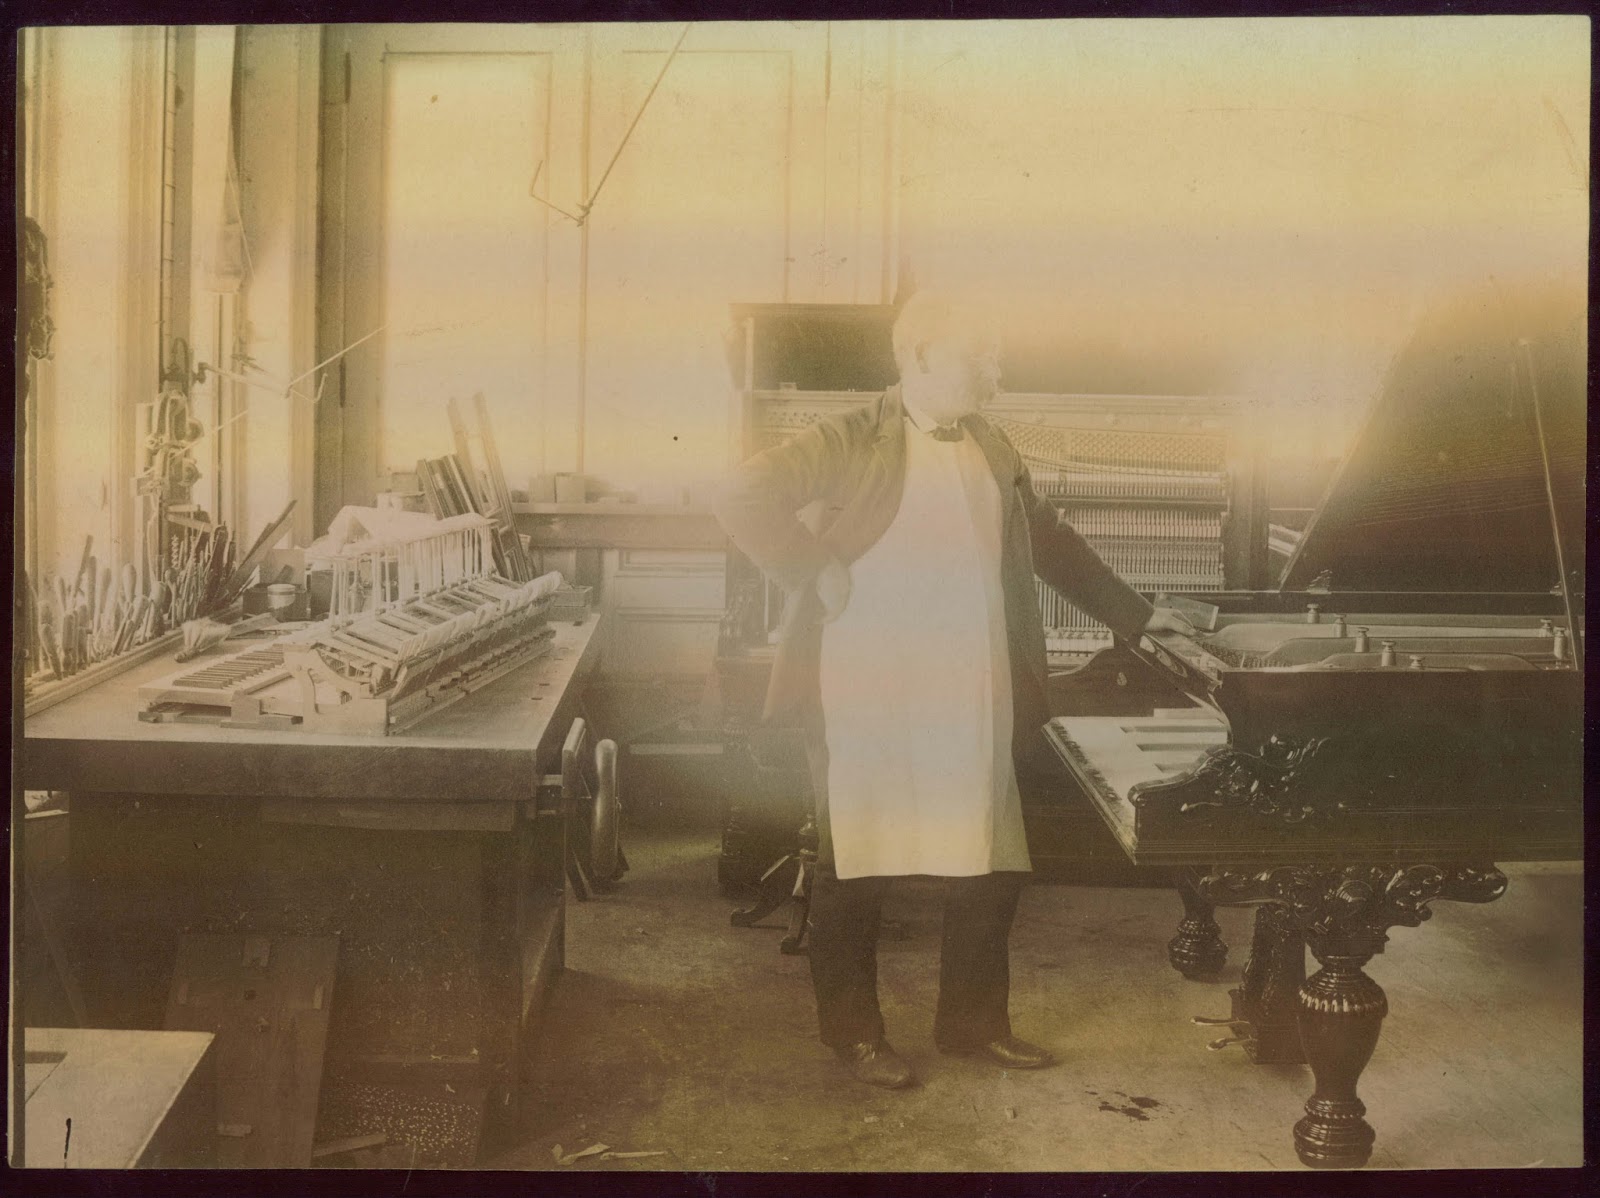
Handworks I was invited by Don Williams to aid him in examining the hand wheel-equipped vises of Studley's bench, in hopes of someday producing a small run of these unique, and rare vises. Examining the two vises we discovered a number of new clues as to their history and construction. Incidentally, of the 18 or so extant vises, no two are alike, although several share an overall similarity in design. No patent records have been found, and only one historical photograph of a piano maker's shop featuring the vise has been found.

Photo courtesy of Patrick Leach

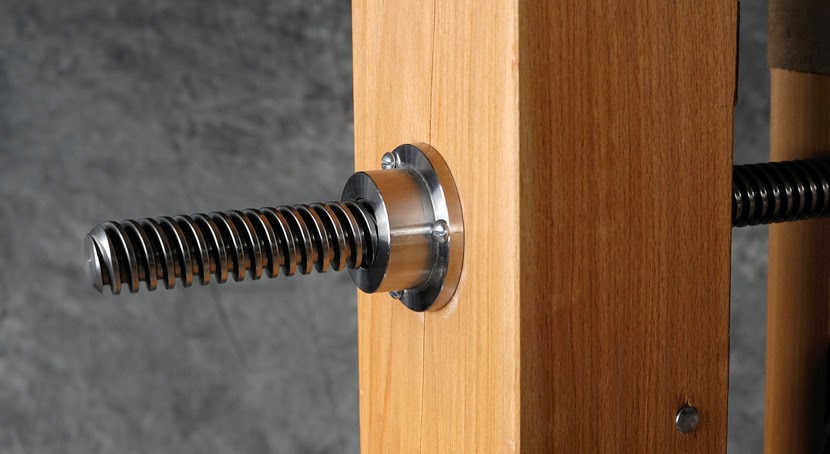
The vises themselves are quite interesting. They almost all feature a sliding "drawer and box" construction, either with a tongue and groove keying the box to the drawer, or a sliding dovetail with gibs (like a powered jointer bed.)  In the case of the Studley vises, the machined surfaces of the castings were shaped, not cut with a rotary tool. If you're not familiar with a metal shaper, its not like the woodworking machine of the same name. It's also known as a metal planer. The distinctive marks made by the shaper are easy to identify. They leave straight lines rather than circular.


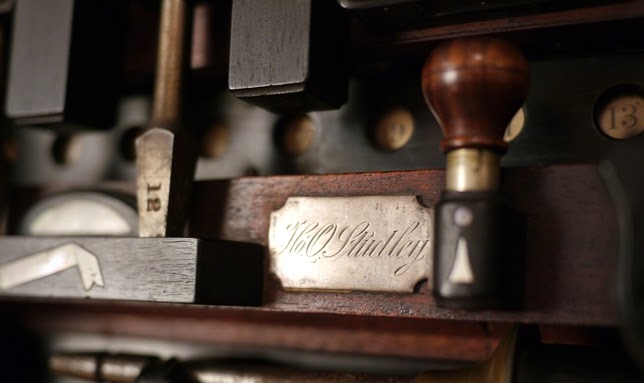
One of the vises we examined had the number 6 stamped on several parts. Look close.
What did this mean? It could have been a way to identify parts that belong to a particular vise, or perhaps it was a serial number. Studley's vise in the tail vise position is the only one we know of with a metal dog dovetailed into the jaw itself. Because of this I always assumed Studley retrofitted the dog on his particular vise. But if that's the case, why would he bother stamping the "6" into the dog?
The dog fits sweetly into the jaw and receives its tension via a brass slug and spring. It's quite nice.


Once we'd examined the vises in their natural position, we pulled the bench away from the wall and flipped the top over to get a closer look at each vise's undercarriage. We were talking about the solid mahogany top and how heavy it was when we took a closer look into one of the holes that key the top onto the base via a dowel. The top is in fact veneered. We couldn't determine the core species. Don thought perhaps oak. Honestly, it was too difficult to tell.


With the top belly up, I got a closer look at Studley's dogs. I've always been fascinated by these. And now I know exactly how they work. The dogs fit very well in their holes. Not too sloppy, not tight. Just right. The brass spring keeps the dog peeking out of its hole at a given height. The brass tongue screwed to the underside of the top provides a stop against the groove in the base of each dog, preventing them from falling out.


Once the bosses arrived we were forced to wrap up our investigation. One minute I was wearing white gloves and examining an historical artifact with "The Don", to unloading strange pieces of foam rubber from the back of Narayan's turbo encabulator-equipped Volvo man wagon. Paddle shifters are pretty cool, but I didn't know you could get a bluetooth tranny on these. Shifting while texting is so convenient.

The remainder of the day was spent much like a photo shoot here at Benchcrafted. Holding umbrellas in odd positions, bracing the tripod against my body so as not to cause permanent damage, advising the photographers on white balance and proper emulsion techniques, all the while keeping the chimping to a minimum.

The room the chest resides in is quite non-descript. Yet the space has a certain energy. Perhaps even a metaphysical quality. Studley's shrine of tooldom brings out the most interesting, almost cult-like behavior.


At one point Schwarz appeared before chest bearing a large gold disc in his left hand. He assumed a sort of meditatively empty stare, and while averting his eyes from directly looking at the chest, aimed the gold disc at the shrine.


As the golden light washed over the surface, a genie emerged from the chest and took over the entire operation. For the remainder of the day, I did everything the genie asked, in exchange for one wish at the end of the day.


Shooting the empty chest requires removal of all the tools. I gladly sat by and watched the magic happen.
 

The first tools to come out were the planes, among which was the transitional Stanley jack plane, with rosewood body. I've never seen or heard of one of these before (I'm no Stanley expert), and Don tells me he's never heard of another. It wasn't a rework by Studley. It's stamped "Stanley..." at the toe.


As tools emerged, I was able to observe some of Studley's trick joinery. Sweet little dovetails. These are tiny.


I had a few moments to get really close to the chest and examine a few of the more well-known elements, like the iconic dividers-and-square. I'd love to post these, but they are not Studley-worthy. Wait until Don's book by LAP comes out, which will be full of the best pictures of every living detail of the chest and its tools. And in case you're wondering, I didn't touch the chest, or any of the tools inside. I had no good reason to, so why risk it?

As Don and Chris removed tools, I realized there was just too much to take in. I wanted to look at every tool, especially Studley's own shop made tools. I just couldn't do it all in the time I had. That's why I'm looking forward to the book. Viewing the chest as a complete piece (tools in place) was awesome. Really. It's like looking into the mechanism of a fine watch.

The empty chest is also something. It gives a chance to really examine the detail that Studley put into the supports, apart from the clever arrangement. I've read about this on Schwarz's blog, many of the ebony supports feature a tiny little cove scratched into the edge of the support, especially the ebony pieces. It gives the entire piece a sparkle as they catch the light. It's beautiful.


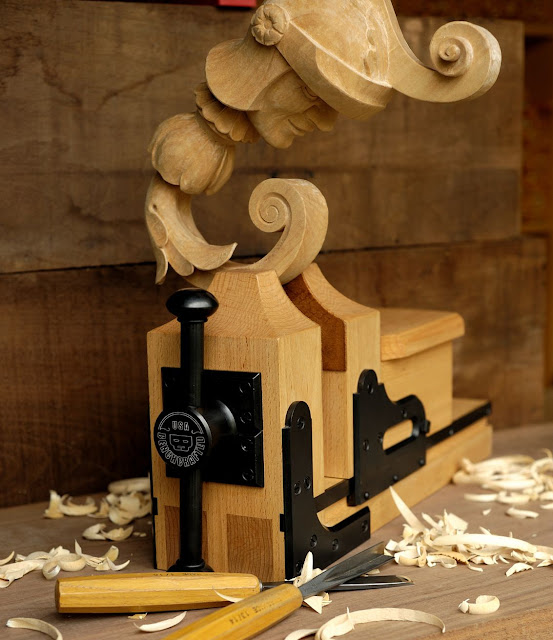
One of the highlights of my visit was being able to compare our fully machined handwheels with their inspiration. The Studley handwheels are so sweet. They are more or less perfect. I have no doubt that Studley spent a lot of time working his wheels by hand to achieve such a level of finish. They are beautiful to see and touch. Real works of industrial art.


For a few short moments I felt like I owned this stuff. U can't touch this.

As I said my goodbyes to The Don, shook the hand of the owner, and gave Schwarz a big bear hug, I turned to the genie, reminding him of my hours of unflinching servitude throughout the day, and his promise of granting me one wish. A big grin spread across his face from ear to ear, a twinkle of light sparkled in his eye, and with a deep, satisfying laugh my wish was granted.


Photos of the plaid gorilla by Narayan Nayar. Digital effects by Harry Toopay Studios. All other photos by your's truly.

Vise hardware outside the USA - another new dealer and future plans

$
0
0

We are happy to announce that we now have a UK dealer for our vise hardware.  For many of you who send us so many emails asking for shipping quotes from overseas, this will come as welcome news.  

Please head over to the CHT website and take a look.

http://www.classichandtools.com/acatalog/BenchCrafted-Hardware-new.html


Our next market is going to be down under.  We're shooting for sometime in the fall.  

May 2015 - Start Planning Now

$
0
0

We've been itching to write this blog post for quite a while now.

Handworks: Woodworking Tools and Traditions will happen again on May 15-16 2015 in Amana, Iowa.

It's no secret at this point that we got the ball rolling for Handworks 2013, and due to all the great companies and people that participated, the groundwork for doing another one was basically laid out right after the first event. But we don't like to toot our own horn here. No question, Handworks 2013 was what it was because of everyone involved. We simply knew about a neat old barn, in a neat old place. The rest sort of happened on its own.

For those who didn't attend the first one, Handworks is more or less a woodworking get-together for us die-hard fans of handwork and the tools and people that go along with it. Handworks doesn't make a dime on the event, and the donation box covers extras like equipment rental, getting some signs printed, and website hosting. 100% of anything that's left gets donated to charity. The exhibitors all pitch in to rent the barn for the weekend, and they all get to Handworks on their own dime. They also don't pay a lick of fees to be at Handworks. The idea is to get as many of the top hand tool makers and teachers together as easily as possible. Handworks 2015 will be no different.


Here's a basic rundown of what to expect at Handworks 2015.


Green Wood Barn

Festhalle Barn. Same as 2013. The best hand tool manufacturers, teachers and advocates under one roof.

Green Wood Barn. Just across the way from the Festhalle Barn is what the locals call the "Market Barn". Shortly after the utopian height of Amana, the local farmers would gather here and sell their produce, hence the name. Nowadays it's still used for this, and also other events. At Handworks 2015 this area will be populated by green woodworking experts and a handful of other demonstrators like Blacksmith/Whitesmith Peter Ross, Carl Swensson (who will be demonstrating coopering), chairmaker Peter Galbert, Don Weber, Jarrod Stonedahl, plus some others. The Green Wood Barn is just a stone's throw from the Festhalle, about a city block down the street.

New Faces. In addition to the new folks at the Green Wood Barn, there will also be some new faces in the Festhalle. From the U.K. David Barron and Phil Edwards, from Australia, Chris Vesper, and we're especially delighted to welcome from Ireland, Daniel and Sally Shaw-Smith of the 1970's and 80's Irish TV Series "Hands" (If you're new to Hands, click here.) And a few folks that had planned to be at Handworks 2013, but had to cancel due to last-minute conflicts: Patrick Leach, Ron and Linda Hock and Konrad Sauer.


Studley. At Handworks 2013 we got an insider's view of the Studley Tool Chest and Workbench. If you were there, you remember Narayan's slideshow. You could hear a pin drop in the barn. This time, Don Williams, of The Barn on White Run is organizing an exhibit of both the Studley Tool Chest and Workbench in nearby Cedar Rapids, IA. Yes, the tool chest and bench will be on display the same weekend. Don was so thrilled with Handworks 2013 that he thought it only made sense to schedule his exhibit on the same weekend as Handworks 2015. You don't need us to explain what a fantastic opportunity this is. As someone who's seen the chest, I wouldn't miss this opportunity. In fact, I'm looking forward to seeing it for the second time. More info at www.studleytoolchest.com

And there will be a Saturday morning presentation in the Festhalle Barn as well, just like last time.

More info at the Handworks website: www.handworks.co

If you'd like to see some pics from Handworks 2013, here's a bunch, courtesy of the tireless Jeff Burks.

Hope to see you there!

Classic Leg Vise - Available Now

$
0
0

The Classic Leg Vise is now available to purchase on our store page.

The web page for the Classic is here.

Thanks!

Assembling the Classic Leg Vise

$
0
0


Now that we're shipping Classic Leg Vises we thought we'd post this video on how to assemble them. The process is also described in the instructions, available on our downloads page.

Sometimes we get emails about why our products require assembly. It's not laziness (well, not entirely!) but rather efficiency. We can store and ship the packaged vises in a much smaller space and more efficiently than assembled ones. This is especially true with the Glide. An 8" diameter handwheel with an 18" long shaft takes up huge amounts of space, not to mention its quite difficult to pack and ship safely, and inexpensively. There are huge amounts of void fill with an assembled Glide. It's not pretty.

We also like to use stock box sizes when packaging our products. They are readily available, inexpensive, and there are no die or printing costs. We can also change our packaging on the fly if need be.

The Classic only takes about 90 seconds to assemble.
Viewing all 305 articles
Browse latest View live